
Custom silicone slow feeder bowls are innovative pet products designed with raised maze-like patterns to naturally slow down a pet’s eating pace. By forcing pets to nibble around ridges and channels, a well-designed slow feeder bowl can significantly reduce gulping, choking, and bloating during mealtime. For pet brands and wholesalers looking to develop a private-label slow feeder, understanding the manufacturing process is crucial. This article, from the perspective of a custom silicone slow feeder manufacturer, walks through each step – from initial concept design and material selection to molding, quality control, and final production. We will also discuss how design elements (like maze patterns and suction cups) affect feeding behavior and manufacturability, the role of Shore A hardness (usually 40–60A) in product performance, and key OEM/ODM considerations (MOQ, lead times, mold costs, etc.). By the end, you’ll know what it takes to bring a food-grade silicone OEM slow feeder bowl from idea to reality – and what to look for in a manufacturing partner.

Design and Prototyping of the Slow Feeder Bowl

Every successful custom project begins with thoughtful design and prototyping. Engineers use CAD software to create a 3D model of the bowl, defining its diameter, depth, wall thickness, and the intricate interior pattern (maze or ridges). A critical aspect of design is ensuring manufacturability – features must have appropriate draft angles and no extreme undercuts, so the silicone part can be molded and released without tearing. For example, each ridge in the maze should be slightly tapered and all sharp corners rounded, which prevents the silicone from getting stuck in the mold.

Once a CAD design is ready, prototypes are made to validate both the feeding performance and the manufacturability. Rapid prototyping methods like 3D printing (often in plastic) can produce a sample bowl to assess its size and how the maze pattern slows down feeding. Some manufacturers also create a single-cavity prototype mold or cast a sample in silicone to test the design. Prototyping is key – it allows the pet brand to field-test the bowl with actual pets to ensure it truly reduces eating speed, and it helps identify any design issues early. For instance, a prototype might reveal that certain narrow channels are too difficult to fill with kibble or that a pattern is so tight it frustrates the pet. These insights inform design refinements before investing in full production tooling. The design phase may also include adding features like an anti-skid base or a spot for a logo. The goal is to strike the right balance between an effective slow-feed design and one that can be produced reliably at scale. Simulation tools (like mold flow analysis) might even be used on the CAD model to predict how liquid silicone will flow into the maze pattern and to spot potential air traps or weak points before cutting the mold.

Maze Pattern Considerations: The hallmark of a slow feeder bowl is its maze or puzzle pattern on the interior. These raised ridges and channels intentionally make the pet work for their food, dramatically extending mealtime. From a manufacturing perspective, intricate maze patterns require precision engineering:

  • Impact on Feeding Behavior: The height, spacing, and complexity of the maze directly influence how much the feeder slows the pet’s eating. Tall, closely spaced ridges create more obstacles, significantly reducing gulping and turning meals into an engaging challenge for the animal. When designing a custom pattern, brands often consider the target pet (e.g. a pattern for a large dog might be more open than one for a small dog) so that it’s challenging but not discouraging. The silicone material is gentle on teeth and gums, so even if pets enthusiastically lick or nudge the maze walls, there’s no risk of chipped teeth as there might be with a hard plastic or ceramic bowl.

  • Maze Geometry and Demolding: Intricate maze designs affect how the mold is made and how easily the part comes out of the mold. Typically, one half of the steel mold forms the bowl’s interior maze (as a cavity) and the other half forms the exterior shape. The mold must be precisely machined so that when closed, the thin maze walls are formed with uniform thickness. Designers will incorporate a slight draft angle (a few degrees of taper) on these tall maze walls. The draft ensures that when the cured silicone is pulled out, the walls release smoothly instead of scraping or tearing. Undercuts are minimized – any backward-hooking features are avoided or kept very shallow. Silicone is flexible enough to handle minor undercuts by stretching, but too much of an undercut could cause the part to tear or deform during demolding. Often, maze patterns are rounded rather than having sharp hooks for this reason.

  • Filling and Venting: Complex maze patterns create many channels that the silicone must fill during molding. In liquid injection molding, the liquid silicone is injected under pressure, which helps push material into every nook and cranny of the maze. The mold is usually gated at the center of the bowl (or uses multiple gates) so that silicone flows outward evenly into the maze channels. Tiny vent holes are machined at the ends of long channels or at the tops of maze peaks to let air escape as silicone fills in. Without proper venting, air pockets could get trapped at the thin tips of the maze walls, causing incomplete filling (short shots). A well-designed mold ensures the maze pattern comes out fully formed without air bubbles.

  • Maze Pattern and Suction Effect: One interesting challenge is that maze patterns can act like suction cups during demolding. The spaces between ridges form small pockets of air. When the mold opens, each pocket may momentarily vacuum-lock onto the mold core. In practice, manufacturers counter this by polishing the mold surface (to reduce friction) and sometimes by adding ejector pins or an air eject assist in strategic locations. It’s not uncommon to have ejector pins that pop out in the middle of maze sections or a quick puff of air to break the vacuum and push the part free. The flexibility of silicone actually helps here: the part can deform a bit as it’s being ejected, breaking any suction, and then spring back to shape once out of the mold.

  • Material Hardness for Maze Walls: The Shore A hardness of the silicone is carefully chosen for maze-style feeders. If the maze walls are very thin and tall, a slightly firmer silicone (toward the upper end of the range, say 55–60A) might be used so the walls don’t flop over too easily. A stiffer silicone helps the bowl keep its shape, ensuring the ridges remain upright to do their job slowing the pet’s eating. However, if the material is too hard, the bowl could become difficult to flex during demolding and might feel less gentle (in extreme cases a very hard silicone could even be unpleasant for a pet to bite or could make the bowl brittle under stress). Most slow feeder bowls use a medium hardness around Shore A 50 ±10 – this provides a stable shape but still plenty of flexibility. For example, a Shore 50A silicone has a rubbery give that is comfortable for pets and allows easy bending to peel out of the mold, while still being firm enough to support the maze structure. The excellent tear strength of quality silicone means even thin maze walls won’t easily rip during normal use.

Overall, maze-pattern slow feeders are usually produced with injection molding for best replication of detail and production efficiency. It is technically possible to compression-mold a complex maze, but aligning a pre-cut silicone blank into all those tiny grooves is impractical and would generate a lot of flash between the walls. Injection’s precision and pressure-driven filling is preferred to perfectly form the maze without excess flash.

Mold Making and Tooling

Once the design is finalized, the next phase is mold making (tooling). The manufacturer creates a precision metal mold that will form the silicone bowl’s shape. Molds for silicone products are typically made of hardened steel (or sometimes aluminum for simpler or short-run molds) and fabricated via CNC machining. All the details of the bowl design – the maze ridges, logos, texture, and overall dimensions – are cut into the mold cavities with exacting accuracy. A high-quality mold is critical: it determines the accuracy, surface finish, and consistency of every slow feeder bowl produced.

Key considerations during tooling include:

  • Single vs. Multi-Cavity: Depending on the production volume needed, the mold may be built with multiple cavities to produce several bowls per machine cycle. For example, a multi-cavity mold might have 2 or 4 identical cavities if a brand needs tens of thousands of units, whereas a smaller run might use a single-cavity mold. Multi-cavity molds greatly improve output (making multiple bowls in one shot) but are more complex and expensive to manufacture, since each cavity must be machined and balanced to fill evenly.

  • Precision Machining and Finishing: The maze features and bowl shape must be machined to tight tolerances, often within ±0.1–0.3 mm for linear dimensions, to ensure each bowl comes out uniform. After machining, mold makers polish or texture specific areas of the cavity as needed. For instance, the interior maze surfaces might be highly polished to help the cured silicone release easily, since a glossy surface has less friction. Alternatively, the outer surface of the bowl might be bead-blasted or etched to add a matte texture or grip. If the design calls for a logo, the logo can be CNC-engraved or EDM-sunk into the mold so that it appears raised or recessed on the final product. Every detail must be mirrored correctly in the mold.

  • In-House Tooling Advantages: A manufacturer with in-house mold making capabilities offers a big advantage for custom projects. They can fabricate and tune the mold on-site, resulting in faster lead times and better quality control. Small adjustments (like adding a vent pin, tweaking a draft angle, or polishing a troublesome area) can be done rapidly without shipping the mold to a third party. In-house CNC machining also protects the confidentiality of a custom design – critical if you’re investing in a unique pattern that you want to keep proprietary.

  • Mold Costs and Lead Time: Creating a custom slow feeder mold is a one-time investment that typically ranges from a few thousand dollars for a simple, single-cavity mold up to $5,000–$10,000 or more for large or multi-cavity molds. Actual costs depend on complexity: a basic mold (simple shape, one cavity) might be $500–$2,000, an intermediate mold (medium complexity or size) about $2,000–$5,000, and a very advanced mold (intricate design or multiple parts) could reach $5,000–$15,000+. Experienced OEM manufacturers will provide a detailed tooling quote up front. Lead times for mold fabrication are commonly around 2–4 weeks. Some factories can fast-track a prototype or single-cavity mold in about one week for simple designs – for example, using a rapid CNC program to cut a test mold (“micromold”) and mold a few samples to validate design. Standard production molds with multiple cavities and complex features will take longer to machine, assemble, and test. It’s wise to budget a few weeks for tooling and first-shot samples. Once the mold is ready, it can be used to mass-produce thousands of identical bowls with high efficiency.

Before moving to full production, the manufacturer will usually do a test run with the new mold. They inject or press a small batch of bowls and inspect them closely, a step often called T1 sampling. The first-off samples are sent to the client for approval. This is the chance to see the actual product in your hands and verify details like dimensions, pattern effectiveness, logo appearance, color, and overall quality. If any issues are found (for instance, if the fit or finish isn’t perfect), the mold can be tuned or adjusted. Only after the sample is approved does the project advance to the main production run.

Food-Grade Silicone Material Selection (and Shore Hardness)

Choosing the right silicone material is just as important as the design. Slow feeder bowls must use food-grade, platinum-cured silicone that is safe for pets to eat from. Reputable manufacturers source high-quality silicone from established suppliers and provide material certification to confirm it meets regulatory standards like U.S. FDA 21 CFR 177.2600 and the stricter European LFGB standard. These standards test that no harmful chemicals leach out of the silicone even under conditions like hot or acidic food contact. Always ensure your OEM partner is using 100% food-grade silicone, free of BPA, phthalates, PVC, and other toxins. They should be able to supply documentation (FDA/LFGB compliance certificates or third-party lab test reports) for the specific silicone formulation used.
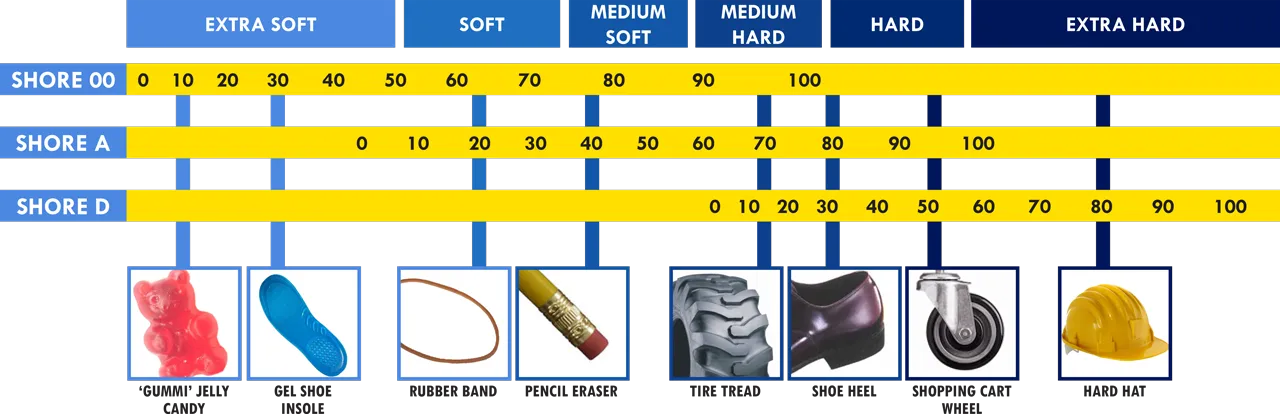
Shore hardness

Silicone comes in various durometers (hardness levels), measured on the Shore A scale. As noted earlier, slow feeder bowls typically use a medium hardness around 50 Shore A (with a usual range of about 40A to 60A being suitable). Hitting the right hardness is crucial:

  • A softer silicone (around 40A) will be very flexible and grip surfaces well (helpful for suction cups or anti-skid bottoms), but if it’s too soft the bowl might feel floppy or the internal ridges might bend excessively under a pet’s tongue or paws.

  • A harder silicone (60A) will be more rigid and hold its shape firmly, which keeps tall maze walls upright – but overly hard material could make demolding more difficult and might not provide the same gentle, springy feel that pet owners expect from silicone. Extremely hard silicone could also reduce the friction needed for suction cups to seal (since it doesn’t conform as easily to surfaces).

Manufacturers often balance hardness and thickness of the design. For example, if using a softer silicone for better suction on the base, they might slightly thicken the walls of the maze to compensate so they remain sturdy. Or if using a firmer silicone for durability, they ensure the edges and corners are rounded so the product is still safe and comfortable. The chosen Shore hardness also plays into durability and temperature resistance – food-grade silicone in the 40–60A range generally has excellent tear resistance and can handle a wide temperature range (typically from -40°C up to ~200°C) without degrading. This means the slow feeder bowl will remain intact even if a dog aggressively chews or bends it, and it also means the product is dishwasher-safe (it can withstand high heat washing and drying without warping). In fact, one selling point of silicone feeders over plastic ones is that silicone doesn’t crack or become brittle over time, and it doesn’t leach chemicals when heated.

Colorants and Additives: If a custom slow feeder bowl is to be produced in a specific brand color or a fun bright hue, the color is achieved by mixing food-safe pigments into the raw silicone before molding. Only FDA/LFGB-approved colorants are used, to ensure no heavy metals or harmful substances are present. The pigments are blended thoroughly with Part A or Part B of the silicone so that the final cured bowl has a uniform color that won’t rub off or fade. Virtually any Pantone or custom color can be matched by the manufacturer’s material team. Some brands even request dual-color slow feeders (for example, a bowl with a different colored maze vs. base). This can be done either by over-molding two silicones or by a two-shot molding process if the factory has the capability, or more simply by painting/printing a design post-molding (though embedded color is most durable). Aside from pigments, no other fillers should be in the silicone for pet products – reputable suppliers use pure platinum-cured silicone with no recycled content or unknown additives, ensuring the product is odorless, non-toxic, and compliant. Some manufacturers will do an extra post-cure bake of the molded parts (a few hours in a hot oven) to drive off any residual volatiles and ensure the silicone is fully cured and smell-free.

In summary, material transparency is a hallmark of a good silicone OEM. The factory should openly share the material specifications: Shore hardness, certification of food-grade compliance, and whether they do any additional post-curing or testing on the silicone. High-quality silicone (often platinum-catalyzed LSR for injection molding or high-consistency silicone rubber for compression) yields a feeder that is durable (withstands biting and pulling), heat-resistant (safe for dishwashers and sterilization), and resistant to mold or bacteria growth. These are important product benefits you can pass on to pet owners, and they all start with using the right raw material.

Molding Process: Compression vs. Injection Molding

The core manufacturing step is molding the silicone into the bowl shape. There are two main production methods for silicone slow feeders: compression molding and liquid silicone injection molding (LIM/LSR injection). Both processes involve filling the mold with silicone and heat-curing it (vulcanizing) into a solid elastomer, but the techniques differ:

Liquid Silicone Injection Molding (LSR Injection)

silicone-injection-molding-pocess

In LSR injection molding, a liquid silicone rubber is used. This method is ideal for high-volume production and designs with fine details (like complex maze patterns), because it offers excellent precision and repeatability. The process works as follows:

  • Metering and Mixing: Two liquid components of platinum-cure silicone (often called Part A and Part B) are stored in drums and fed into a metering unit in a 1:1 ratio. One part contains the platinum catalyst and the other contains a crosslinker and base polymer. The machine precisely pumps and mixes these components, sometimes adding a pigment at this stage for colored products. Once mixed, the silicone remains liquid for a short time before it begins to cure.

  • Injection and Curing: The mixed liquid silicone is injected under high pressure into the closed mold, which is heated (typically 150–175 °C) to accelerate curing. Thanks to the injection pressure, the silicone quickly flows into all areas of the cavity, capturing fine details like small ridges or logo text. The heat triggers rapid vulcanization – cycle times are often on the order of 30 seconds to 2 minutes for a part like a medium slow feeder bowl. In many cases, an LSR bowl can cure in about 60–90 seconds at temperature. This fast cure means injection machines can output a high number of parts per hour compared to compression. As soon as curing is complete, the machine opens the mold.

  • Demolding: Advanced LSR molds are designed for semi-automated demolding. Usually the cured bowl will stick to one half of the mold (by design, often the side with ejector pins). Ejector pins then push the part out of the cavity. Silicone is somewhat tacky, so if needed the mold might use air jets or have a very smooth finish to aid release. Sometimes a robotic arm or operator will grab the part if it doesn’t fully pop free. One advantage of injection molding is that it can incorporate a cold runner system, which delivers the silicone to each cavity with minimal waste. Many LSR molds separate the runner automatically (cold runners leave a tiny “gate” vestige on each part that is easy to trim). The result is little to no excess material attached to the bowl – a high-quality injection-molded slow feeder might only have a nearly invisible seam line and a small dot where the material was injected.

  • Advantages of Injection: LSR injection produces parts with excellent consistency and tight tolerances, due to the precision of machine controls and the closed molding environment. It’s well-suited to intricate designs – the injection pressure and automated mixing ensure even complex maze patterns are completely filled without voids. Injection molding is also highly efficient for large orders: cycle times are short and the process can be fully automated, reducing labor costs per part. In fact, even a single-cavity injection mold can often out-produce a multi-cavity compression setup in the same timeframe, thanks to fast curing and quick cycling. The process is clean (sealed from outside contaminants) and repeatable, which is important for maintaining quality. For these reasons, most high-end, private label slow feeder bowls for pets are made via LSR injection in modern facilities.

  • Typical Tolerances: With injection molding, dimensional tolerances on silicone parts are generally tighter than with compression. For example, for a bowl-sized part (100 mm+ diameter), you might expect on the order of ±0.3 mm variation or better in critical dimensions. Well-optimized processes can do even better on smaller features. The consistent pressure and dosing of material mean each part is very similar in weight and shape.

One consideration with injection molding is the upfront cost – the steel molds are more complex (often including cooling lines, multiple cavities, and injection runner systems) and thus higher cost, as discussed earlier. However, if your production volume is significant, the per-unit cost is lower and the quality is top-notch. Many OEM silicone manufacturers will recommend LSR injection for custom slow feeders, especially if the design has fine details or if you plan to scale to high volumes.

Compression Molding

Silicone-Compression-Molding-Process

Compression molding is a more traditional process using solid silicone rubber (often called HCR – high consistency rubber – which has a clay-like consistency). It can be a cost-effective choice for simpler designs, lower volumes, or very large parts:

  • Charging the Mold: The process is akin to making a waffle. A measured preform of uncured silicone is prepared – for instance, a chunk of raw silicone is weighed out and sometimes pre-shaped (like a disk or slab) close to the bowl’s size. This piece is placed into the open mold cavity by an operator. Properly measuring the silicone is important: too much material will lead to a lot of excess flash; too little will leave unfilled areas.

  • Pressing and Curing: The mold is then closed in a heated hydraulic press. The closing action squishes the silicone, forcing it to flow and fill the cavity (including the maze pattern). The mold is held closed under high pressure at curing temperature (again around 150–170 °C) for a longer time than injection – typically 5 to 10+ minutes depending on part thickness. During this dwell, the silicone vulcanizes into the shape of the bowl. Because there’s no injection nozzle, the mold often has small bleeder grooves or vents at the parting line to allow air and excess rubber to escape, preventing voids.

  • Opening and Demolding: After curing, the press opens and the operator manually removes the part by peeling it out of the mold. The new bowl will have a thin sheet or ring of flash – excess silicone that squeezed out between the mold halves – around its edges and possibly around any inserts or cores. Flash is expected in compression molding; the amount depends on mold fit and how precisely the material was dosed. The operator usually strips away the larger bits of flash by hand as they remove the part.

  • Advantages of Compression: Compression molding uses simpler, more affordable tooling since no injection system or runner channels are needed. A single-cavity compression mold can cost significantly less than an equivalent injection mold. This makes it attractive for low to medium volumes or startups who want to minimize initial costs. It’s also suitable for very large or basic parts that don’t have intricate detail – for example, a plain round slow feed mat or a simple ridged dish could be compression molded effectively, especially if only a few hundred or a couple thousand units are needed. Compression molding can be a good way to do a pilot run or market test for a new slow feeder design before investing in injection tooling. Additionally, compression presses generally exert less total force on the mold (since they’re not injecting at high pressure), which can allow molding of larger parts or multiple cavity molds with lower tonnage machines. However, compression is slower (curing each part takes minutes rather than seconds) and labor-intensive (each cavity must be manually loaded with material and the part manually demolded). This means the per-unit cost is higher when scaling up. Also, compression tends to have more variability in part weight and dimensions because it relies on manual material prep; each part might have slight differences based on how the operator placed the silicone, and flash trimming is required for every piece.

  • Typical Use Cases: If a slow feeder bowl design is relatively straightforward and the order volume is modest, a manufacturer might suggest compression molding to save cost. For example, an ODM slow feeder with a basic spiral or concentric ring pattern could be compression molded, especially if the brand wants a lower MOQ. That said, for complex maze designs, as noted, injection is generally preferred to ensure all details fill properly and to reduce the extensive flash that would result from pressing silicone into so many crevices.

Tolerances and Finish: Compression-molded parts often have slightly looser tolerances and require more post-mold finishing. Expect a more noticeable parting line and flash that needs trimming. Typical dimensional tolerances might be ±0.3–0.5 mm or more on a compression-molded bowl, versus ±0.2–0.3 mm on an injected one (exact numbers vary, but injection is inherently more precise). However, a well-made compression mold can still yield good quality – experienced manufacturers will design the mold with very tight parting surfaces and use techniques like preheating the silicone or vacuum degassing to improve consistency. The choice between injection and compression ultimately comes down to design complexity, volume, and budget. Many silicone OEMs have both capabilities and will choose the method that best fits the project’s needs.

Demolding, Trimming and Finishing

After molding (whether by injection or compression), the cured silicone bowl must be removed from the mold and finished. Demolding and trimming are crucial steps to ensure the final product is clean, safe, and cosmetically perfect:

  • Injection Mold Demolding: As described, injection molding often uses ejector pins to push the part out when the mold opens. Because silicone can stick, some molds include air poppet valves that puff air between the part and mold surface, or use extremely smooth finishes to minimize adhesion. High-end LSR molds can eject parts with very little manual intervention. Any leftover runner or gate vestige (the tiny nipple of material where the silicone entered the part) is cut off at this stage, though in many cases the mold design eliminates runners automatically. A well-optimized injection process produces minimal flash – often just a hairline seam around the parting line that’s barely visible. The operator might do a quick trim with a scalpel or send the parts for cryogenic deflashing, where they are tumbled in a freezing chamber so that any micro-flash freezes and breaks off. For most slow feeder bowls, manual trimming of a tiny seam and gate is all that is needed.

  • Compression Mold Demolding: In compression molding, once the press opens, an operator peels the part out. Silicone’s flexibility allows the bowl to be pulled off any cores (like pulling off a sock). As mentioned, compression parts will have more flash. The operator typically removes the large ring or sheet of flash by tearing it off along the edge. They then pass the part to trimming.

  • Trimming and Inspection: Trimming is the process of removing all excess silicone (flash, sprues, runner bits) and smoothing the edges. For injection-molded bowls, trimming might involve using a small knife or cutter to slice off the negligible flash line or gate nub. Often this is very quick. For compression-molded bowls, trimming is more laborious because there can be a larger flap of flash around the rim or even covering the entire parting area. Skilled workers use scissors, knives, or special trimming dies to cut away this flash without nicking the actual part. In some cases, a custom trimming tool is made – for instance, a circular punch that the bowl is placed into to cut the perimeter in one go, ensuring a clean round edge. Interior holes or suction cup areas also need to be carefully checked and trimmed. The team must be meticulous because even a tiny leftover flash edge can interfere with the product’s function (for example, a bit of flash on a suction cup lip can prevent it from sealing). After trimming, the bowl’s edges should be smooth to the touch and the shape exactly as intended.

  • Surface Finish and Cleaning: Silicone is forgiving in that cut edges can be very smooth (no fraying or sharpness once flash is removed). Manufacturers often give each bowl a final once-over such as a quick buffing, rinse, or wipe-down to remove any particles or dust from trimming. Because these products will be used for feeding, cleanliness is important. Some factories wash the bowls in clean water or a mild food-safe soap and then dry them completely before packaging. Any particulate or leftover trimming bits must be eliminated.

At this point, the slow feeder bowl is molded and physically complete – it looks like a finished product. All ridges are in place, edges are trimmed, and the bowl is functional for its intended use. The next steps focus on ensuring quality control and any custom finishing (like branding or packaging).

Quality Control and Testing

Quality control (QC) is vital in silicone pet product manufacturing. A reputable private label slow feeder bowl manufacturer will have multiple checkpoints for quality to ensure every batch meets safety standards and design specs.

Key QC activities include:

  • Visual & Tactile Inspection: Trained inspectors examine the bowls for any visible defects. They check the shape (no warping or deformation), verify that all molded features are present and correct (e.g., every maze ridge is fully formed, with none missing or short due to air bubbles). They also feel the surfaces, making sure there are no rough spots or residual flash that could harm a pet or feel sharp. The bowl’s interior and exterior should be smooth except for the intended texture. Any tacky or uncured spots in the silicone would be flagged (this is rare if molding was done properly, but tackiness could indicate under-curing).

  • Dimensional and Functional Checks: Critical dimensions may be measured with calipers or gauges – for example, overall diameter and height (to ensure the bowl will fit in any accessories or packaging), thickness of certain sections, etc. Because silicone is flexible, dimensional checks have some tolerance, but the goal is to catch any major deviations (perhaps due to mold wear or process drift). The hardness (durometer) of the silicone might be tested on a few samples to ensure the correct material was used and cured properly. A good QC practice is also to do a functional test: factory staff can sprinkle some dog kibble into a finished slow feeder and tilt or jostle it to see that the food lodges among the maze as intended. This simulates the user experience and confirms the design performs – kibble shouldn’t all immediately slide out of the bowl, for instance. If the product includes a suction base, QC will test that it actually sticks to a flat surface for a reasonable time.

  • Compliance Verification: Since these products contact food, manufacturers maintain strict compliance records. The QC team will ensure the materials used in that batch match the certified food-grade lot (traceability is often kept by recording material lot numbers). Many factories also do an additional post-curing oven bake for food-contact silicone products and then verify there’s no residual odor or bloom on the parts. Some will send random samples for third-party lab testing (for example, an extraction test to reconfirm FDA compliance or to ensure no lead in pigments, etc., especially if required by the client’s country regulations). An experienced silicone OEM can provide certificates of conformity or lab test results upon request to support your product safety claims. They will be familiar with international standards and can help navigate any testing needed for import/export.

  • Consistency and Lot Sampling: In mass production, typically not every single bowl is measured in detail (that would be very time-consuming), but the factory will sample a certain percentage from each batch or each cavity for large molds. For instance, they might fully inspect 5% of units and do a quicker check on the rest. Any detected defect can trigger a 100% check. Common issues they watch for are: air bubbles trapped in silicone (should be none visible), improper curing (very unlikely in a well-controlled process), contamination (no debris embedded in the silicone), or cosmetic flaws like big flow lines or discoloration (again rare if pigments are mixed correctly).

A manufacturer with ISO 9001 or similar quality certification will have documented procedures for these inspections. The bottom line is that quality control is woven throughout the process – from incoming material checks, to in-process inspection, to final QC before packaging – to ensure the slow feeder bowls are safe, compliant, and meet the brand’s specifications. This rigorous QC ultimately reduces customer complaints and returns, protecting the brand’s reputation and the manufacturer’s as well.

OEM/ODM Production Considerations (MOQ, Lead Times, Costs)

When partnering with a silicone manufacturer to create a custom or private label slow feeder bowl, there are important business logistics and project management aspects to consider. Below are key OEM/ODM details:

  • Minimum Order Quantity (MOQ): Silicone manufacturers typically set an MOQ for custom projects to make the production economically viable. For slow feeder bowls, MOQs can vary depending on the factory and the complexity of the item. Some specialized silicone pet product factories advertise low MOQs like 200 pcs for custom orders, especially if they are confident in selling that design or if they want to support small brands. More commonly, MOQs might be in the range of 500–1000 units for a first order of a custom bowl. The MOQ covers the cost of setting up the production (and often the custom packaging). Keep in mind that producing fewer units than the MOQ is usually possible but at a higher unit cost. If a manufacturer is willing to do a small initial run (hundreds of units), it’s a sign of flexibility – they may be hoping to grow with your brand long-term. Be sure to clarify MOQ expectations early.

  • Lead Time and Production Schedule: Custom manufacturing involves several stages each with its own timeline. Here’s a general scenario for a new silicone slow feeder project:

    • Design Finalization & Quotation: This can take a few days to a couple of weeks as you and the factory exchange ideas, 3D models, and finalize requirements.

    • Mold Fabrication: Typically 2–4 weeks as discussed. Some manufacturers can expedite a prototype mold in ~1 week, but standard lead time for a durable production mold is a few weeks.

    • Sampling (T1 sample): Once the mold is ready, initial samples are molded. You should expect samples about 1 week after mold completion (to allow time for molding and QC). Shipping the sample to you might add another few days if by express courier. Some factories quote 7–10 days for sampling after tooling.

    • Sample Approval: You should promptly test and review the samples. If changes are needed, mold adjustments could take a few extra days. Minor tweaks (like polishing a surface or venting a bit more) are usually quick. In case of a major design change, a new mold insert might be needed, which adds time.

    • Mass Production: Once the sample is approved, the factory will schedule the production run. Actual production of bulk quantities might take 2–3 weeks for a few thousand units, for instance. One manufacturer gives a guideline of 15–25 days for bulk production depending on order size. Production includes molding all units, performing trimming and QC on each, and preparing them for packaging.

    • Packaging & Consolidation: If you have custom packaging (boxes, labels, etc.), add time for those to be printed (often concurrently while molding happens). Final packing of products into their packaging and then into export cartons might add a few days.

    • Shipping: This is outside manufacturing but important for your timeline. Sea freight can take 3–6 weeks to the US or Europe; air freight takes days but is costlier. Factor this in to your go-to-market schedule.

    In total, a realistic timeline from project kickoff (after design lock and payment) to having goods ready to ship could be around 6–8 weeks (e.g., 3–4 weeks tooling + sampling, 2–3 weeks mass production, plus any buffer) for a straightforward project. Some manufacturers pride themselves on faster turnarounds – for example, “prototype new molds in about one week and move to production in roughly two weeks for straightforward designs” – but this is an optimized scenario. Always discuss lead times with your supplier and build in some cushion for unexpected delays.

  • Mold Fee and Payment: Most OEM manufacturers charge a one-time mold fee upfront. As outlined earlier, this can range widely (a few hundred to several thousand dollars). Some factories may agree to amortize the mold cost into the unit price for very large orders or waive the mold fee if you commit to certain volume. But typically, the mold is paid 100% (or 50% deposit, 50% on approval) before or during the sampling stage. This mold remains your property (in many cases) or at least dedicated to your production – ensure your contract clarifies that it won’t be used for other clients without permission. In many cases, if you reorder regularly, the mold can last for hundreds of thousands of cycles, effectively making the mold cost negligible per unit over time.

  • Per Unit Pricing: The unit cost for the slow feeder bowls will depend on order quantity, silicone weight, coloring, complexity, and any extras like packaging. Silicone material itself is not cheap (high-grade LSR might be $5–10 per kg or more), and a large bowl uses a significant amount of material, so expect a few dollars per unit just in silicone cost. Labor for trimming/packaging and any scrap factor also adds. Generally, larger orders get better pricing. It’s wise to get a price breakdown for different quantity tiers (e.g. 1k, 5k, 10k units). Don’t forget to account for packaging costs if you have custom boxes or inserts – those can add $0.20–$1.00 per unit depending on complexity.

  • Sample Policy: Most manufacturers will provide a couple of initial samples from the mold for free or at cost (sometimes charging only shipping). It’s important to thoroughly test these samples – check the fitting of lids (if any), try it with pet food, run it through a dishwasher, etc. If any issue arises in samples, communicate them clearly. Manufacturers are generally willing to adjust the mold or process to fix legitimate problems. After approval, if you require an official pre-production sample (from the first batch, with final packaging) that can usually be arranged too. Some brands also request a material swatch or color plaque ahead of production to approve the exact silicone color, since colors can appear differently in person than in digital renderings.

  • OEM Branding and Customization: In addition to the product itself, you’ll coordinate with the factory on branding elements: logo application (molded vs printed), labels, and packaging artwork. Good OEM partners often help with these details. For example, a cost-effective way to brand is to have your logo engraved in the mold so it appears raised or debossed on the bowl – this incurs no per-unit cost and looks professional. If you want a full-color logo, factories can do pad printing or apply a heat-transfer decal and ensure the ink is food-safe and durable. Discuss these during the design phase, as adding a molded logo must be done before the mold is finalized. For packaging, you might send them your artwork for boxes or ask their design team to help create a package that fits your brand style. Many silicone product manufacturers offer one-stop services, handling everything from product to packaging, which simplifies the supply chain for you.

  • Regulatory Testing and Certifications: If your market or distributors require specific certifications (for example, EU LFGB food-contact test, or US FDA documentation, or even reach/RoHS chemical compliance), let the manufacturer know upfront. Reputable factories are very familiar with these and often have in-house labs or partnerships to get products tested. They might have done basic FDA/LFGB testing on the material already (which covers the product in many cases). For a custom item, you can sometimes use a previous material certificate plus a written declaration. However, for full peace of mind, you may decide to commission a third-party lab test on the final product. A good manufacturer will assist with testing – they can send sample pieces to an accredited lab and provide you the reports, usually at your cost (few hundred dollars per test). This is well worth it to ensure your product meets all safety regulations. Top manufacturers will also be transparent about their quality control processes and certifications (look for ISO 9001, BSCI, etc., which indicate strong process and social compliance).

In summary, clear communication with your OEM partner is key to navigating MOQs, costs, and timelines. A professional silicone factory will guide you through these steps, from initial quote to final delivery, and make the process as smooth as possible. Many advertise features like low MOQs, in-house mold making, fast sampling, and certified materials – all signs that they cater to custom projects. Don’t hesitate to ask questions and have everything defined in the manufacturing agreement, including ownership of the mold, lead time guarantees, payment terms, and quality expectations. Developing a food-grade silicone OEM product is a collaboration – the factory’s expertise plus your market knowledge should result in a successful product launch.

What Sets a Good Silicone Manufacturer Apart?

Choosing the right manufacturing partner can make or break your custom slow feeder project. Beyond basic capabilities, great silicone manufacturers distinguish themselves in several ways:

  • Expertise in Material and Compliance: The best manufacturers prioritize using premium, transparent materials. They will gladly share the composition and source of the silicone they use, along with food-grade compliance certificates. If a supplier is hesitant or vague about material quality, that’s a red flag. Top-tier factories use platinum-cured silicones and can customize the formulation (hardness, color) as needed while still meeting FDA/LFGB standards. They stay up-to-date on global regulations (like EU REACH, CA Prop65, etc.) and proactively ensure products have no prohibited substances. This material expertise saves you from surprises down the line – such as a shipment held up in customs for missing test documents.

  • In-House Mold Tooling and R&D: As mentioned, in-house tooling capability is a major advantage. Manufacturers with their own CNC machines and mold engineers can iterate designs faster and control quality tightly. They might offer quick-turnaround prototype molds, which helps in refining the product design quickly. In-house mold making also tends to reduce costs and lead times for you. These manufacturers usually have an R&D team that can provide design for manufacturability feedback early – suggesting, for example, slight changes to a maze pattern to optimize flow or adding a feature like a suction base per their experience. A collaborative partner will treat your project as their own, investing engineering time to get it right rather than just “taking orders.” Look for factories that emphasize their engineering strength and have case studies of custom projects.

  • Quality Control and Certifications: A good manufacturer implements stringent QC processes as we detailed. Things to look for: ISO 9001 certification (ensures they have a formal quality management system), any factory audit reports or social compliance certifications (e.g., BSCI) if that’s relevant to you, and a track record of producing for reputable brands (which implies they passed those brands’ quality requirements). Ask if they do 100% inspection or how they handle defects. Leading suppliers might even invite you to see their QC process or provide a detailed QA report with your order. They stand behind their product quality, often promising to replace any subpar units. This commitment to quality reduces risk for your brand.

  • Ability to Assist with Testing and Compliance: Beyond making the product, a manufacturer that helps with testing, certification, and documentation is invaluable. They should be able to provide you with all the paperwork you need for customs and retailers – this might include food-contact safety declarations, material Safety Data Sheets, quality certificates, etc. The better ones often have a library of past test reports (for similar products or materials) and can quickly arrange any new testing you request. They understand pet industry standards and even specific retailer compliance (for example, if a large pet retail chain has its own testing protocol, a seasoned OEM supplier may have encountered it before). Essentially, they act not just as a production site but as a compliance consultant to ensure your slow feeder bowl meets all necessary standards in your target market.

  • Communication and Project Management: In B2B relationships, especially across continents, communication is key. The best manufacturers assign a dedicated project manager or account manager to your project. This person keeps you updated at each milestone – design, tooling, sample, production, etc. Look for suppliers who are responsive (reply within 24 hours typically) and who can understand your requirements (technical and aesthetic) clearly. Since you may be iterating on design, having someone who can provide photos, videos, or even live video calls from the factory floor is a huge plus for peace of mind. Top manufacturers are proud to show their process and keep you in the loop. This kind of transparency builds trust; you essentially have eyes on the ground watching over your project.

  • Value-Added Services: Finally, consider what other services a manufacturer offers. Many good silicone OEMs offer custom packaging, labeling, assembly, and logistics support. For example, if your slow feeder is part of a set (say, with a silicone lick mat or a stainless steel bowl), can they source or produce the other items and kit them together? Some have partnerships for mixed material products (like combining silicone with plastic or metal components). Others can warehouse or drop-ship if needed. While not every project requires these extras, having a versatile manufacturing partner can simplify scaling your business – you won’t need to coordinate multiple vendors if one factory can handle the majority of the work under one roof.

In essence, what sets a good manufacturer apart is their commitment to your product’s success. They will be proactive in improving the design, meticulous in production, honest and thorough in quality control, and supportive in achieving certifications. As the client, you should feel that the factory is an extension of your own team, not a black-box supplier. When you have that level of partnership, you can confidently develop innovative products like custom slow feeder bowls knowing that quality and compliance are in expert hands.

Conclusion

Developing a custom silicone slow feeder bowl – from initial concept to a market-ready product – is a complex but rewarding journey. We’ve explored how careful design (and maze geometry) can influence a pet’s eating habits and how those design choices translate into manufacturing considerations for mold making and demolding. We discussed why food-grade silicone (usually medium Shore A hardness) is the material of choice for its safety, durability, and dishwasher-proof resilience. And we compared compression vs. injection molding for production, noting why many brands opt for the precision of LSR injection for intricate private label slow feeder bowls.

For pet brands and wholesalers, partnering with an experienced custom silicone slow feeder manufacturer is crucial to navigate these technical details. The right OEM will help with everything: optimizing your design for manufacturability, prototyping samples, building high-quality molds, and ensuring each batch of bowls meets stringent quality and safety standards. They’ll also guide you through business aspects like MOQs, lead times, and certification so you can launch your product smoothly and confidently.

At the end of the day, a silicone slow feeder bowl is more than just a pet accessory – it’s a health and wellness product that reflects on your brand’s quality. By choosing a manufacturing partner that excels in material transparency, in-house tooling, and rigorous quality control, you set your product up for success in the market. Such a partner will not only deliver a great product but also act as a collaborator in innovation, perhaps suggesting new features (like better suction footing or collapsible designs) to keep your line cutting-edge.

OEM / ODM Silicone Manufacturing

Ready to Develop a Private Label Slow Feeder?

We support pet brands and wholesalers with custom silicone slow feeders and other silicone pet products.
From design and prototyping to certified mass production, we make the process simple and reliable.

What you get
Pattern + structure optimization for better feeding performance
Shore hardness, color matching, and food-grade silicone options
Fast prototyping and sample approval support
Consistent QC + compliance documentation for your market

Why Natural Rubber for Pet Chew Toys?

Natural rubber pet chew toys have become a go-to choice for pet brands seeking safe, durable products. Unlike hard plastics or brittle bones, natural rubber offers a tough yet flexible chew that can withstand gnawing without splintering. These toys are marketed as non-toxic, natural, and gentle on teeth, appealing to pet parents who demand higher safety standards for their “fur-kids”. For OEM buyers and wholesalers, understanding the science and standards behind natural rubber toys is crucial. This article dives into what natural rubber is (and how it differs from synthetic rubber or silicone), where it’s sourced, how manufacturers tame that “rubbery” smell, and the rigorous safety testing that ensures safe rubber pet toys reach the market.

A dog enjoying natural rubber chew toys. Natural rubber offers a safe and durable material for pet toys, balancing toughness with enough softness to protect dogs’ teeth. High-quality natural rubber chew toy OEM products are designed to be resilient against heavy chewing while remaining free of harmful chemicals, making them a preferred choice for pet brands.

What is Natural Rubber? (vs. Synthetic Rubber and Silicone)

Natural Rubber: Natural rubber is an elastic polymer harvested from the latex sap of rubber trees (Hevea brasiliensis). It is a renewable, plant-based material – farmers tap the trees to collect milky latex, which is then refined into rubber. Natural rubber (essentially polyisoprene) is prized for its resilience and chew-friendly elasticity. It’s biodegradable and has a lower overall environmental impact during disposal than synthetics. Importantly for pet toys, 100% natural latex rubber contains no petroleum-based plastics; reputable brands ensure it’s free of BPA, phthalates, and other toxins. The result is a non-toxic, “safe to chew” material that many consider the gold standard for pet toys. However, natural rubber can have a mild organic odor and will gradually age (becoming stiffer or brittle over years, especially if exposed to sunlight or heat).

Synthetic Rubber (TPR/TPE): Synthetic rubbers are man-made elastomers derived from petrochemicals (e.g. styrene-butadiene rubber, thermoplastic rubber compounds). They can be formulated for high durability, but there are trade-offs. Unlike natural latex, synthetic rubber is not biodegradable and its production can release pollutants. Cheap TPR (thermoplastic rubber) toys are common – they’re easy to mold and often cheaper than natural rubber. But unless carefully formulated and tested, synthetic rubber toys may contain residues of BPA, phthalates, or other chemicals, which can leach out over time. Inconsistent quality can also lead to toys becoming sticky or smelly as they break down. For aggressive chewers, many experts prefer natural rubber over TPR due to its reliable resilience and chemical stability. In short, synthetic rubber has its uses (extreme durability toys, treat dispensers that need to be very rigid, etc.), but OEM buyers should ensure any “rubber” toy advertised as such specifies if it’s natural or synthetic. If synthetic, it’s critical to confirm it’s free of harmful additives.

Silicone: Silicone is a different class of material – a synthetic elastomer made from silicon and oxygen (often derived from sand). Food-grade silicone is popular in baby teething toys and molds because it’s odorless, non-toxic, and highly heat-resistant. Unlike natural rubber, silicone is non-porous and doesn’t absorb smells or liquids. It can be sterilized at high temperatures and won’t degrade or leach chemicals easily. However, silicone tends to be softer and less tear-resistant than vulcanized natural rubber. For dog toys, pure silicone might not endure an aggressive chewer (it could tear if the dog has sharp teeth and bites down hard). Additionally, silicone is not biodegradable and typically more expensive. In the context of pet chew toys, silicone may be used in treat-dispensing toys or gentle chew toys, but it’s less common for heavy-duty chew products. Many pet brands stick to natural rubber for chew toys because it “gives” under a dog’s bite (preventing tooth damage) while still being tough to break. As one industry blog succinctly put it: natural rubber remains the safest and most reliable chew toy material for dogs.

Bottom Line: When comparing materials, natural rubber hits a sweet spot for pet toys – it’s natural, safe, and durable with the right design. Synthetic rubber (like TPR) can offer durability and cost benefits but must be scrutinized for safety (consistent formula, no toxic additives). Silicone is extremely safe and inert but may be better suited for light chewers or special applications. OEM buyers should ensure their supplier clearly specifies the material and its composition. Mislabeling a synthetic blend as “natural rubber” is unfortunately not unheard of, so insist on materials transparency (more on that later).

Sourcing Natural Rubber for Pet Toys

Tapping a rubber tree for latex sap. Natural rubber for pet toys is primarily sourced from rubber tree plantations in tropical regions. In fact, about 87% of the world’s natural rubber comes from Southeast Asia, with Thailand, Indonesia, and Vietnam being leading producers. Latex is harvested by tapping the trees – making a shallow incision in the bark and collecting the milky sap in cups (as shown above). For pet product manufacturers, this raw latex is then refined into solid rubber through processes of filtering, coagulating, and drying, before it’s shipped to toy factories for molding.

Majority of rubber plantations are small farms, so supply chain transparency is a key concern. According to industry sources, roughly 90% of natural rubber is produced in a narrow equatorial belt using one type of tree. This concentrated geography means ethical sourcing is important – unsustainable expansion can lead to deforestation in those regions. Responsible manufacturers today pay attention to sourcing: some partner with suppliers certified by the Forest Stewardship Council (FSC) or similar programs to ensure the rubber is harvested sustainably and with fair labor practices. While sustainability might not be every OEM buyer’s first concern, it often goes hand-in-hand with quality: plantations that follow modern standards are less likely to use harmful chemicals or adulterants in their latex.

From a practical standpoint, if you’re developing a custom rubber dog toy and working with an OEM, it’s wise to ask where their rubber comes from. A reputable natural rubber chew toy OEM will know their material’s origin (country or even plantation) and can often provide raw material specifications. Some use “medical-grade” or “food-grade” natural rubber which indicates higher purity (suitable for baby products or food contact items). For example, one U.S. manufacturer, Ruff Dawg, emphasizes that they use FDA-approved, high-quality rubber in all their toys. Likewise, Lucas b. Natural Dog Toys notes their products are made from 100% natural latex from Hevea brasiliensis trees, with no harmful chemicals added. As an OEM buyer, look for that level of material transparency – it signals that the supplier is sourcing real, pure natural rubber and not mixing in cheap fillers.

Managing the “Rubber Smell”: Odor Control Techniques

One common issue with natural rubber products is the distinctive smell. Raw natural latex has an odor often described as a sweet or vanillin-like rubber scent (thanks to organic compounds like isoprene in the material). Some pet toys – for example, a fresh Kong® toy straight out of the package – have a noticeable rubbery smell. While generally harmless (and even intriguing to many dogs), an overpowering odor is something manufacturers work to minimize to improve consumer appeal.

Why the Smell? The odor comes from volatile compounds inherent to natural rubber and from substances used in manufacturing (ammonia from latex preservation, sulfur compounds from vulcanization, etc.). If not properly treated, these can linger in the final toy. High-quality manufacturers address odor in several ways:

  • Material Purity and Washing: Starting with high-purity latex and thoroughly washing the rubber during processing can remove proteins and residues that cause smell. After molding the toy, factories often wash or boil the pieces to leach out any remaining processing chemicals. For example, natural rubber baby products are typically washed to remove latex proteins (which also reduces allergens and smell). Some manufacturers use a mild, pet-safe detergent wash or even an air-curing period to let the rubber off-gas before packaging.

  • Curing and Post-Curing: Proper vulcanization (the curing process that hardens rubber) is critical. Undercured rubber can smell more and even feel oily. Top OEMs carefully control curing temperature and time. They may also “post-cure” by baking the molded toys at a moderate heat for several hours to drive off volatile odors. This extra curing step can significantly reduce that latex smell.

  • Odor-Neutralizing Additives: There are natural odor absorbers like activated carbon or baking soda that can be used in the storage areas to absorb smell. Some industrial additives (marketed for rubber/plastics) can be mixed into the rubber compound to neutralize odors, though for pet toys any additive must be non-toxic. Many pet toy makers avoid adding unnecessary chemicals, so a common approach is to infuse a pet-safe flavor or scent instead. For instance, several brands infuse their natural rubber toys with vanilla extract – not only does this mask the latex scent, it also makes the toy more attractive to dogs (vanilla is a flavor dogs tend to like). You’ll see products advertising “vanilla-scented rubber” or even mint scents. These are usually achieved by mixing a tiny amount of food-grade flavoring into the rubber or by surface-coating the toy after molding.

  • Surface Coatings: In some cases, toys are coated with a light layer of food-grade oil or similar to seal the surface. Notably, Hevea (a natural rubber pet product brand) treats their toys with a bit of vegetable oil – this is harmless and helps the toys feel less sticky. Such a coating might also lock in some odor-causing compounds. Other toys might have a dusting of rice starch or baking soda from the molding process, which can be rinsed off and also helps neutralize odor.

As an OEM buyer evaluating samples, it’s a good practice to smell-test your supplier’s toys. A faint natural rubber smell is normal (often described as mildly sweet or “new toy smell”), but it shouldn’t be overpowering or chemical-like. If you detect strong petroleum or chemical odors, that’s a red flag – it could indicate the use of synthetic fillers or plastifiers in the “natural” rubber. A quality-focused OEM will be upfront about their de-odorizing process (e.g. “we soak our toys in warm water for 24 hours before drying and packing” or “we use a proprietary odor-neutralizer that is FDA compliant”). Ultimately, end consumers appreciate a product that doesn’t make the whole room smell like rubber, so investing in proper smell control is worthwhile. And if a slight scent remains, you can even market it: some brands highlight the natural latex smell as non-toxic and even vanilla-like, reassuring customers that it’s the sign of real rubber.

How Rubber Chew Toys Are Proven Safe

When developing a new chew toy, safety testing is paramount. Pet chew toys endure a lot of abuse – tugging, biting, gnawing, not to mention exposure to dog saliva and the occasional ingestion of small pieces. Responsible manufacturers put prototypes through rigorous tests to ensure they won’t pose hazards like choking, poisoning, or dental injury. Here are key aspects of safety testing for natural rubber toys:

  • Bite Resistance & Tear Strength: Chew toys must resist strong bite forces without breaking apart. Labs or in-house QA teams perform mechanical bite simulations. For example, one OEM describes using equipment-simulated dog bite tests – essentially a machine that applies bite pressure repeatedly to the toy’s surface to mimic a dog’s jaws. They also do tear tests by gripping parts of the toy with pliers and pulling or twisting to see if it tears easily. Measurements like tensile strength (psi) and tear strength (psi) can be quantified for rubber compounds. (One advanced toy brand, Bionic®, publishes that their proprietary rubber has a tensile strength of 2,100 PSI and tear strength of 440 PSI – extremely high values for an elastomer, giving an idea of how robust some toy materials are.) While you may not need the numbers in marketing, as a buyer you can ask if the OEM has tensile/tear data for their rubber formulation. High tear strength means a dog can’t easily rip chunks off, which is crucial for safety.

  • Tensile and Pull Tests: Beyond bite simulation, manufacturers perform tension/pull tests – this involves stretching the toy or its components to ensure they don’t snap under force. Petopia (an OEM) notes they do suspension pull tests with over 200 kg weight on their toys. This kind of test is especially important if the toy has appendages or parts (like a rope through a rubber toy) – they test that these won’t pull apart easily. A well-designed natural rubber toy should deform (stretch) under extreme force rather than shatter. If it does break, it ideally breaks into large pieces, not shards or tiny bits. These tests help validate that threshold.

  • Puncture and Chew Testing: Some labs use actual dog chew testing (with volunteer dogs or controlled setups) to see how real pets interact and where the product might fail. But more standardized is using metal probes or mandibles to attempt puncturing the toy’s surface at forces simulating dog bites. The goal is to ensure no sharp pieces break off that could cut gums or pose choking hazards. Many rubber toys are designed to be soft enough to dent with a fingernail – a common rule is that if you can’t make a slight dent with your nail, the toy might be too hard and risk tooth fractures. Thus, testing finds a balance between hardness and safety.

  • Chemical Safety (Non-Toxicity): Even the toughest toy is unsafe if it contains toxic substances. Lab chemical testing is a critical part of pet toy safety. Manufacturers will have their rubber (and any coatings or colorings on it) tested for things like heavy metals (lead, cadmium, etc.), phthalates, bisphenol-A (BPA), and other harmful chemicals. These tests are often the same as those for children’s toys. For instance, lead and cadmium levels should be below strict thresholds (often measured in parts per million) per standards like U.S. ASTM F963 or Europe’s EN 71-3 (which covers soluble heavy metals). Phthalates (plasticizers that can be toxic) are regulated under U.S. CPSIA and EU REACH – a quality OEM will ensure no phthalates are used in the rubber compound. In fact, many leading brands proudly state what’s not in their toys: “Phthalates? Never. Lead? Not acceptable. BPA? Nope.”. They’ll use only food-grade colorants and materials. For example, Lucas b. dog toys are colored with natural food-based dyes and painted with certified lead-free paint, specifically to meet child-safety standards.

  • Choking Hazard Assessment: Even though pet toys aren’t legally bound by child toy regulations, good manufacturers design with similar precautions. They avoid small detachable parts. If a toy includes a squeaker or rope, it’s embedded in a way that a dog can’t easily extract it. Some companies even include safety indicators – e.g., a toy with a colored core that shows when it’s been chewed down to a dangerous point (like Goughnuts’ “red indicator” core that signals it’s time to replace the toy). During testing, they simulate wear by abrading or chewing the toy and then checking for parts that could come off and be swallowed. Softness is also tested: a too-hard rubber toy can risk tooth damage, so many are formulated to have a bit of “give” under pressure.

  • Usage and Abuse Tests: Testing often goes beyond chew-specific scenarios. Labs may do drop tests (does the toy crack if dropped from a height?), compression tests (if a dog’s mouth or a heavy weight compresses the toy, does it deform and recover without breaking?), and even temperature tests (some toys are meant to be frozen for soothing gums, so they check that freezing and thawing doesn’t make the rubber brittle). If the toy doubles as a treat dispenser or has holes, they test for proper sizing of holes (to avoid tongues getting stuck, etc.). In one case, a poorly designed toy led to a dog’s tongue getting trapped, which highlights why these odd scenarios must be considered in design and testing. A thorough OEM will often have an internal “destruction test” lab where prototypes are intentionally beaten up in all the ways a pet or owner might abuse them.

In summary, as a buyer you should ask your OEM about their testing protocols. Do they do in-house mechanical tests? Do they use third-party labs for chemical testing? Ideally, they should provide you with test reports – for example, an SGS or TÜV certificate showing the toy passed relevant safety standards (more on those next). Pet product safety is increasingly under scrutiny, and while regulations lag behind human toy standards, the best practice is to meet or exceed the child toy standards for toxicity and durability. This ensures the toys are not only safe for pets, but also for any children who might handle them (since kids often end up playing with dog toys too).

Global Safety Standards and Regulations

One might be surprised to learn that pet toys are not strictly regulated by law in many countries. In the U.S., for instance, there are virtually no federal safety regulations specifically for pet toys – the Consumer Product Safety Commission only focuses on products that harm humans. That means it’s up to manufacturers to self-impose standards. Reputable pet product companies voluntarily comply with global toy safety standards to give customers peace of mind. As an OEM buyer, you should look for compliance with the following key standards and certifications:

  • FDA-Approved Materials (Food-Grade Rubber): In a pet chew toy context, “FDA compliant” typically refers to the U.S. Food and Drug Administration’s regulations for materials that can contact food (or be put in the mouth). Natural rubber intended for chewing should meet food-grade standards under FDA guidelines (for example, 21 CFR 177.2600 covers rubber articles for food contact). Many top brands use FDA-approved natural rubber and advertise that their toys are BPA- and phthalate-free. This gives confidence that if trace amounts of the material are ingested, it won’t harm the pet. As evidence, companies like Ruff Dawg and West Paw highlight that their rubber is FDA-compliant and free of harmful additives. When choosing an OEM, ask if their material has an FDA food-grade certificate or if they can supply a document stating the rubber compound complies with FDA or equivalent requirements. This is especially important if the toy will be sold as treat-holding or for puppies (who have sensitive tummies).

  • EN 71 (European Toy Safety Standard): EN 71 is a set of European standards for toy safety, originally meant for children’s toys. It has multiple parts; relevant ones for chew toys include EN 71-1 (mechanical and physical properties), EN 71-2 (flammability), and EN 71-3 (migration of certain elements – essentially heavy metal limits). Pet toy makers often test to EN 71 to ensure their products would also pass as baby-safe. For example, Lucas b. Natural Dog Toys explicitly states their toys “comply with the exact same safety standards as children’s toys: European Safety Standard EN 71”. Another brand, P.L.A.Y., notes their dog toys use AZO-free dyes and meet EN71 and ASTM F963 standards. For an OEM, having EN 71 compliance means they likely had a third-party lab test the toy for things like choking hazards and chemical safety. It’s a strong indicator of quality. Importantly, EN 71-3 will ensure no toxic heavy metals (lead, arsenic, etc.) are present beyond minuscule trace levels. EN 71-9 and others cover organic chemical compounds too (like nitrosamines, which can be an issue with some rubber – Lucas b. even mentions their toys are nitrosamine-free). If you aim to sell in the EU, EN 71 compliance may be required by distributors, even if not explicitly mandated for pet products.

  • ASTM F963 (U.S. Toy Safety Standard): ASTM F963 is essentially the U.S. counterpart to EN 71, specifying safety requirements for toys (primarily children’s toys). It covers mechanical hazards, flammability, and heavy metals similar to EN 71. While not law for pet toys, many manufacturers choose to test against it. For instance, high-end plush dog toy brands often say they meet “the same strict standards as children’s toys, including ASTM F963”. For rubber chew toys, ASTM F963 would ensure that lead content is under 100 ppm, no sharp points are present, etc. An OEM that does ASTM testing at accredited labs is demonstrating a commitment to human-grade safety. Ask your supplier if they have an ASTM F963 test report or Children’s Product Certificate (CPC) for the toy – even though a dog toy isn’t a child’s product, some will have it. At the very least, they should be knowledgeable about these standards.

  • REACH Compliance: REACH is the EU’s comprehensive chemical regulation (Registration, Evaluation, Authorization, and restriction of Chemicals). A pet toy sold in Europe should comply with REACH requirements, which among other things restrict hazardous substances (like certain phthalates, aromatic amines, etc.) and heavy metals. There have been instances where pet products were pulled from markets due to REACH violations – for example, a dog leash was removed in Germany for containing excessive chromium, which didn’t comply with REACH and could cause allergic reactions. Reassuringly, many dog toy listings will state “REACH compliant” or “tested to REACH SVHC standards”. In one Alibaba OEM listing, the supplier highlighted that their rubber dog toy was compliant with EN71, REACH, and U.S. 16 CFR standards, effectively “adhering to global safety and eco-friendly standards.”. As a buyer, ensure your OEM can provide a REACH SVHC (Substances of Very High Concern) compliance statement or test. This indicates the toy has no prohibited chemicals above 0.1% that are on the SVHC list (which is regularly updated with things like certain plasticizers, flame retardants, etc.).

  • Other Standards and Marks: Depending on your market, you might also look for CPSIA compliance (the U.S. Consumer Product Safety Improvement Act, which enforces lead and phthalate limits for children’s products – not required for pet toys, but many manufacturers conform to it voluntarily). If selling in California, being CA Prop 65 compliant (no chemicals known to cause cancer/birth defects beyond safe harbor levels) is important – many will test for this as part of chemical safety. Some international standards include ISO 8124 (similar to EN71/ASTM, for toy safety globally) and specific country regulations (e.g., Japan Food Sanitation Act for pet toys that might contact food). While it’s not necessary to cite every standard, the key point is: choose an OEM who is proactively testing and certifying their products to recognized safety benchmarks. This not only protects end-users (pets and any people around them), it also protects your brand from liability and recalls.

Finally, remember that documentation is key. An ethical OEM will furnish you with test reports or certificates for each batch or at least each product design. For example, they might provide an SGS test report showing the toy passed EN71-3 for heavy metals and EN71-1 for mechanical safety, and perhaps an FDA raw material certificate for the rubber. Some may even have an SGS Performance Tested mark on their products, with a QR code linking to test details. Don’t be shy about asking for these documents – it’s standard due diligence in B2B product development. If an OEM cannot supply any lab test results or claims “we self-certify our rubber is safe” without evidence, that should give you pause. When it comes to safe rubber pet toys, transparency and proof are the name of the game.

Choosing a Natural Rubber Chew Toy OEM: What to Look For

Selecting the right manufacturing partner for your custom chew toy is critical. You’re not just buying a product design – you’re entrusting the OEM with your brand’s reputation for safety and quality. Here are key factors and questions to consider when choosing a custom rubber dog toy supplier:

  • Materials Transparency: Ensure the OEM openly specifies the material and its quality. Is it 100% natural rubber latex? Do they add any fillers or recycled content? Do they use natural dyes or any paint/coating? A trustworthy OEM will proudly state, for example, “made from 100% natural rubber, no PVC or synthetic additives”, and be able to back it up. They should also disclose how they color the toys – the safest method is using non-toxic color compounds mixed into the rubber or food-safe dyes. (Some lower-end makers might paint the toy after molding with cheap paint – avoid that, as paint can chip off and often contains heavy metals. Ideally, choose an OEM that can produce vibrant colors without any paint or glue.) Ask if they have certifications for the raw rubber (e.g., an SDS or a compliance letter stating it’s BPA-free, etc.). If an OEM sources ethically (say, FSC-certified rubber or has an organic latex source), that’s a bonus sign of quality. Tip: Request a sample piece of the raw rubber or a test slab – you can have this independently lab-tested if needed to verify purity.

  • Design & Tooling Experience: Look for an OEM with a proven track record in mold design and product engineering for pet toys. Chew toys might seem simple, but subtle design choices make a huge difference in durability and safety. An experienced manufacturer will have in-house design engineers and mold technicians who know how to avoid weak points (like too-thin sections) and how to optimize shapes for chewing fun and longevity. For instance, they’ll know how thick a toy’s wall should be for a given rubber hardness to prevent easy tearing, or how to design grooves/ridges that clean teeth but don’t compromise strength. During vetting, ask how many years they’ve been making pet chew toys and for which markets. If they’ve been producing for leading pet brands or have references, that’s a good sign. Evaluate their tooling capabilities: Do they make their own molds? High-quality steel molds and precise molding processes (like compression or injection molding of rubber) will yield consistent products. Some OEMs can also assist with 3D prototyping. Petopia, for example, emphasizes a data-driven design approach – using an extensive database of dog bite force and tear strength data to inform product development. An OEM with this level of expertise can guide you in refining your design (e.g., recommending a thicker tether on a tug toy for larger breeds, or adjusting the rubber hardness for a puppy toy vs a power chewer).

  • Safety Testing & Documentation: As discussed in the previous section, the OEM should have robust testing protocols. Inquire about their quality control and testing: “What tests do you perform to ensure the toys are durable and safe?” The answer should reference mechanical tests (bite/chew simulations, tension tests) and chemical tests (third-party lab certifications). Preferably, they should be able to supply test reports for EN71, ASTM F963, REACH, or similar. Also ask about ongoing quality control – do they batch test each production run? Do they have ISO 9001 or other quality management certifications for their factory? A good OEM partner will not only design to safety standards but also consistently produce to those standards. It’s worth checking if they work with well-known labs like SGS, TÜV, or Intertek for certifications – an OEM that invests in reputable lab testing shows professionalism. In short, demand test documentation. In this industry, any serious OEM expects that and will have a ready folder of certifications to share.

  • Manufacturing Capacity and Reliability: While not explicitly about safety, the OEM’s production capability and reliability matter. You’ll want a partner who can scale production to your needs and deliver on time. Indicators include the number of production lines, monthly output (e.g., Petopia advertises 300,000+ monthly toy production capacity), and how long they’ve been in business. An OEM with 25+ years of experience and dozens of professional molds and machines has likely encountered and solved many manufacturing challenges. This reduces the risk of defects in your order. Also, discuss what warranties or guarantees they offer on quality – for example, if you receive a batch with an issue, will they replace it? The best suppliers stand behind their work.

  • Compliance and Certifications: Beyond product tests, check if the factory has any relevant audits or certifications. Some buyers might require BSCI or SEDEX social compliance audits, or environmental certifications especially if promoting eco-friendly toys. If your brand angle is sustainability, see if the OEM offers recycled rubber options or participates in recycling programs (some do grind and reuse their rubber waste in non-toy items). A forward-thinking OEM might also be developing biodegradable formulations or have upcycling initiatives for old toys – aligning with trends can be a marketing plus for you. At minimum, ensure the OEM complies with local manufacturing laws (no forced labor, etc.), as any scandal in the supply chain can hurt your brand.

  • Communication and Development Support: Since you may be engaging in custom development, the ease of communication and technical support from the OEM matters. Do they offer material sampling (sending you rubber material samples of different hardnesses or colors to choose from)? Will they assist in rapid prototyping or provide CAD files for your design? A cooperative OEM will help optimize your concept for manufacturability and may even suggest improvements. Look for one that is willing to collaborate on iterations and provide insight from their past projects.

Ultimately, choosing the right OEM comes down to a partner that can deliver safe, high-quality rubber pet toys consistently, while being transparent and supportive. Don’t hesitate to vet multiple suppliers – ask each the same tough questions about materials and testing, and compare responses. The OEM that ticks all the boxes – clear about their natural rubber sourcing, has tooling expertise, provides test documentation, and communicates well – will give you confidence as you develop your custom chew toy line.

Partnering for Safe & Successful Chew Toys

Natural rubber pet chew toys offer a winning combination of safety, durability, and pet appeal – but realizing a great product from concept to store shelf requires deep material knowledge and strict quality standards. As we’ve covered, understanding the nuances of natural vs synthetic materials, addressing raw rubber odors, and rigorously testing for chew resistance and toxins are all part of delivering a premium product. OEM buyers should leverage this knowledge to ask the right questions and demand the highest standards from their manufacturing partners.

The good news is, the industry is moving towards greater safety and transparency. Forward-thinking manufacturers already treat pet toys with the same care as baby toys, adhering to FDA, EN71, ASTM, REACH and beyond. By choosing an OEM who does the same, you protect your brand and your end customers (both the pets and the humans who love them).

Ready to turn your pet product idea into reality? Contact our factory to kickstart your custom chew toy development. With years of experience as a leading natural rubber chew toy OEM, we offer end-to-end support – from material selection and prototyping to final safety testing and production. We can provide material samples of our premium, food-grade natural rubber and show you our library of test reports for peace of mind. Whether you need a durable dental chew for power chewers or an engaging treat-dispensing toy with your unique design, our team has the tooling expertise and technical know-how to deliver. Let’s work together to create safe rubber pet toys that delight your customers and keep tails wagging.

Contact us today to request samples, discuss your project requirements, or see our safety certifications. We’re excited to partner with you in bringing outstanding, safe, and fun chew toys to the global pet market – complete with custom development, material transparency, and full safety testing support every step of the way. Your brand and our manufacturing can be the perfect pairing for success in the pet industry. Let’s make something pawsome, safely!

Understanding Shore Hardness (Shore A Scale): Shore hardness is a durometer rating of material stiffness. On the Shore A scale (0–100), 0A is extremely soft (marshmallow‑like) and 100A is very hard (skate‑wheel stiff). A durometer presses into the cured silicone: more penetration means a lower Shore number (softer), less penetration means higher Shore (firmer). High‑quality food‑grade silicone for pet products typically spans roughly Shore 20A to 70A. In fact, most pet‑safe silicone elastomers fall in the broad 30–70A range. This mid-range covers everything from very floppy feeding mats to semi-rigid bowls. (For reference, a pencil eraser is about 30A, and a hard skateboard wheel is ~75A.)

Shore hardness

Typical Hardness for Bowls and Lick Mats: In practice, silicone slow‑feeder bowls and lick mats use a medium Shore A durometer to balance stability with flexibility. A common rule of thumb is around 50A (±10) for a sturdy bowl. For example, one industry guide notes that a silicone slow‑feeder bowl “needs a balance” – stiff enough to hold its maze patterns yet flexible enough to demold – and so around Shore A 50 is typically chosen. Similarly, a trade‑publication for custom pet parts points out that a puppy chew toy might be ~30A soft, “whereas a dish might be Shore A 50 (firmer)”. In other words, many adult dog bowls or feeding mats use mid‑range silicone (about 40–60A), while very soft silicones (~30A) are reserved for gentle puppy toys and extremely firm silicones (60–80A) are for power‑chewers.

  • ~40A (Very Soft): Feels quite rubbery and squeezable, like a puppy chew toy. A silicone at ~40A bends easily and is gentle on teeth, but it will tear more easily if overstretched or bitten. In a bowl or mat, 40A silicone would hug surfaces well (good for suction cups or sticky mats) but may collapse or puncture if thin. (Use when flexibility is paramount and loads are light.)

  • ~50A (Medium/Firm): The “sweet spot” for many pet dishes and enrichment products. At 50A the material holds its shape under use but still has some give. Bowls and lick mats at this hardness are durable yet pliable. A 50A mat can flex under a pet’s tongue or child’s hands, but it won’t flop over like a very soft rubber would. (Industry examples confirm ~50A as a typical durometer for adult dog bowls and treat mats.)

  • ~60A (Firm): Quite stiff and puncture‑resistant. A 60A silicone bowl or mat resists deformation under heavy pressure, making it durable for large or boisterous dogs. However, it will be less flexible and more rubbery‑hard to the touch. Using 60A may make fine details (like intricate grooves) harder to fill or demold, and if a pet chews it, the surface can feel hard. (Use when maximum durability is needed and flexibility can be sacrificed.)

Silicone slow‑feeder bowls often have raised ridges or maze patterns. These bowls are usually molded at a medium hardness (~50A) so they hold their shape but still flex slightly for easy demolding.

As this suggests, softer silicone (e.g. Shore ~30–40A) makes a bowl or mat extremely pliable and tacky – ideal for suction cups and gripping surfaces – but risks tearing or collapsing. A stiffer 50–60A part is rock‑solid in shape but provides a firmer bite sensation for pets. Grip and Suction: Notice that many lick mats and bowls use suction attachments on the bottom. Those suction cups themselves are often made of very soft silicone (around 30A) so they can form a tight seal. The main bowl or mat, however, sits at a slightly higher hardness (40–50A) to retain structure. If the entire mat were 60A, it might not conform well to surfaces; if it were 30A, the whole thing would be too floppy to stand up. In practice, designers mix these functions by using e.g. a 50A base with 30A cups, or by molding rings and feet in softer durometers.

Balancing Softness vs. Durability: The Shore hardness governs a key trade-off: softer silicone is gentler (flexible, good underbite) but has lower tear strength, while harder silicone resists puncture but can feel rigid. Lower‑Shore mats feel very squishy and appealing to lick, but a puppy’s claws or repeated washing can abrade them quickly. Higher‑Shore mats hold their ridges and won’t flop, but they’re tougher to flex and (if chewed) can chip a tooth. In short, an overly soft silicone mat might shred after some use, whereas an overly firm one might not “stick” to surfaces or could become brittle over time. Designers must balance these factors. For example, one supplier advises that “soft silicones (lower Shore) are great for detailed, flexible needs; harder silicones (higher Shore) are better for tougher, more rigid needs”.

Silicone lick mats have textured grooves and sometimes suction zones. A slightly softer durometer (often ~40–50A) is used so the mat remains flexible and the suction cups seal well. Extremely hard silicone (60A+) in a mat would be very durable but much less able to conform or adhere.

In practice, we often find that Shore A 50 is the compromise that works best for bowls and mats – firm enough to last, yet soft enough for comfort and safe contact. For very gentle applications (e.g. senior pets or thin mats), we might go down to 40A. For very heavy duty bowls (for giant dogs or outdoor use), we could specify 60A for added sturdiness. By testing samples at different durometers, we ensure the final product meets the intended use-case.

Certifications and Material Safety

No matter the hardness, it’s critical to use food‑grade silicone that meets regulatory standards. All silicone for pet bowls and mats should be platinum‑cured and certified to FDA food-contact regulations (21 CFR 177.2600 in the US) and EU LFGB standards. These high-quality silicones are inherently BPA‑free, phthalate‑free, and hypoallergenic. In marketing, call-outs like “100% FDA food‑grade silicone” or “LFGB-certified” reassure retailers and customers of safety. Always ensure all pigments and additives in the silicone are likewise approved for food contact. (Our factory can provide certificates of compliance for every material batch.)

Molding, Demolding, and Product Lifespan

Shore hardness also affects manufacturing and longevity. In molding, lower-hardness silicones flow very well into fine details, which is great for deep grooves on a lick mat. Because they remain soft, these parts release from the mold more easily – the material can flex to pop out of undercuts. In contrast, very stiff compounds can require stronger ejectors or mold-release coatings (though we avoid harmful release agents on food parts). On lifespan: a correctly chosen durometer maximizes durability. Too soft a bowl may tear or deform under load (shortening its life), while too hard a part might become brittle or lose elasticity over many temperature cycles. In general, a medium-hardness silicone will yield the longest service life for a bowl or mat, since it resists tearing without excessive brittleness. We also run tensile and tear tests on new formulations to verify that a pet product won’t crack or permanently warp under normal use.

Partner with a Custom Silicone OEM for Hardness Expertise

As a silicone pet bowl manufacturer and custom lick mat supplier, we guide our clients through every step of material and hardness selection. Our engineers can perform durometer (Shore A) tests on prototypes to fine‑tune the softness. We offer services such as:

  • Hardness Testing & Selection: We sample different Shore A formulations so you can feel the difference. This ensures the final product (bowl, mat, etc.) has the ideal firmness for your target pet and use-case.

  • Mold Design & Tuning: We design custom molds with the right draft angles and ejection features for your chosen hardness. For example, we can integrate suction-cup cores or collapsible sections and adjust wall thickness for durability.

  • Food-Grade Material Compliance: As a food-grade silicone OEM, we supply platinum-cured silicone certified to FDA/LFGB standards. All our compounds are odorless, BPA‑free and pass stringent extractables tests. We also help you label the product (e.g. “100% FDA/LFGB food-grade silicone”) so customers know it’s safe.

Our full-service approach means you have one partner for prototype sampling, material guidance, mold making, and quality assurance. When you work with us, we ensure your custom pet bowls and mats are both well-designed and use the best Shore hardness for their function. Contact our team to discuss your project – we’ll test hardness options, fine-tune the formula, and deliver a final product that’s safe, durable, and perfectly tailored to your brand.

Market Outlook: Growth and Projections

The sex toy industry is booming worldwide. Analysts project strong growth through 2030. For example, Grand View Research estimates the global market at $35.2 billion in 2023, rising to $62.7 billion by 2030 (CAGR ~8.7%). Regionally, North America leads – nearly one-third of global revenue – driven by mainstream acceptance and e‑commerce. In 2024 the U.S. market was about $10.6 billion, with forecasts of ~8.4% annual growth through 2030. Europe is also growing fast: one report projects the European market to jump from $8.5B in 2021 to $16.4B by 2030 (7.6% CAGR). Much of this expansion is fueled by wider social acceptance (fewer taboos), proliferation of online retail, and interest in sexual wellness. Major product categories – especially vibrators and couple toys – are expected to grow especially quickly as consumers seek both solo and partner-oriented experiences.

Consumers are buying more diverse products than ever. Vibrators account for the single largest segment (~22% of sales), followed by dildos, anal toys, ring-type stimulators, and other accessories. Importantly, most sales occur online: e‑commerce already commands well over half of the market (around 63–64% of revenue), as shoppers value the privacy and product variety available through apps and web stores.

Material Preferences & Safety: The Case for Silicone

Material safety is front and center. Today’s consumers demand body‑safe, non‑toxic materials – a key reason medical-grade silicone dominates new designs. Silicone’s advantages are well-documented: it is non-porous, hypoallergenic, and chemically inert. Platinum-cured (medical-grade) silicone is essentially as safe as a medical implant, meaning it resists bacteria and can be sterilized. It is also very durable and retains lifelike softness. In practice, this means silicone toys can be cleaned easily and are unlikely to cause irritation or allergic reactions. By contrast, cheaper materials – such as jelly rubber, PVC or generic thermoplastic elastomers (TPE) – are often porous or contain phthalates and other additives. Analysts have noted “concerns regarding the safety of some materials… such as plastic and certain types of rubber, which may contain harmful chemicals.”. In short, manufacturers are moving away from “novelty” plastics toward premium silicone and other non-toxic polymers to meet consumer demand for safety.

Silicone’s manufacturing flexibility also helps. Liquid silicone injection molding lets producers create complex shapes and textures (ridges, curves, studding, etc.) in a single seamless piece. This not only improves user experience but also reduces seam lines where bacteria could hide. Many manufacturers now tout “medical‑grade silicone” in their product specs for its superior safety: as one industry source notes, MGS is easy to clean and fully non‑porous. (By comparison, ABS plastic is also non-porous and body-safe, but is rigid and less comfortable, while jelly plastics are being phased out due to hygiene concerns.) In practice, consumers have come to expect platinum-cured silicone in high-end vibrators, dildos, anal plugs and other core products – and will pay a premium for it.

Product Design & Customization Trends

Design innovation is accelerating. Personalization and diverse use cases are major themes. Modern sex toys now often feature app connectivity, adjustable patterns, and even artificial intelligence to adapt to the user – but all built on a foundation of silicone parts for comfort and safety. For example, vibrators and couple-pleasure devices increasingly offer Bluetooth app control, syncing with media or partner’s device to enable long-distance play. At the same time, haptic feedback and ergonomic shaping are being refined: advanced silicone molding allows “realistic” textures and custom contours that target pleasure zones.

One standout trend is mass customization. Consumers no longer want “one-size-fits-all” toys. Several manufacturers now offer truly bespoke silicone products. One company, Criar Designs, even advertises custom 3D-printed silicone novelties based on customer photos or measurements. They have developed processes to produce items (like personalized cock rings or dildos) in 100% medical-grade silicone according to user-specified dimensions.

Example: a custom 3D-printed silicone cock ring (red) created by Criar Designs based on customer input. Such services illustrate the personalized future: users can tweak length, girth, shape or add unique textures to match their anatomy or fantasy. This hyper‑custom approach – combining 3D modeling and silicone molding – requires manufacturers to adapt their production lines. We see on-demand 3D prototyping and flexible tooling becoming more common, alongside traditional injection molding, so that small batches or one-off designs can be made economically. The payoff is higher customer engagement and loyalty: buyers feel their needs are uniquely addressed.

Inclusivity is another design focus. Products are being designed without gender assumptions, using neutral colors and forms. There’s growing attention to ergonomic adjustments: for example, toys that serve users with different anatomies (post-surgery bodies, trans needs, etc.). Rugged but body-safe silicone harnesses, universal shafts and reversible designs (e.g. double-ended silicone dildos) are gaining in popularity, reflecting a broader range of consumer identities and situations.

Key takeaways on design trends include:

  • Rich Textures & Shapes: Advanced silicone molding allows fine detail (ribs, waves, bumps) in a single piece, and even dual-durometer parts (one soft grip area, one firmer insert) to enhance sensation.

  • Smart Connectivity: Many new silicone vibrators now include app control, syncing (for couples), and even voice or biometric features as the “Internet-of-Intimacy” evolves.

  • Discreet Form Factors: Consumers want silent, small, and aesthetically pleasing toys – a niche where minimalist silicone designs (egg vibrators, slim wand styles) shine.

Sustainability & Eco-friendly Innovation

Environmental concerns are reshaping the industry. Consumers – especially millennials and Gen Z – increasingly factor sustainability into their purchases, even for intimate goods. The scale is significant: most mass-market sex toys today are petroleum-derived plastics that do not biodegrade and often end up in landfills. The industry has taken note: one report found “258% month-over-month growth in sales for sustainable sexual wellness products” on a UK eco marketplace, reflecting surging demand for greener options.

In response, manufacturers are rethinking materials and packaging. Many premium brands now offer toys made from recycled or bio-based inputs. For example, some vibrators and rings are made from ocean-bound plastics or cornstarch bioplastics (both recyclable), while high-end wood or metal alternatives are promoted for their longevity. Importantly, silicone – though not biodegradable on its own – can be made partially from plant-sourced precursors, and its durability aligns with sustainability goals (long-lasting toys mean fewer replacements).

Manufacturers also innovate in power systems: most new premium toys use USB-rechargeable batteries instead of disposables, reducing e-waste. Packaging is likewise changing: eco-conscious brands use recycled cardboard, minimal plastic and plant-based inks. One strategy many companies adopt is “buy-back” or recycling programs for old toys. Overall, the trend is clear: sustainable design and safety go hand-in-hand. Premium silicone products often emphasize their eco-credentials (e.g. “phthalate-free, hypoallergenic, heavy-metal-free”), tapping into the wellness movement.

For manufacturers, this means reevaluating supply chains. We seek silicone and chemical suppliers with greener processes, and aim to eliminate hazardous release agents or toxic pigments. Some lines now use food-grade (non-toxic) pigments in silicone, and we incorporate eco-certifications in QA. The net result is a positive marketing differentiator: consumers feel good about toys that are kind to their bodies and to the planet.

US vs. EU Market Insights

United States: The U.S. market is the world’s largest and most mature. Mainstream retailers now treat sexual wellness akin to personal care: for instance, Walmart and Target carry basic vibrators and lubricants in their health aisles. Online sales dominate, and social media/influencers have destigmatized discussion of sex toys. Brands targeting U.S. consumers often emphasize discretion and tech: quiet motors, discreet packaging, app integration and broad color palettes. We see especially high demand for premium rechargeable vibrators and luxury silicone dildos among U.S. shoppers. Data shows 55% of U.S. adults bought vibrators in 2022, underscoring strong mainstream adoption.

Europe: The EU market is also growing steadily, with nuances by country. Western European consumers (Germany, France, UK, Netherlands, Nordics) are very quality- and safety-conscious. Toys with CE-certified, medical-grade silicone and high build quality sell well. German buyers in particular expect robust regulation-compliant products. Scandanavian markets prize minimalist design and eco-features – brands like LELO and Svakom are strong there. While online retail is booming across Europe (similar to the U.S.), European shoppers still appreciate well-appointed brick-and-mortar boutiques. Many EU cities now have “adult wellness stores” with trained staff that present toys as health aids. Notably, regulation in the EU has started classifying certain connected devices under health standards, pushing makers to tighten data privacy and safety.

Among differences: U.S. consumers tend to favor bold, modern designs (and faster adoption of tech features), whereas European users often lean toward sustainable and ergonomic designs. However, both markets share a preference for platinum-cured silicone over any jelly-like materials. In terms of segments, Asia (especially China, Japan, India) is becoming a huge growth driver, but our focus remains on tailoring products to the distinct Western preferences above.

Manufacturer’s Perspective: Adapting to Demand

As a professional silicone toy manufacturer, we are closely aligning R&D and production with these evolving trends. Key steps we’re taking include:

  • Material Upgrade: We source only certified medical-grade silicone for our products. All batches are tested to ensure no harmful leachables. This lets us confidently market “body‑safe” and even “surgical‑grade” silicone toys, which consumers are increasingly demanding. We also invest in new silicone compounds with varying durometers (softness levels) and hydrophilic or hydrophobic profiles to meet diverse preferences.

  • Flexible Manufacturing: To offer customization, we’ve added 3D printing and soft tooling capabilities alongside our traditional injection-molding lines. This hybrid approach allows small runs or custom orders at reasonable cost. For example, when a customer requests a unique texture or size, we can quickly prototype it via 3D printing, validate feel and shape, then either produce it on-demand or scale up tooling if it’s a hit. Our engineers use CAD modeling to adjust toys for specific ergonomic needs (e.g. fit to a certain body shape or adding harness-friendly features) before molding.

  • Sustainability Integration: We’ve overhauled our processes to cut waste. Excess silicone is reclaimed and reprocessed where possible. We switched many formulations to platinum catalyzed systems that require no harmful surfactants. In packaging, we’ve phased out plastic inserts in favor of recycled cardboard and plant-based inks. Our newest lines use rechargeable USB batteries exclusively. By 2026 we aim for 100% recyclable packaging and a manufacturer take-back program.

  • Quality & Certification: As noted by industry sources, safety is non-negotiable. We adhere to ISO 10993 biocompatibility testing for implants, even though toys aren’t regulated like medical devices. Many of our products carry CE and FCC marks (for electronics) and our silicone compounds are NSF-51 food-grade certified. We believe emphasizing these credentials – e.g. “as safe as surgical tools” – resonates with customers.

  • Design Collaboration: We continually gather consumer feedback (reviews, social media, clinic recommendations) to refine designs. For example, user reports led us to increase the range of sizes for a popular plug, since one size clearly didn’t fit all. We also partner with sexologists and therapists to develop products for specific needs (pelvic rehab vibrators, post-mastectomy aids, etc.).

By staying agile and consumer-focused, we align our product lines with the wellness-first, high-quality trends that are shaping 2025–2030. In short, we’re evolving from “toy makers” to sexual health innovators, in step with market data and customer demands.

Outlook and Strategy

The sex toy market through 2030 is set to thrive, fueled by technology, changing attitudes, and a pursuit of both pleasure and well-being. From our perspective, silicone will remain king – it ticks the boxes of safety, luxury feel, and technical versatility. The challenge for manufacturers is to blend this reliable material with the new currents of personalization, inclusivity, and sustainability.

Concretely, our strategy includes expanding our silicone lines (introducing new colors and textures), developing an online customization portal for custom orders, and optimizing supply chains for greener materials. We will also amplify marketing around health benefits (stress relief, therapeutic uses) and eco credentials, to capture the informed consumer. As reports emphasize, the stigma is fading and “the market is on the upswing due to technological advancements and a growing emphasis on sexual wellness”. By anticipating these trends – and backing them with rigorous R&D – we aim to lead the silicone sex toy segment into this exciting future.

Custom silicone dildos are no longer a fantasy reserved for big brands. Whether you’re an individual with a very specific idea or a company building a new product line, custom manufacturing lets you bring a unique design to life.

But what actually happens between your first sketch and holding a finished, body-safe silicone toy in your hand?

In this behind-the-scenes look, we’ll walk through how we transform your idea — from drawing or 3D model — into a finished custom silicone dildo.


Step 1: Understanding Your Idea

Every project starts with a conversation. We’ll usually ask you for:

  • A sketch, 3D file, or reference images

  • Target size (length, girth) and proportions

  • Desired firmness (soft, medium, firm, or dual-density)

  • Intended use (for example: G-spot focus, anal-safe, harness-compatible)

  • Any special features (textures, ridges, suction base, logo, etc.)

If you already have a 3D file (like STL/OBJ), great. If you’re starting from a hand drawing or a basic concept, we help you translate that into a manufacturable design.


Step 2: 3D Design & Digital Prototyping

Once we know what you want, our design team turns your idea into a precise 3D model.

This stage includes:

  • Refining proportions so the toy is comfortable, safe, and functional

  • Adding or adjusting curves and angles for the desired stimulation (e.g., G-spot or prostate focus)

  • Making sure there’s a safe base for anal use, if applicable

  • Checking wall thickness, transitions, and geometry for moldability and durability

We’ll typically share renders or previews so you can see the toy from all angles and request changes:

  • “Can we make the head a little smaller?”

  • “I want the base thinner so it fits better in a harness.”

  • “Add a subtle ridge here for extra texture.”

This is the phase where we fine-tune aesthetics and functionality before investing in molds.


Step 3: Prototyping – From Screen to Physical Shape

Next comes prototyping, which is usually done by:

  • 3D printing a master model, or

  • CNC machining a master from a block of material

This physical master represents the final external shape of your dildo. We inspect it for:

  • Smoothness of curves

  • Accuracy of dimensions

  • Ergonomics when held or positioned

  • Real-world appearance and feel

You may receive photos, videos, or even a physical prototype (depending on the project) to approve before we move on. This is your chance to see your idea in real life and request any last shape changes.


Step 4: Mold Making – Creating the “Negative”

Once the master is approved, we create a mold. This is essentially the negative cavity that will later be filled with liquid silicone.

Key considerations in mold design:

  • Parting lines – where the mold opens and closes, which later becomes a faint seam on the toy

  • Vents and gates – channels that allow silicone to flow in and air to escape

  • Demolding – ensuring the shape can be removed from the mold without damage

High-quality molds:

  • Produce consistent, repeatable shapes

  • Reduce defects like bubbles and thin spots

  • Allow efficient production, whether you need a small custom batch or a larger run


Step 5: Mixing & Casting the Silicone

Now it’s time for the star of the show: platinum-cured silicone.

Here’s what happens behind the scenes:

  1. Choosing the silicone grade & firmness

    • Soft, medium, firm, or dual-density options

    • Specific Shore hardness chosen based on your preferences and use case

  2. Coloring the silicone

    • Pigments are carefully measured and mixed to achieve your chosen color(s)

    • We can create solids, gradients, marbling, and sometimes even glow effects

  3. Measuring and mixing components

    • The silicone base and curing agent are weighed and mixed thoroughly

    • We take care to avoid introducing excessive air bubbles during mixing

  4. Degassing (if needed)

    • The mixture can be placed in a vacuum chamber to remove trapped air

    • This step helps ensure a smooth, bubble-free surface and consistent strength

  5. Pouring or injecting into the mold

    • The mold is assembled and prepared

    • The silicone is poured or injected into the mold, filling all the details


Step 6: Curing, Demolding & Trimming

Once the silicone is in the mold, it needs time to cure — to transform from a liquid into a solid, flexible form.

  • Curing times depend on the silicone and process chosen

  • After curing, the mold is opened and the toy is carefully removed

At this stage, we:

  • Trim any excess silicone (flash) along the mold seams

  • Smooth edges and finishing details

  • Inspect the toy for bubbles, deformities, or color irregularities

Only toys that pass inspection move on to the next step.


Step 7: Cleaning, Testing & Quality Control

Before a custom dildo is shipped, it goes through cleaning and quality checks:

  • Washing to remove any remaining processing residue

  • Inspection of surface finish, dimensions, firmness, and color

  • Optional safety or durability tests based on the project (especially for brands)

We verify:

  • The toy matches your approved design

  • The base and structure are safe for their intended use

  • The surface is smooth and free of defects

If you’re a brand, we can also help you develop care instructions and product information for your packaging.


Step 8: Final Touches & Packaging

The last stage is all about presentation:

  • Applying brand logos (if integrated into the design or packaging)

  • Packaging the toy in a way that protects it during shipping

  • Optionally including storage bags, instruction cards, or care guides

For private customers, this might be a simple, discreet package. For brands, it can be a fully customized presentation that reflects your identity.


From Idea to Reality – And Beyond

By the time you hold your custom silicone dildo, it has gone through:

  1. Concept & consultation

  2. 3D design and digital refinement

  3. Physical prototyping

  4. Mold creation

  5. Silicone mixing and casting

  6. Curing, demolding, and finishing

  7. Quality control and cleaning

  8. Packaging and shipping

It’s not just a product — it’s a collaboration between your imagination and our manufacturing expertise.

If you have:

  • A sketch on paper

  • A 3D model you’ve already designed

  • Or just a strong idea of what you want but no drawings yet

we can help you turn that concept into a safe, functional, and beautiful silicone toy.

If you’ve ever had itching, burning, or weird irritation after using a sex toy, you’re not alone — and it’s not “all in your head.”

Many mass-market toys are made from materials that can contain phthalates, dyes, fragrances, and other additives that irritate sensitive skin. The result: discomfort instead of pleasure.

That’s exactly why more people (and professionals) are switching to high-quality silicone. In this article, we’ll explain:

  • Why some toy materials cause reactions

  • What makes silicone different

  • How to spot truly body-safe silicone toys

  • When to talk to a doctor


Why Some Sex Toy Materials Cause Irritation

Not all toy materials are created equal. Some common culprits include:

  • “Jelly” or “rubber” toys – often porous and may contain softeners and additives

  • PVC and some plastics – can include plasticizers and dyes that irritate skin

  • Low-quality blends labeled as “silicone” – sometimes mixed with unknown fillers

These materials can be:

  • Porous – tiny holes allow fluids, bacteria, and residue to soak in

  • Chemically unstable – may break down over time, releasing compounds

  • Lightly scented or colored – added fragrances and certain dyes can be irritating

If you’re prone to skin reactions, have a history of contact dermatitis, or are simply sensitive, these materials can easily trigger:

  • Redness or rash

  • Itching or burning

  • Unusual discharge or irritation after use


What Makes High-Quality Silicone Different?

lsr-silicone-rubber

High-quality liquid silicone

High-quality, platinum-cured silicone used for body-safe toys is:

  • Non-porous – it does not absorb fluids, making it easier to clean thoroughly

  • Chemically stable – it doesn’t rely on phthalates or softening chemicals to stay flexible

  • Latex-free – it’s an alternative for people with latex allergies

  • Widely used in medical and healthcare products like tubing, implants, and baby products

This doesn’t mean no one on earth can ever react to silicone (people can be sensitive to almost anything), but true, pure silicone has a very low rate of reactions compared to many other materials used in adult products.


How to Tell If a Toy Is Really Silicone

Unfortunately, not every toy labeled “silicone” is actually made from high-quality, pure silicone. Here are some signs to look for:

  1. Brand transparency

    • Do they clearly describe the material as “100% silicone” or “platinum-cured silicone”?

    • Do they provide safety information, care instructions, and testing standards?

  2. Smell and feel

    • A strong chemical or “plastic” smell is a red flag.

    • Sticky or oily surfaces can indicate cheap materials or coatings.

  3. Price and packaging

    • Extremely low prices can mean cut corners on material quality.

    • Professional packaging with clear material information is usually a good sign.

Working directly with a specialized silicone manufacturer (like us) means you can get detailed answers about:

  • Material grades

  • Production methods

  • Quality and safety testing


Why Non-Porous Surfaces Matter for Sensitive Users

If you’re allergy-prone or sensitive, cleanliness is huge. Porous toys can trap:

  • Bacteria

  • Yeast

  • Lube and body fluids

  • Soap and cleaning product residues

Over time, that lingering buildup can trigger discomfort or recurring irritation, even if you clean the toy as best as you can.

High-quality silicone is:

  • Non-porous – so you can fully clean the surface

  • Often able to withstand higher-temperature cleaning methods (check the manufacturer’s instructions)

  • Compatible with simple, unscented cleansers and proper toy cleaners

That means fewer surprises for your skin.


Tips for Sensitive or Allergy-Prone Users

If you’ve reacted to toys in the past, try this approach:

  1. Switch to known, body-safe silicone

    • Look for 100% silicone with clear, professional information.

    • Avoid toys labeled only as “jelly,” “rubber,” or “novelty use only.”

  2. Patch test on your skin

    • Clean the toy first.

    • Press it gently against the inside of your forearm for a few minutes.

    • Wait a few hours and see if there’s any reaction.

  3. Use a simple, gentle lube

    • For silicone toys, many people use high-quality water-based lubes.

    • Avoid flavored or heavily scented products if you’re sensitive.

  4. Clean thoroughly and consistently

    • Wash before and after each use according to the instructions.

    • Let the toy dry completely before storing.

    • Store in a clean, dry bag or container away from other materials that could react with it.


When to Talk to a Medical Professional

If you experience:

  • Persistent burning, pain, or swelling

  • Unusual discharge or odor

  • A rash that doesn’t go away

you should stop using all toys and speak with a healthcare professional. Bring information about the materials you used — they may help identify the specific trigger.


The Bottom Line: Why We Rely on Silicone

As a silicone-focused manufacturer, we choose this material because it’s:

  • Safer and more predictable for most users

  • Durable and long-lasting, reducing waste

  • Versatile, allowing many shapes, sizes, and firmness levels

  • Suitable for customization, so users with extra sensitivities can request surface finishes or designs that are even gentler on their bodies

If you’ve been burned (literally or figuratively) by cheap toys in the past, high-quality silicone is one of the best ways to give your body a fresh start.

Picking your first dildo can feel… a little overwhelming. So many shapes, sizes, and materials — and then you see words like “shore hardness” and “dual-density” and think, okay, I just wanted something that feels good.

The good news: once you understand size and firmness, choosing the right silicone dildo gets much easier.

In this guide, we’ll walk through everything you need to know before you buy (or design!) your first one.


Why Silicone Is a Smart Choice for Beginners

Before we talk size and firmness, a quick note on material.

lsr-silicone-rubber

High-quality silicone is:

  • Non-porous – it doesn’t soak up fluids, so it’s easier to clean and more hygienic

  • Body-safe – it’s free of phthalates and other common irritants found in some cheap toys

  • Durable – it holds its shape and texture for years with proper care

  • Versatile – it can be made soft, firm, matte, glossy, smooth, or textured

That means you can focus on getting the right feel instead of worrying about safety.


Step 1: Choosing the Right Size

When we talk about dildo size, we’re usually talking about:

  • Length (often “insertable length”)

  • Girth (circumference around the widest part)

Both matter — but girth usually makes the biggest difference in how a toy feels.

A. Length: How Long Is “Too Long”?

For a first dildo, you don’t need to chase impressive numbers. Your body is unique, but a good beginner range is usually:

  • Insertable length: about 12–16 cm (4.75–6.5 inches)

Longer toys aren’t “wrong,” but they:

  • Take more practice and control

  • Can feel uncomfortable if you push past your natural limits

  • Are simply not necessary for good sensations, especially at the beginning

If you’re unsure, start in the middle of that range. You can always size up later.

B. Girth: The Most Important Measurement

If you only pay attention to one number, make it circumference (girth).

Most people will feel a big difference between, for example, 3.5 cm and 4 cm diameter, even if the length is the same.

For beginners, a comfortable girth range is often:

  • Slim/Beginner: 9–10.5 cm (3.5–4.1 inches) circumference

  • Average: 11–12.5 cm (4.3–4.9 inches) circumference

If you’re used to inserting nothing or only small items (like slim fingers or small plugs), start on the slimmer end. If you’re already comfortable with moderate insertion, average might be perfect.

Tip:
Roll a measuring tape into a loop and test different circumferences around your fingers to visualize how it might feel.


Step 2: Understanding Firmness

Silicone firmness is often measured on a Shore scale (typically Shore A for toys). You don’t need to memorize the exact numbers, but it helps to understand the basic categories:

  • Soft / Plush: squishy, bends easily

  • Medium: flexible but with some “push back”

  • Firm: holds shape strongly, less bend

Some toys are also dual-density – a soft outer layer with a firmer core to mimic body tissue.

Shore hardness

Picking the Right Softness for Silicone Adult Products

How Firmness Changes the Experience

  • Softer silicone

    • Feels gentler and more “forgiving”

    • Great for beginners, sensitive bodies, and deeper thrusting

    • Less intense pressure on sensitive areas

  • Medium silicone

    • A balance between squish and structure

    • Good for thrusting and pressure without feeling too hard

    • Very popular as an “all-rounder” firmness

  • Firm silicone

    • Excellent for targeted pressure (e.g., G-spot, A-spot, prostate)

    • Easier to control and position

    • Can feel intense or too hard for some beginners

For a first dildo, most people do best with soft to medium firmness — especially if you’re still learning what your body likes.


Step 3: Matching Size + Firmness to Your Body & Preferences

Now let’s put it together. Ask yourself:

  1. How experienced am I with insertion?

    • Totally new → slim girth, medium or softer

    • Some experience → average girth, medium

    • Very experienced and likes fullness → you might enjoy a thicker toy, but consider starting with a medium firmness first.

  2. Do I want gentle comfort or strong pressure?

    • Gentle, relaxing, or longer sessions → softer, slightly slimmer toy

    • Strong, focused pressure on specific spots → medium to firm toy, not too long

  3. Am I mainly interested in thrusting or more static pressure?

    • Thrusting → a bit of flexibility is good; choose soft to medium

    • Static pressure or grinding → medium to firm can work better


Step 4: Other Design Details That Matter

Size and firmness are key, but a few extra design features will also shape your experience:

  • Shape: Straight for versatility, curves for G-spot/prostate focus

  • Base: A wider base adds safety for anal play and can be harness-compatible

  • Surface: Smooth silicone is beginner-friendly; ridges and textures are better once you know what you like

  • Weight: Heavier toys can feel more “present”; lighter toys are easier to maneuver

If you’re working with a manufacturer (like us) who offers customization, you can fine-tune all of these to suit your body and preferences.


Step 5: Start Smaller, Upgrade Later

Your first silicone dildo doesn’t have to be your forever dildo. Think of it as a starting point:

  1. Begin with a comfortable, confidence-boosting size and medium or soft firmness

  2. Learn what your body likes – more girth, less length, more curve, more firmness, etc.

  3. Use that experience to choose or design your next toy (maybe a custom one!)

Your comfort matters more than the numbers on a product page. If you choose something that feels good for you, you picked the right size.

Silicone slow-feeding bowls and mats are increasingly popular in the pet market because they are durable, flexible, and made from food-grade, pet-safe silicone. We use 100% premium food-grade silicone that meets FDA/EU standards, so the base material is inherently non-toxic and safe for pets. Brands often want to add their logo or artwork to these feeders to build recognition and a premium feel. There are three main approaches: molded logos (embossing/debossing in the tooling), printed logos (pad-printing, silkscreen, or heat-transfer), and laser-etched logos. Each has distinct trade-offs in durability, appearance, cost, and production process, so it’s important to choose the right method for your product goals.

Molded Logos (Embossed/Debossed)

With molded logos, the artwork is engraved into the injection mold so that every part comes out with a raised (embossed) or recessed (debossed) logo in the silicone itself. This method makes the logo part of the plastic, so it is extremely durable and will never peel or wear off. No inks or coatings are used, so it is inherently safe for food contact. Appearance-wise, a molded logo is subtle and single-color (the same as the silicone), giving a clean, low-profile “premium” look.

  • Durability: Since the logo is part of the silicone, it is permanent and cannot fade or chip. Embossed/debossed marks resist abrasion and washing, even if a pet chews or scratches the feeder.

  • Cost & Production: The trade-off is tooling. CNC-engraving a custom logo into a metal mold adds to the initial setup cost. Mold fabrication is a large portion of project expense, so this method is most cost-effective for medium-to-high volumes (the mold cost is amortized over many units). Once the mold is made, producing additional units incurs no extra marking cost – each feeder is automatically “branded” in one step.

  • Appearance: Because there’s no ink, the logo is the same color as the bowl (single-tone). This creates a subtle, sophisticated look. Fine text or very intricate detail can be challenging with molding – very small logos may not stand out as much. (For raised detail, the mold must be carefully designed to avoid thin features.)

  • Use Case: Best for high-quality feeders where longevity is key. Ideal for premium or OEM products with large runs, or when a minimalist style is desired. For example, a luxury pet feeder might use an engraved logo on the underside or rim, since it’s enduring and food-safe.

Printed Logos (Pad, Screen, or Heat-Transfer)

Printed logos involve applying ink or printed film onto the cured silicone surface. Common methods include pad printing (silicone pad transfers ink), screen (silkscreen) printing, and heat-transfer. These allow vibrant, multi-color designs and are often used for promotional feeders. We ensure all inks and films are formulated for silicone and tested for food-contact safety.

  • Appearance: Printed graphics can be bold and colorful. Screen printing is good for large, flat areas and high volumes (vibrant solid colors). Pad printing conforms to curved or bumpy surfaces (e.g. inside a patterned slow-feeder). Heat-transfer (sublimation) lets you reproduce complex, multi-color images or gradients. This flexibility is great for detailed logos, mascots, or text in brand colors.

  • Durability: High-quality silicone inks can be very durable, but printed coatings are not as permanent as molded or etched marks. Over time and heavy use, screen/pad prints can eventually fade, chip, or wear. (Silicone feeding bowls are often washed, so it’s important to use proven ink systems.) In practice, well-done prints last a long time, but they generally rate lower on longevity than engraved marks.

  • Food Safety: Printed logos involve adding pigments/coatings, so you must use FDA/ISO-certified inks for food contact. Good silicone-print inks are formulated to flex with the material without cracking.

  • Cost & Production: Printing doesn’t require new molds, so it has low tooling cost for a given silicone part. Instead, there are setup costs for screens or pad plates. This makes printing very economical for short to medium runs, or for applying multiple different logos on the same feeder design. It’s also faster to change artwork (no mold change needed).

  • Use Case: Printing is popular when you want a colored, eye-catching logo. It’s ideal for mid-volume custom feeders or giveaways (e.g. dog bowls with a shelter’s logo). For a slow feeder with a mostly black bowl, we might pad-print a company name in white or full color on a flat rim area. Just note that prints may dull slightly over years of use.

Laser-Etched Logos

Laser marking uses a focused laser beam to etch the logo into the silicone surface. This effectively burns or vaporizes the top layer, revealing the underlying color (e.g. white silicone underneath a colored coating). Laser etching produces extremely fine detail and is very durable (the mark is truly part of the material).

  • Durability: Laser-etched marks are permanent and wear-resistant. According to industry sources, laser etching yields “clean, sharp, and durable markings” that remain “resistant to wear, abrasion, and harsh environments”. In our experience, a laser logo won’t peel or fade at all – it simply changes the material color.

  • Appearance: Laser logos are usually monochrome (just the base silicone color vs. the topcoat). They have a crisp, mechanical look and can reproduce tiny fonts or fine graphics with high precision. However, they lack color. (Laser is great for a precise serial number or very fine line art, but not for bold multi-color logos.)

  • Cost & Production: The initial investment is in laser machinery rather than in new molds. There’s no tooling cost per logo, but each batch of feeders must be run through the laser machine as a secondary process. This adds time but no materials. Laser marking is best suited to medium or smaller runs where durability or detail are paramount. Note: often the silicone part must have a top-color coating for contrast (common in keypad manufacturing), so truly colorless silicone may not show much contrast unless specially prepared.

  • Use Case: Laser etching is ideal if ultra-fine detail or maximum durability is required. For example, a high-end pet brand might laser-etch its logo or pet-proof serial number on the bottom of a bowl. It’s also used when nothing can be allowed to flake off. Because of the cost, we typically reserve laser marking for specialized designs or when a printer/paint won’t hold up.

Choosing the Right Method

Each technique suits different priorities. Here are some key factors to consider:

  • Durability: Molded (embossed/debossed) and laser-etched logos are the most durable. They become part of the silicone and are rated 5★ on durability, whereas printed logos are rated lower (around 3★). If the feeder will see heavy use or biting, a molded or laser mark is safest.

  • Color & Detail: Printed methods support full color and complex artwork. If your logo has multiple colors, gradients, or photo-like graphics, printing (especially heat-transfer) is the way to go. Embossed logos can only use the material’s color, and laser etching typically yields a single contrast color. For very fine text or tiny symbols, laser can achieve thinner lines than most printing or molding.

  • Production Volume: Molded logos require custom tooling, so they pay off at higher volumes. As Newtop notes, a $10,000 mold cost spread over 100 units means $100 extra per unit, but spread over 1,000 units it’s only $10 each. For small batches or one-off runs, printing or laser can avoid the high upfront mold cost. Printing setups (screens/pads) have lower initial fees, and laser needs no per-design tooling at all.

  • Aesthetics and Branding: Think about your brand image. A subtle, integrated logo (e.g. tone-on-tone embossing) can look very sophisticated, whereas a bold printed logo makes an immediate visual impact. Laser marks have a technical, engraved aesthetic. Choose the look that matches your brand identity.

Recommendations at a Glance

To summarize our guidance for pet-product brands and designers:

  • Small Runs or Multi-Color Logos: Screen/pad/heat printing is often best. It allows full-color, multi-logo runs at relatively low cost, with no new mold needed. Use silicone-safe inks. Keep in mind prints will wear eventually, so reserve this for seasonal promos or mid-range products.

  • Large Runs & Premium Branding: Molded logos shine here. Emboss or deboss the logo in the tooling for maximum durability and a high-end feel. The upfront mold engraving cost is offset by lower per-unit cost and lifetime durability on big orders. This is the method we recommend for flagship feeder products with established brands.

  • High-Detail or Industrial Looks: Laser etching is a niche choice but ideal if you need fine detail or absolute permanence. It’s “excellent” for durability and can capture tiny text or logos. Use laser if you’re making small lots of elite products or if the design absolutely must never fade/peel.

  • Food Safety & Comfort: Regardless of method, always ensure any inks or coatings are FDA/EU-approved for food-contact. All silicone we use is already food-grade and odor-free. Also, consider the pet’s experience: raised molded logos might even add a non-slip texture under the bowl, whereas printed/laser marks won’t affect function.

In conclusion, there is no one “best” choice for every scenario – each approach has a sweet spot. Use this framework to guide your decision: molded logos are best for durability and premium look (especially on large production runs); printed logos are best for color flexibility and small-to-medium orders; and laser-etched logos excel when you need ultimate permanence and fine detail. By matching the method to your brand’s aesthetic goals, budget, and run size, you can create custom silicone pet feeders that both look great and stand up to everyday use.

The pet toy market is booming, and many brands – from e-commerce startups to pet store chains – are exploring custom silicone pet toys as a way to stand out. In fact, the global pet toy market was valued around $8.3 billion in 2022 and is projected to reach $18.4 billion by 2032, reflecting strong demand. A key driver of this growth is the rise of private-label and specialty pet products; pet brands increasingly want their own uniquely designed toys under their label. Silicone has emerged as an ideal material for these toys due to its safety and durability. Silicone toys are non-toxic (free from harmful chemicals like BPA or phthalates) and extremely durable, so they won’t crack or crumble even under rough play. From the perspective of a silicone manufacturing factory, we’ve helped many brands bring their custom toy ideas to life. In this step-by-step guide, we’ll walk you through the entire process – from initial concept and design all the way to production, packaging, and logistics. Whether you’re a pet brand manager or a first-time product developer, this roadmap will help you understand how to create a custom silicone pet toy efficiently and successfully.

Step 1: Concept and Market Research

Every great product starts with a clear concept. Begin by defining the core idea for your pet toy and researching the market landscape around it:

  • Identify the Target Pet & Use-Case: Are you designing for dogs or cats (or another pet)? Consider the pet’s size, breed, and play style. For example, a toy for a teething puppy will differ from one for an aggressive adult chewer. Likewise, cat toys (perhaps teaser toys or treat-dispensing mats) will have different features than dog chew toys. Defining the target user (the pet) will guide many design decisions later (size, hardness, features).

  • Spot Market Gaps and Needs: Look at existing pet toys in your category. What’s popular, and what’s missing? Perhaps you notice a trend in interactive puzzle toys or a demand for eco-friendly materials. Align your concept with a genuine need or trend – maybe a silicone slow-feeder mat for dogs that gulp food, or a chew toy with a unique shape that hasn’t been seen before. Research competitors and read customer reviews to learn what pet owners like or dislike about current products.

  • Ensure Safety by Design: At the concept stage, start thinking about safety. There are virtually no specific regulations for pet toys in many countries (unlike children’s toys), meaning manufacturers can technically sell toys without standardized testing. Responsible brands should fill this gap by self-imposing high safety standards. This means envisioning a toy that has no small parts that could break off and choke a pet, no sharp edges, and uses only pet-safe materials. If your toy will be a chew toy, plan for it to be virtually indestructible under normal use – words like “indestructible” have no legal definition, so it’s up to you to design for durability and back up that claim.

  • Concept Creativity and Brand Fit: Brainstorm what will make your toy unique. Will it have a fun shape (e.g. shaped like a bone, a animal, or even your brand’s mascot)? Will it serve a special function (for example, double as a treat dispenser or dental cleaner)? Ensure the concept also fits your brand identity. If your brand emphasizes wellness, perhaps a toy that also cleans teeth or slows eating fits well. If your brand is playful, a whimsical shape or bright color might be on point.

  • Initial Feasibility Check: It’s wise to do a quick reality check on your concept’s feasibility. Consult with a silicone manufacturer early – you can share rough ideas and ask if there are any obvious manufacturing red flags. At this stage, you don’t need final designs, just confirmation that your idea is doable within budget. Also consider any intellectual property aspects: if your toy mechanism is very novel, you might explore patent searches or filing. And if you have a unique brand name or logo, ensure those are trademarked or in process.

By the end of the concept and research phase, you should have a clear vision of the toy you want to create, an understanding of where it will sit in the market, and confidence that it’s both needed and feasible. This will set a strong foundation for the design phase.

Step 2: Design and Specifications

With a solid concept in hand, the next step is to translate that idea into a tangible design. This is where you determine exactly how the toy will look, feel, and function. Working closely with a product designer or your chosen manufacturer’s engineering team is key in this phase. Here’s what to cover in design:
  • Sketches to 3D Models: Start by sketching the toy’s shape and features. Even a rough hand-drawn sketch helps communicate your vision. Then, move into creating a 3D design (CAD model) of the toy. At our silicone factory, for example, we often take a client’s sketches or ideas and develop a detailed 3D CAD model. This model will include precise dimensions, and it becomes the blueprint for the mold. During this process, every detail is considered – the overall size, thickness of parts, angles, and surface textures. Designers will also analyze how the toy will be used (chewed, licked, thrown, etc.) to make sure the shape is suitable.

  • Integrate Functional Features: If your toy has functional elements, incorporate them now. For instance, if it’s a chew toy that should also clean teeth, you might add textured nubs or ridges along the surface for a dental massage effect. If it’s a treat-dispensing puzzle toy, design cavities or maze-like channels for the treats. If it’s a slow feeder mat, include the raised patterns that slow down eating. Each feature (suction cups, handles, holes for squeakers, etc.) should be intentional and designed into the 3D model from the start. Our engineers often ask questions like: Does this hole need a reinforced ring so it doesn’t tear? Do we need to make this section thicker to withstand biting? – those considerations ensure the toy will function as intended in the real world.

  • Safety and Pet-Friendly Design: Make design choices that enhance safety. For example, ensure any protrusions are rounded and not too pointy. If the toy is ball-shaped or could potentially get stuck in a pet’s throat, add ventilation holes (some ball toys have holes to prevent suction and allow breathing if stuck). If it’s meant for chewing, the toy should be large enough that it isn’t a swallowing hazard for the target pet. Also plan the toy in one solid piece if possible; avoid small attached parts. Silicone is very flexible in terms of design – it allows complex shapes with no seams. Use that to your advantage to create a one-piece toy that won’t break apart.

  • Branding and Logo Integration: One big benefit of custom manufacturing is that you can embed your brand into the product. Decide how you want your logo or branding to appear. Common approaches include embossing or debossing the logo directly in the mold so it appears raised or sunken on the toy’s surface. This is permanent and cost-effective for branding. Another option is pad printing the logo with safe ink, which allows color detail (though printed logos may wear over time, and for items pets chew, we usually prefer molding the logo in). Silicone manufacturers can typically achieve surprisingly fine detail in molds (even small text or intricate logos can be molded). For example, we have made toys with company names, website URLs, or fun sayings molded on the side. Consider placement – you might want the logo subtle (e.g. on the bottom of a bowl or the side of a toy) or more visible. Communicate these preferences so the design team can incorporate the logo into the 3D model.

  • Color Customization: Decide on colors early, since it can affect material selection. One huge advantage of silicone is you can get almost any color or even multiple colors. Provide Pantone codes or samples of your brand colors; manufacturers can mix pigments to match precise color shades in the silicone. You could do a single solid color or even a two-tone toy (some advanced techniques allow co-molding two colors, or painting details after molding). Keep in mind, each color might require an extra manufacturing step or even a separate mold in multi-shot molding, so weigh the aesthetic benefit against complexity. But generally, adding color is straightforward – food-grade color masterbatches (concentrated pigments) are blended into the raw silicone, producing a vibrant, stable color that won’t rub off. This means you can have a toy in your signature brand blue or a set of toys each in different colors.

  • Selecting the Right Hardness: An important specification for silicone toys is the material hardness, measured in Shore A durometer. This determines how soft or firm the toy will be. In design, you should specify the desired feel. For instance, a toy for teething puppies might be fairly soft and flexible (e.g. Shore A ~30) so it’s gentle on young teeth, whereas a toy for large aggressive chewers might need a firmer, tougher feel (Shore A ~50 or higher) to withstand bite force. Even bowls and mats have optimal hardness – a silicone food bowl might be medium firmness (too soft and it won’t hold shape; too hard and it loses the nice flexible feel). Your manufacturer can guide you: we often discuss the target pet’s size and chewing strength to pick the proper silicone formulation. The good news is that by adjusting the silicone mix, the factory can tailor the hardness without changing the design – so include your hardness preference in the specs.

  • Design for Manufacturing: Throughout the design phase, keep the manufacturing process in mind (this is where a manufacturer’s input is invaluable). Mold design constraints, parting lines, draft angles (small tapers that help remove the part from the mold), and avoidance of undercuts (features that would trap in a mold) are technical details that the engineers will handle. They might suggest slight tweaks to the geometry to ensure the toy can be molded flawlessly. For example, if you want a hollow center in a toy, that will require a complex mold piece – the factory might advise a certain diameter or adding a small vent hole to aid molding. Be open to these recommendations; they ensure your beautiful design can actually be produced consistently and cost-effectively.

By the end of this stage, you should have finalized design files (CAD models or drawings) and a detailed specification sheet for your toy. It will detail dimensions, weight, material (silicone type and hardness), color, surface finish (matte or glossy), and branding elements. This is the “blueprint” that the manufacturer will use to create prototypes and eventually the production mold.

Step 3: Prototyping and Iteration

Before you jump into mass production, it’s crucial to prototype your custom toy and test it. Prototyping turns your digital design into a physical object, so you and your team can validate that the toy meets your expectations for look and function. Here’s how the prototyping phase typically works:

  • 3D Printed Prototypes: One fast and cost-effective way to prototype is using 3D printing. With a 3D printer, you can create a plastic model of your toy design within days, without any mold. This is especially useful to get an initial feel of the size and ergonomics. For instance, you can 3D print a chew toy concept to see how large it feels in hand or how the textures look. Many companies utilize 3D printing early because it’s lower cost and quicker turnaround than making a mold. However, note that a plastic 3D print won’t behave like silicone (it will be rigid), so while it’s great for examining shape and dimensions, it won’t tell you much about the softness or chewability.

  • Silicone Prototype Samples: To truly test the toy in its real material, manufacturers often create a small batch of silicone prototypes. There are a couple ways to do this. One common approach we use is making a simplified or single-cavity test mold, often from aluminum (cheaper and faster to machine than full steel production molds). We then hand-mix and pour silicone into this mold to create a few sample toys. This process can replicate the final product closely, including the exact silicone grade and hardness, and any embedded logo or texture from the mold. Another method is casting silicone in a 3D-printed mold or using vacuum casting techniques. The goal is to get, say, 1–5 prototype units that are as close to the real thing as possible.

  • Review and Feedback: Once you have prototype samples in hand, examine them carefully and test them. Check the dimensions and aesthetics: Does the logo appear clearly? Is the color the shade you expected? How is the surface finish? Then, consider functionality: If it’s a chew toy, you might actually give it to a few friendly test dogs (under supervision) to see how they like it and whether it shows any signs of damage. If it’s a slow feeder mat, try it out with a pet’s meal to see if it effectively slows eating and then see how easy it is to clean. Gather feedback from colleagues or potential users. Often, this testing reveals minor improvements needed – maybe the toy could be slightly larger for giant breed dogs, or perhaps the edges of a groove need rounding to make cleaning easier.

  • Iterate on the Design: It’s common to go through one or two rounds of prototyping to get everything perfect. Based on the feedback, you will make adjustments. For example, after testing you might decide to thicken a certain area that bent too much, or maybe add more texture if the toy was slipperier than expected when covered in dog drool. These changes are applied to the 3D design, and then a new prototype is made to validate them. While it can feel like a time delay, this iteration cycle is extremely valuable – catching and fixing issues at the prototype stage will save a lot of cost and hassle later. It is far cheaper and easier to tweak a prototype mold or reprint a 3D model than to discover a flaw after you’ve made a full production mold or mass-produced inventory.

  • Approvals: Once you and your team are satisfied with the prototype, formally approve the design for production. At our factory, we usually have clients sign off on the final prototype or pre-production sample. This ensures everyone is on the same page that “this is the product” moving forward. It’s essentially locking the design before heavy investment in tooling.

By the end of prototyping, you should have high confidence that the toy design works as intended, looks great, and is ready to go into manufacturing. You’ll also have a physical reference (the approved prototype) that the production units should match.

Step 4: Material Selection and Safety Standards

Parallel to design and prototyping, you (with guidance from your manufacturer) will be finalizing the silicone material selection. Not all silicone is identical – there are variations in grade, hardness, and additives – so choosing the right formulation is critical. As a silicone factory, we cannot overemphasize the importance of this step for ensuring product safety and performance:

  • Use Food-Grade Silicone: For pet toys, always insist on food-grade silicone rubber as your base material. This is the same type of silicone used in baby bottle nipples or kitchen bakeware, which means it’s proven safe for chewing and contact with food. Food-grade silicone is non-toxic and FDA-compliant for food safety standards, meaning if a pet licks or bites the toy, there’s no risk of harmful chemicals leaching. We use platinum-cured food-grade silicone for all pet products, and it comes with certifications (FDA in the US, and often LFGB in Europe/Germany) to verify its safety. Using this high-grade material is a must – it will allow you to confidently market the toy as BPA-free, phthalate-free, and safe for pets. Don’t cut corners with cheaper industrial silicone; it might contain fillers or residues that you wouldn’t want in a pet’s mouth.

  • Select Hardness and Elasticity: As mentioned in the design section, silicone can be formulated to different hardness levels. Work with your manufacturer to pick the right Shore A durometer for your toy. They might provide you with sample swatches of silicone at different hardnesses to squeeze and compare. For example, you might end up choosing a medium-soft 40A for a chew toy that needs some give, or a firmer 60A for a feeding mat that should stay flat. This hardness is achieved by the specific polymer mix and curing process. By choosing and testing the silicone compound upfront, you set the foundation for the toy’s feel and durability.

  • Color and Additives: If your toy is a specific color, the material stage is when colorants are added. Ensure that any pigments or color masterbatch used are also certified non-toxic and stable. Good manufacturers will use food-grade colorants that won’t bleed color or fade over time. If you want an unusual effect (glow-in-the-dark, for instance), discuss what additives are possible and safe. Another consideration: some brands ask about adding scent or flavor to chew toys. There are food-grade flavor additives that can be mixed into silicone (for example, a light beef or peanut butter scent). If you think a scent would enhance the toy’s appeal, ask your manufacturer – but also consider longevity (scents can fade) and ensure any additive is pet-safe. In many cases, keeping the material pure and simple is best.

  • Safety Compliance: Even though pet toys are not heavily regulated, you should align your materials with established safety standards. Using FDA-approved silicone covers the U.S. market; for the EU, compliance with EC 1935/2004 and LFGB (for Germany) is key. If you plan to sell in Europe, request an LFGB test report for your product – this involves lab testing a sample to ensure no harmful chemicals migrate from the silicone. Many large retailers or distributors will ask for these certificates. Additionally, you might voluntarily ensure compliance with EN71 (European toy safety standard) for chemical content, even if it’s not required, just to demonstrate your product meets stringent safety levels. The material you choose should allow you to meet all these standards. Luckily, food-grade silicone usually passes such tests easily since it’s designed for safety.

  • Durability and Quality of Material: Not all silicone factories source material from the same suppliers. High-quality silicone will have properties like high tear strength and no strong odors. We source medical or food grade silicone that, when cured, is odorless and has excellent tear resistance and heat resistance. This ensures the toy won’t give off any funny smell (cheap silicone sometimes smells like vinegar if cured with certain agents – avoid that!). Also, quality silicone means the toy won’t degrade or become brittle over time. During material selection, you might ask if the silicone is UV resistant (important if toys will be used outdoors) and generally long-lasting. Silicone naturally has great properties – it remains stable from roughly -50°C to +250°C, meaning your toy could go from freezer to dishwasher without issues. It also doesn’t support microbial growth easily, which is great for pet hygiene. Confirm with your manufacturer that the chosen silicone formulation optimizes these benefits.

  • Documenting the Specs: Once you’ve agreed on the silicone grade, color, and hardness, these details should be documented. For instance, the factory might note: Material: Platinum-cure silicone (FDA 21 CFR 177.2600 compliant), Shore A 50, color matched to Pantone XYZ. They may also keep a batch of the mixed material to use for reference in testing. As a client, you can ask for material certification documents. It’s good to have copies of things like the FDA compliance letter or test results for your records – and you might use them in marketing (e.g. stating “made with FDA-approved silicone” or “LFGB certified silicone” on your packaging can be a selling point).

By carefully selecting the right silicone material and additives at this stage, you ensure that when production begins, every toy will be made from a safe, high-quality compound. This gives peace of mind to you as the brand owner and to your customers who trust that the toy is okay for their beloved pet. It’s much better to sort out all material questions now than to face issues later (like failing a lab test or having to explain why a toy smells or falls apart). With material and design finalized, you’re ready for tooling and production.

Step 5: Mold Making and Tooling

Silicone prototype mold designWith a final design and chosen material, the focus shifts to tooling – creating the mold that will be used to mass-produce your silicone toy. Mold making is one of the most significant steps in terms of both time and investment, so it’s handled very carefully. Here’s what to expect:

  • Mold Design Preparation: Using the 3D CAD model of your toy, the manufacturer’s engineers will design the mold (sometimes called the “tool”). This includes determining how many cavities the mold will have (i.e. how many toy pieces it can form in one cycle), where the parting line will go (the line on the toy where mold pieces meet), and where injection gates or vents need to be. For a relatively small pet toy, a mold might have multiple cavities to increase production efficiency – for example, a mold could be made to produce 2, 4, or 8 toys at once, depending on machine size and your volume needs. In initial tooling discussions, you’ll also clarify the manufacturing method: injection molding vs. compression molding. As noted earlier, injection molding is ideal for complex designs and large volumes – it uses liquid silicone injected under pressure into the mold, capturing fine details and yielding very consistent parts. Compression molding is simpler – a chunk of solid silicone is placed into the mold which is then pressed closed to form the part – this method can be very cost-effective for smaller runs or simpler shapes. We advise on this choice during mold planning: for instance, if your toy has intricate hollow sections or needs high precision and you plan to make tens of thousands of units, an injection mold is worth the higher cost. If the toy is a straightforward solid shape or your initial production is relatively small (a few hundred or a couple thousand units), a compression mold might suffice and will typically have a lower tooling cost. In either case, the mold will usually be made of metal (often steel for long production life, or aluminum for quicker/cheaper tooling when volume is lower).

  • Tooling Cost and Lead Time: It’s important to budget for and understand the tooling process. Mold fabrication usually takes several weeks. On average, a complex production mold might take around 4–6 weeks to build. Simpler molds or single-cavity prototype molds can be quicker (perhaps 2–3 weeks). The cost varies widely based on complexity and number of cavities, but it often runs in the thousands of dollars (for example, a mold for a relatively simple silicone toy could be, hypothetically, $3,000–$8,000; more complex multi-cavity molds can be more). The manufacturer will quote this upfront. While this cost can feel high for first-timers, remember it’s a one-time investment – once the mold is made, you can typically use it to produce tens or hundreds of thousands of units over its life. High-quality steel molds can last a very long time, especially with silicone (which is molded at relatively low pressure compared to plastics). It’s often helpful to amortize the mold cost over your anticipated production volume to see its impact per unit.

  • Mold Ownership and Maintenance: Discuss and clarify the ownership of the mold. In most cases, since you (the client) are paying for the custom mold, it should belong to you once paid for. This means if you ever needed to switch factories, you could take the mold with you. Reputable manufacturers will be clear about this. Some might offer to store and maintain the mold for you (which is convenient), but ensure there’s an agreement that you can retrieve it if needed. Also, ask about mold maintenance – after how many shots (uses) might it need servicing, and will the factory cover that or charge? Most molds can produce many thousands of parts before needing any touch-up, but it’s good to know. At our factory, we periodically clean and inspect customer molds to keep them in top shape.

  • CNC Machining and Mold Fabrication: The process of mold-making itself is fascinating. The factory’s toolmakers will use your CAD design to cut the mold cavities out of metal, often using CNC machines that precisely mill the shape. For fine details like tiny text or very sharp corners, they might use EDM (electrical discharge machining) to spark-erode those details. If your design was reviewed in-depth earlier, there should be no surprises – the mold will be an exact inverse of your toy. Modern CNC and machining can capture extremely fine textures (even simulating animal fur texture, etc., if it were needed!). If you requested multiple cavities or multi-part molds, those are machined and then assembled to fit together perfectly.

  • Test and Sample from Mold: Once the mold is finished, the manufacturer will usually do a trial run with it. They’ll mold a few samples using the real production process (injection or compression) to see if everything fits and fills correctly. They’ll check for any molding defects like air bubbles, incomplete filling, or too much flash (flash is the thin excess silicone that can seep between mold halves – a small amount is normal and trimmed off, but large flash could indicate a poor fit or not enough clamping force). If any issues are found, the mold may need slight adjustments or tuning. For instance, if the pieces aren’t filling fully, they might enlarge a gate or adjust the venting. It’s common to send one of these initial mold samples to you for approval before mass production. This is often called the T1 sample (from the first trial). Examine this carefully – it should essentially match the prototype you approved, but now it’s made using the final mold and production process. Confirm things like the surface texture (production molds can impart a different finish than a prototype did) and any minor differences. If the T1 sample is good, you’ll give the go-ahead for production. If there’s an issue, you can request the mold be tuned or even a T2 sample after fixes.

  • Optimizing for Efficiency: A good manufacturer will also use the mold design stage to optimize for production efficiency and quality. For example, they’ll plan the mold layout to minimize waste and make de-molding easy. They might add features to the mold like ejector pins (to push the part out cleanly) and ensure the orientation prevents any undercuts that would tear the silicone. If you require multiple products or sizes, sometimes molds can be combined or made interchangeable – you could discuss if future product variations can use similar mold bases to save cost. At this stage, also confirm the expected cycle time (how long each molding cycle takes) and thus how many units per hour can be produced – this will influence your lead time for orders and is useful info for planning.

Mold making is arguably the most technical step in creating your custom toy, but as a brand owner, your main roles are to approve the investment, provide prompt feedback on samples, and ensure you have clear agreements about tool ownership and outcome. Once the production mold is perfected, you are ready for the exciting part – mass production of your toy!

Step 6: Testing and Quality Assurance

Even after the mold is ready, the work isn’t done – testing and quality assurance (QA) are critical to ensure that the final product meets all safety and quality expectations. This stage often overlaps a bit with the first units coming off the production line (or the final prototype runs), but it’s worth highlighting separately.

  • Initial Production Testing: When the first batch of toys is molded (often the pilot run or first articles from the production mold), thorough testing should be conducted. Physically inspect and test the toy’s durability. For example, we perform a series of in-house tests: stretching, bending, and even mechanically tugging or chewing on the toy to simulate pet use. If your toy is meant for chewing, try twisting it and see if any part starts to tear. If it’s a feeder or mat, check that it doesn’t crack or permanently deform when bent. This is also when any functional testing happens: if your toy has a suction cup, test it on smooth surfaces for suction strength; if it’s a treat dispenser, actually put treats in and see that they dispense as intended. The goal is to catch any performance issues now. For instance, during QA if we find a particular thin section that consistently tears under stress, we would halt and suggest a design tweak (if minor and possible without new tooling) or at least inform you of the limitation. It’s much better to address such issues before a full production run goes out.

  • Dimensional and Visual Inspection: Quality inspectors at the factory will measure the toy against the specifications. They might use calipers to check critical dimensions (like the diameter of a ball or the thickness of a wall) to ensure they match the CAD design within tolerance. They will also compare the product to the approved sample to ensure consistency. Visual inspection is important too: the color should be correct and uniform (no weird streaks), the surfaces should be smooth (aside from intended textures), and any logos or text should be clearly formed. We also ensure there are no sharp edges or excessive flash that could harm a pet – any flash from molding is trimmed off cleanly. If your toy has a part like a squeaker to be inserted, QA will check that the fit is correct and that the squeaker works.

  • Small Parts and Choking Hazard Check: Even though pet toys don’t have strict regulations, it’s wise to treat them with similar care as children’s toys in this regard. QA should confirm that no small pieces can break or come loose from the toy. For example, if your toy has a built-in rope or a cloth tag (some toys combine materials), make sure those are secured well. If any part of the toy could potentially be bitten off, that’s a red flag – either redesign or include warnings for use (e.g. only for supervised play). Many brands choose to voluntarily adhere to standards like ASTM F963 or EN71 (toy safety standards) for things like small parts, even if not legally required, to ensure an extra margin of safety. During QA, doing a stress test to see if anything breaks off is essential.

  • Chemical and Safety Testing: Since you carefully chose your silicone material to be food-grade, it should pass chemical safety tests – but some brands will do a confirmatory lab test on the final product. You may opt for third-party lab testing (e.g. through SGS, Intertek, or similar) to certify that the product is indeed free of lead, phthalates, etc., and meets relevant standards. For example, if you plan to sell in Europe, you might get a lab to do an LFGB compliance test on a sample from the production run, which will check that no harmful chemicals migrate when the toy is in contact with simulant liquids. If you want to label the product as “FDA compliant,” you might have the lab do a test to ensure it meets FDA 21 CFR 177.2600 (which basically it should if the ingredients are proper). These tests can be a part of QA. Manufacturers often can assist in arranging them and obtaining the certificates. It’s a cost (each test might cost a few hundred dollars), but for peace of mind and marketing claims, it’s often worth it.

  • Quality Control in Mass Production: As production moves forward (see next step), QA is an ongoing process. A robust quality control (QC) system means the factory will pull samples from the production line at regular intervals to inspect. For instance, every batch of maybe 100 toys, a few are inspected fully. They might also do continuous visual checks as each piece is demolded. We maintain inspection logs and can share a QC report with clients for transparency. The report might include things like hardness measurements of random samples, color verification, and confirmation that the quantity produced matches the order with acceptable defect rates. If any defects are found (e.g. an air bubble inside one toy, or a piece where the logo didn’t form well), those units are rejected and not shipped. The criteria for rejection should be discussed – for example, perhaps slight color marbling might be acceptable for an inner part of a toy, but a missing logo emboss would not be. By setting these QA standards, you ensure that every toy a customer receives is safe, functional, and high-quality, protecting both pets and your brand’s reputation.

In summary, the testing and QA phase is about not leaving anything to chance. It transforms the manufacturing process from just making items into making items that consistently meet a defined standard. For first-time product makers, it’s reassuring to know that your manufacturer is conducting these checks. Don’t hesitate to ask for test results or even videos of testing. A proactive approach to QA means that by the time your product is boxed and ready to ship, you can be confident that it delivers on its promises (safety, durability, etc.). Now, with design proven and quality assured, it’s time to actually produce your toys at full scale.

Step 7: Production and Manufacturing

Now we arrive at the exciting part – mass production of your custom silicone pet toy. This is where all the prep work (design, prototyping, tooling, testing) comes together, and your idea truly comes to life in quantity. From a manufacturing perspective, our goal is to produce your toys efficiently, on time, and with consistent quality. Here’s what happens during the production phase:

  • Scaling Up from Prototype to Mass Production: Before full production, there is often a pre-production run or sample made with the final mold and final process settings. You might receive a last “approval sample” (sometimes called the golden sample) that represents exactly what the mass-produced item will be. Assuming you’ve signed off on that, the factory will schedule the mass production. In an OEM silicone factory like ours, we typically schedule a specific machine and allocate materials for your order. For example, if you ordered 5,000 units, we plan how many cycles and how much material that will require.

  • Molding Process Execution: Depending on the chosen method (injection or compression), the production workflow will follow suit. In injection molding, operators (or automated systems) will mix the two-part liquid silicone mixture (A & B components, one of which has a curing agent) and feed it into the injection machine. The machine injects the silicone into the heated mold cavities with precise timing and pressure. The silicone cures in a matter of seconds to a couple minutes (curing time depends on factors like part size and material). Then the mold opens, and the parts are ejected, either by ejector pins or manually taken out. In compression molding, operators pre-form measured “blanks” of solid silicone and place one in each cavity of the open mold, then close the press. Heat and pressure vulcanize the silicone. After curing, the press opens and the parts are removed. Each cycle produces a set number of toys (equal to the number of cavities in the mold). The factory will dial in optimal parameters – temperature of the mold, curing time, pressure, etc., to maximize throughput while ensuring a full cure and good quality. We maintain strict process control on these parameters so that each batch of toys is molded under the same conditions. This consistency is key to product uniformity.

  • Production Throughput and Timeline: The time it takes to complete production depends on your order size and the mold’s output. For example, if your mold has 4 cavities and a cycle time of 2 minutes, that’s 4 toys every 2 minutes, or roughly 120 toys per hour per machine. If you need 5,000 toys, that’s about 42 hours of machine time, which might be spread over a couple of days with continuous operation (or a single day if multiple machines/molds are used). The manufacturer will let you know the lead time for production. Small orders might be done in a day or two; larger orders could take a week or more of machine running time, possibly scheduled in batches. Always build in a little buffer, as sometimes production can be paused for QC checks or if any machine adjustments are needed.

  • In-Process Quality Checks: During production, the QC team doesn’t wait until the end to inspect – they’ll be doing spot checks throughout (as mentioned in Step 6). For instance, the first few cycles might be closely observed to ensure the mold is performing well after warm-up. Then, periodically, a piece from the mold will be checked for any developing issues (like tool wear or slight drift in material mixing ratio). We also ensure that any excess flash is trimmed from each toy as needed as a part of the finishing process. Injection-molded silicone often has very minimal flash by design; compression-molded parts might have a thin flashing around the seam which workers trim off with small scissors or a blade. The toys might also go through a quick post-curing oven if needed (sometimes silicone parts are baked at low heat after molding to remove any residual volatiles – this is more common in medical silicone products, but for thick parts it can ensure no uncured sections).

  • Consistency and Batch Tracking: Each batch of silicone mixture is typically recorded, and we keep traceability records. If your order is large enough to use multiple batches of silicone (mixing a fresh batch after the first is used up), we ensure the color matching is consistent. Masterbatch pigment control and exact weight ratios are followed so that toy number 1 and toy number 5000 look and feel the same shade and hardness. If any anomaly is detected (say one batch of material had an off-color), those pieces would be segregated. Factories often also mark molds or cavities in subtle ways on the part (for example, a number or letter code on an inner surface) – this can help identify if one cavity in a mold is problematic. If QC notices a recurring defect only on toys marked with “Cavity B”, they know that cavity might have an issue. These are internal quality management details, but they show the level of attention given to delivering you a consistent product.

  • Problem Resolution: In the unlikely event a problem arises during production (e.g., the mold gets damaged or a machine breaks down), the manufacturer should inform you along with an action plan. Sometimes, small issues can be fixed quickly (like a machine swap or minor mold polish) with little impact on delivery time. But open communication is key. When choosing a manufacturing partner, their ability to stick to timelines and handle issues is an important consideration. We pride ourselves on keeping clients updated so there are no surprises. As a client, don’t hesitate to ask for a status update during production – we often send photos of the products coming out of the mold, which is exciting for clients to see their vision materializing.

By the end of the production run, all your silicone pet toys will have been produced and passed initial QC. They are now ready for the final steps: any post-production finishing (if needed), packaging, and getting shipped out to you. Mass production is where the rubber (or silicone, in this case) meets the road – it’s thrilling to see a palette full of your custom-designed products for the first time. But how those products are packaged and delivered is just as important for your business, so let’s move on to that.

Step 8: Branding, Packaging, and Labeling

Production is complete – congratulations! The next step is to prepare your custom pet toys for the market through packaging and branding touches. Good packaging serves several purposes: it protects the product, provides information, enhances the unboxing experience, and amplifies your brand. From a manufacturer’s standpoint, we often offer an array of custom packaging options, so you can have a factory-finished product that’s shelf-ready when it arrives. Here’s what to consider:

  • Packaging Design Choices: First, decide what type of packaging suits your product and sales channel. If you’re selling in retail stores, you might opt for individual packaging for each toy – for example, a colored box with your branding, or a blister pack where the toy is sealed on a cardboard backing with graphics. Eye-catching packaging can greatly influence a customer picking your product off the shelf; even the best toy might not sell well if packaged poorly. On the other hand, if you’re selling online or offering the toy as part of a kit, simpler packaging might do – perhaps a polybag with a header card, or a recyclable cardboard sleeve. Also consider bulk packaging: how will the items be grouped for shipping to you or to stores (inner cartons, master cartons)? Manufacturers will help design these as well to ensure safe transit.

  • Branding and Informational Labels: Work with your design team to create the artwork for any packaging or labels. This includes your logo, product name, and branding elements that you want on the package. Equally important are informational labels: you’ll likely need to include a description of the product, materials (e.g. “100% food-grade silicone”), usage instructions if any, and safety notes. Common safety notes for pet toys are things like “Pets should be supervised during play” or “Replace toy if damaged.” Since there are no strict labeling laws for pet toys as there are for kids’ toys, this is more about customer guidance and liability protection. If your toy is for a specific pet size (e.g. “for dogs under 20 lbs”), note that. If it’s a chew toy, you might add a note about not for ingestion. Also include contact info of your company (website or customer service) on the packaging. If selling internationally, consider multilingual labels or icons.

  • Regulatory Labels: Some markets do have general regulations that might apply. For example, in the U.S., the FTC requires country-of-origin labeling on products (so include “Made in China” or appropriate country if that’s where it’s made, unless your legal counsel advises otherwise). If you got any certifications (like CE mark in Europe, or compliance statements), you can include those logos or text. For instance, some brands choose to mark packaging with “BPA Free” or “Meets ASTM F963 Standards” if they went the extra mile in testing. Just ensure any claim is truthful and ideally supported by your QA tests.

  • Custom Packaging from the Factory: Most silicone OEM manufacturers, including us, provide services to handle custom packaging at the source. This can save you a huge headache and cost. For example, we can get boxes or cards printed with your artwork, have each toy packaged as desired, and even insert any leaflets or instruction manuals. By the time you receive the products, they’re retail-ready. If you are an Amazon seller, the factory can also help by sticking on the required barcodes or FNSKU labels on each unit, and making sure the carton packing meets Amazon’s guidelines. When requesting packaging, discuss materials: many brands now prefer eco-friendly packaging, such as recycled cardboard, minimalist packaging, or using soy-based inks for printing. We have options like biodegradable polybags or fully recyclable paper boxes if that aligns with your values (and it often impresses eco-conscious customers).

  • Protective Bulk Packing: After individual units are packed, the manufacturer will pack them into larger cartons for shipping. They will use appropriate protective measures (bubble wrap, dividers, etc.) so that the toys and their packaging don’t get damaged in transit. Each master carton will typically have a label indicating what’s inside (product name, quantity, weight, etc.), which helps you or any fulfillment center manage inventory. Ensure the carton size and weight are manageable (e.g., if shipping to Amazon FBA, they have a 50 lb weight limit per box, and certain size limits – your manufacturer should be aware of these and can pack accordingly).

  • Presentation and Unboxing: Think about the unboxing experience for the end customer. A nicely packaged toy with your logo and perhaps a fun tagline or story about the product can delight customers and strengthen your brand. Some brands include small inserts or cards – for example, a thank-you note, or instructions on how to clean the toy (e.g. “Dishwasher safe – top rack”). If the product has multiple pieces, an instruction sheet might be needed. We can insert those during packaging as long as you provide the content. Also, ensure any SKU or barcode needed at point of sale is printed or stickered on the package. If you plan to sell in retail stores, having a UPC barcode on each package is usually necessary.

  • Final Clean and Finish: As a finishing touch, many factories (ours included) will give the toys a final cleaning or wipe-down before sealing them in packaging. This ensures no factory dust or residues are on the product when the customer opens it. Silicone products, especially if they are light-colored, can show a bit of dust, so a quick wipe with alcohol or a wash can make it look pristine. After that, everything is sealed up. From this point, your product is essentially complete – a fully finished, branded, packaged item ready for sale.

By handling packaging at the manufacturing source, you greatly simplify your supply chain – you won’t need a separate co-packer or to package items by hand when you receive them. It’s cost-efficient and ensures consistency. Plus, your customers (or retailers) will receive a product that looks professional and aligns with your brand image right out of the box. With packaging done, the only thing left is to get those products into your (and your customers’) hands.

Step 9: Working Effectively with Your Manufacturer (Tips for Success)

Developing a custom product is a collaborative process. As a silicone manufacturer, we deeply value a good working relationship with our clients – it makes the project more enjoyable and results in a better product. For many brand owners or startups, this might be your first time working with an overseas factory or developing a product from scratch. To help you out, here are some tips and best practices for working effectively with your manufacturer and navigating the process smoothly:

  • Choose the Right Manufacturing Partner: Do your homework when selecting a factory. Look for a manufacturer with extensive experience in silicone and pet products, because their expertise will be invaluable. Check if they have relevant certifications (ISO 9001 for quality management, for example) and can meet safety standards like FDA/LFGB. A good manufacturer should be open to letting you verify their credentials or even conduct audits/visits. Also, assess their capabilities: can they do in-house mold making? Do they offer the customization you need (colors, logo techniques, packaging)? Picking a partner that is a one-stop shop from design to delivery can save you time and ensure better coordination.

  • Establish Clear Communication Channels: Communication is key to any successful partnership. From the get-go, make sure you have a clear point of contact (e.g. a project manager or sales engineer at the factory) who is responsive. State your preferred communication method and frequency – for instance, you might have weekly update calls or emails. Don’t be afraid to ask questions – even basic ones – about any part of the process. A reliable manufacturer will provide regular updates and be transparent about progress. If there are language differences, keep communications clear and concise, possibly with visuals. After any call or major discussion, it helps to recap in writing to avoid misunderstandings. When you receive samples or photos, provide timely and clear feedback so the project keeps moving.

  • Use NDAs to Protect Your Idea: If your toy concept is unique or proprietary, it’s perfectly acceptable to request a Non-Disclosure Agreement (NDA) before sharing details. Reputable manufacturers understand and sign these routinely. In fact, some have their own confidentiality policies to protect client designs. Don’t let fear of idea theft prevent you from moving forward, but do take reasonable precautions like an NDA and checking that the manufacturer doesn’t sell identical stock toys publicly. We sign NDAs to assure clients that their custom design will not be shown to others. Your IP (intellectual property) can also be protected by patents or trademarks as applicable, but those are legal steps outside the manufacturing process. The key is to work with a trustworthy partner and formalize that trust via agreements.

  • Plan and Agree on Timelines: At the outset, discuss the project timeline in detail. Have milestones for design completion, prototype readiness, mold completion, production, etc. Manufacturers can give estimated durations for each step (as we’ve outlined, e.g., design maybe 1-2 weeks, prototyping 1-3 weeks, mold making 4-6 weeks, production 1-2 weeks, shipping variable). Share any hard deadlines you have (for example, “We need products in hand by Black Friday”) so the factory can schedule accordingly. It’s wise to build some buffer into the timeline for unforeseen delays or a round of revisions. Once in production, ensure the factory is on track with the agreed schedule. Holding them to reasonable timelines is fair, but also be understanding if, say, a tweak in design added a week here or there. A collaborative approach works best: both you and the manufacturer want the project done on time and done right.

  • Budgeting and Cost Management: Beyond the obvious costs (mold fee and per-unit price), talk about other potential costs: What about packaging, does it have its own cost per unit? Who pays for shipping and import duties? Will there be extra charges for things like color matching or testing certificates? Getting a clear quote that covers all expected costs will help prevent surprises. Also, ask how costs might scale with volume – for example, the unit price might drop significantly at higher order quantities, which could influence your pricing strategy. Be upfront about your target cost if you have one, and let the manufacturer advise if it’s realistic. Sometimes small design adjustments can reduce cost (for instance, slightly reducing size to save material, or designing the mold to fit more cavities). This is part of cost efficiency – a good manufacturer will help find ways to meet your budget without compromising quality.

  • Understand Minimum Order Quantities (MOQs): Every factory has a MOQ for custom production, which covers their setup costs. We mentioned earlier some can be flexible, but it’s important to clarify this early. For instance, one silicone factory’s MOQ might start at 300 units for custom items, while another might require 1,000+. This can also depend on the product’s size and complexity. If you only want a small initial run (to test market demand, for example), negotiate that upfront or seek a manufacturer known for lower-volume runs. You might pay a slightly higher unit cost for a smaller batch, which is normal. Also consider the trade-off: sometimes ordering a bit more drastically lowers the unit price. Balance inventory risk with cost per unit. The manufacturer can produce efficiently to their MOQ, but most will happily produce more if you need – just set expectations so they can plan materials and scheduling.

  • Stay Involved and Request Documentation: Even if you’re new, showing engagement in the process helps. Ask for documentation and updates at key points – for example, request a copy of the material certification, or a test report after QA, or photos of the mold. Not only does this keep you informed, but it signals to the manufacturer that you care about details, which often encourages them to be extra diligent. When the production is ongoing, you can request pictures or even do a video call tour of the line. Many manufacturers are proud to show their work. Being involved doesn’t mean micromanaging; it just means you’re an active partner. It can also speed up decisions – if an issue arises, since you’re in touch, they can get your input quickly.

  • Prepare for Iterations (Stay Flexible): Product development is rarely a perfectly linear process. You might go through a few iterations of a prototype, or find yourself making a tough choice like tweaking the design to meet a deadline. Stay flexible and work with your manufacturer on solutions. For instance, if a first prototype isn’t quite right, discuss together what the best way to adjust is (maybe the factory’s engineer has a suggestion you hadn’t thought of). If timing is tight, sometimes you can overlap steps (e.g. start ordering packaging while the mold is being made, using the prototype dimensions). Manufacturers appreciate a customer who understands that unforeseen tweaks can happen. Of course, if changes affect cost or time significantly, they should let you know and get approval before proceeding. Maintain that two-way flexibility: you may ask them for a rush in one phase, and later you might grant a little extra time in another phase. The end goal is a great product, done efficiently.

  • Quality Expectations and Inspections: Early on, communicate your quality expectations clearly. For example, what is your tolerance for defects? (Ideally zero for functional/safety defects; maybe a tiny cosmetic imperfection on 1 out of 500 might be tolerable). Knowing this, the manufacturer can adjust their QC thresholds. You might also consider hiring a third-party inspection service to check the goods before they leave the factory (many importers do this for large orders). Services like SGS, Bureau Veritas, etc., can do a pre-shipment inspection. If you plan to do that, inform the manufacturer – they’ll cooperate if it’s in the contract. It’s another safety net to catch any issues. However, if you trust your manufacturer’s QC (and have seen evidence of their quality commitment), you may find this unnecessary. Our approach is to ensure the custom toys you receive are safe and high-quality, as that not only protects end-users (pets) but also your brand’s reputation. Aligning on this principle with your manufacturer sets the tone that quality is non-negotiable.

  • Mold Ownership and Future Use: We touched on this, but it bears repeating as a tip: get it in writing that you own the mold after payment. Also, clarify what happens to the mold after production. Generally, the factory will store it for you for future orders. But ask how long they will store an inactive mold (many will keep it indefinitely, or at least inform you if they ever plan to scrap it). If you ever need the mold shipped to you or another manufacturer, discuss how that would work (you might have to pay shipping and maybe a mold release fee). It’s unlikely you’ll move production if you’re happy, but it’s good to have the option. Also, maintaining a good relationship means the factory will take care of your mold and use it only for your orders. Some clients even request their molds to be tagged or locked when not in use for extra security, though that’s often not necessary with a trusted partner.

  • Launch and Feedback Loop: Once you start selling the product, share the feedback with your manufacturer. Did the product get great reviews? Let them know – it boosts morale and they’ll enjoy knowing their work is out in the world making pets happy. If there’s any negative feedback, definitely inform them too, especially if it’s something that could be improved in the next production run. For example, if customers report that the toy is awesome but they wish it was slightly softer for their small dogs, you can discuss making a slight material hardness adjustment in the next batch, or maybe even introduce two versions. Treat the manufacturer as part of your product development team, not just a vendor. This collaborative relationship can lead to cost improvements, product line expansions (maybe they have ideas for other pet products you could add), and a smoother experience on future projects.

Lastly, for first-time product developers entering the pet toy market, remember that every successful product is a result of learning and iteration. Don’t be discouraged by the complexity – by reading guides like this, you’re already gaining the knowledge to navigate it. Work closely with your manufacturer, leverage their expertise, and maintain a spirit of curiosity and quality-focus. From concept to delivery, each step is an opportunity to make your product the best it can be.

Conclusion

Bringing a custom silicone pet toy from an idea to reality is a rewarding journey. We’ve covered all the stages – from initial concept and market research to design, prototyping, mold making, material selection, testing, production, packaging, and logistics – through the eyes of a silicone manufacturing expert. It’s clear that silicone offers tremendous advantages for pet toys (safety, durability, flexibility in design) and that with careful planning, even first-time brands can successfully develop a high-quality product.

As a silicone factory, we have seen many pet brands (big and small) go through this process and launch unique toys that delight pets and pet owners alike. The keys to success are thorough research, a strong partnership with your manufacturer, attention to safety/quality, and clear communication at every step. By understanding the process and setting the right expectations, you can avoid common pitfalls and navigate challenges effectively. It’s normal to encounter a few iterations or decisions along the way – that’s all part of product development. In the end, when you hold that finished custom toy in your hand (and see a dog wagging its tail excitedly for it), you’ll know the effort was worth it.

We hope this comprehensive guide has demystified how to create a custom silicone pet toy, and empowered you to take the next steps toward your own product launch. The pet industry is thriving and innovation-friendly, so it’s a great time to introduce something new under your brand. With the right concept and the right manufacturing partner, you can bring safe, fun, and distinctive pet toys to market.

Good luck with your project – and remember, every great pet toy started as a sketch or a simple idea. With patience and partnership, that idea can soon become a reality on store shelves and in happy pets’ paws. We’re excited for you to embark on this journey and can’t wait to see the creative pet toys you’ll develop!