Latex is softer, silicone is tougher — that is the short version of the pacifier and bottle nipple material debate. Silicone nipples and pacifiers resist heat, odors, and allergens, last longer, and hold their shape; latex feels closer to natural rubber and slightly softer initially, but degrades faster and carries a real protein-allergy consideration. For baby brands, the choice drives safety compliance, shelf life, and consumer trust.
This guide compares the two materials on the factors parents and buyers actually care about — feel, safety, hygiene, lifespan — and what it means when you source OEM baby products.
The Two Materials Side by Side
Factor
Silicone (platinum-cured)
Natural rubber latex
Feel
Slightly firmer, smooth, consistent
Softer and more elastic, closer to a “natural” feel
Transparency
Clear/translucent; tintable
Opaque, amber/tan color
Allergens
Hypoallergenic — no latex proteins
Contains latex proteins — can sensitize or trigger allergies
Heat resistance
Withstands boiling/steam sterilization repeatedly
Degrades with repeated high heat
Aging
Long service life; resists ozone, UV, fats, odors
Degrades faster — ozone, heat, light, and fats attack it
Odor/taste absorption
Minimal — stays neutral
Absorbs odors and tastes over time
Compliance
FDA 21 CFR 177.2600 / LFGB food-contact testing common
Requires allergy labeling care in some markets
Typical replacement advice
Replace when damaged/sticky/cloudy or per brand guidance
Replace sooner — watch for stickiness, discoloration, tears
Neither material is “bad” — they fit different babies and different brand positions. But the trade-offs are concrete, and they change with product type.
Safety and Allergy: The Decision That Matters Most
The single biggest difference between the two is latex protein allergy. Repeated exposure to natural rubber latex can sensitize both children and adults; for a product a baby holds in its mouth for hours a day, hypoallergenic status is a major argument — and many markets require or strongly prefer latex-free baby products. Silicone contains no latex proteins, which is why most modern pacifier and nipple lines are silicone.
Beyond allergies, check the safety framework for your target market — these apply regardless of material:
EU: pacifiers fall under EN 1400 (safety requirements and test methods); toys standards (EN 71) apply to related items; food-contact rules apply to feeding products
US: CPSIA/ASTM F963 framework, CPC (Children’s Product Certificate), and FDA food-contact compliance (21 CFR 177.2600) for feeding items
General design safety: one-piece construction or securely retained parts (no choking hazards), ventilation holes, and shields that cannot detach — verify with your manufacturer’s compliance documentation
A silicone one-piece pacifier with tested ventilation and a food-contact-certified formulation is the lowest-risk compliance path for most brands — which is why private-label baby programs overwhelmingly spec silicone.
Lifespan and Hygiene: The Practical Parent View
Parents replace nipples and pacifiers for two reasons: wear and hygiene. Silicone’s advantage is durability under the harshest treatment parents use — boiling, steam sterilizers, dishwashers. Latex cannot take repeated high-heat sterilization without degrading, and it becomes sticky or tacky as it ages, which is also the signal to replace it.
Practical guidance that appears consistently in pediatric and brand advice:
Inspect before every use: discard at the first sign of tears, stickiness, cloudiness, or deformation
Follow the brand’s replacement interval — most recommend replacing pacifiers/nipples every few weeks to a couple of months with regular use; check your market’s labeling guidance
Never tie a pacifier on a cord or strap around a baby’s neck
Sterilize new products before first use and clean per the brand’s instructions (silicone tolerates boiling/steam; latex needs gentler handling)
What This Means for Brands Sourcing OEM Baby Products
If you are launching or refreshing a baby line, the material decision is also a supply-chain decision:
Compliance documentation. Silicone feeding products have a well-established documentation path (FDA 21 CFR 177.2600, LFGB, EN 1400/EN 71, CPC). Ask your manufacturer for the reports tied to your product and batch, not a generic website scan.
Design freedom. Silicone molds with fine detail and holds tight tolerances — orthodontic shapes, texture patterns, and brand logo integration (molded-in or printed) are straightforward. Latex manufacturing is far more limited in geometry and consistency.
Brand consistency. Silicone is clear, color-stable, and taste-neutral, so a brand’s color and finish reproduce consistently across batches. Latex’s amber color and odor absorption constrain the premium aesthetic.
Who offers what. Most contract manufacturers of baby silicone products (including NEWTOP SILICONE) specialize in silicone; if your range genuinely needs latex, confirm the factory can manage latex handling, labeling, and allergen controls — don’t assume one factory does both well.
FAQ
Q: Is silicone or latex better for a newborn’s bottle nipples?
A: For most families, silicone is the safer default: hypoallergenic, heat-stable for sterilization, and consistent. Some babies accept latex’s softer feel more readily, but its allergy and durability trade-offs make it a niche choice — discuss with your pediatrician if you specifically want latex.
Q: How often should pacifiers be replaced?
A: Follow the brand’s guidance (commonly every 4–8 weeks with regular use) and replace immediately at the first sign of damage, stickiness, or deformation. Silicone generally lasts longer than latex in practice.
Q: Are silicone pacifiers BPA-free?
A: Silicone is not a plastic and does not contain BPA or phthalates. For formal claims, rely on the manufacturer’s material certificates and third-party test reports for the specific formulation.
Q: Can silicone pacifiers be boiled or steam sterilized?
A: Yes — food-grade, platinum-cured silicone withstands boiling and steam sterilization; that heat tolerance is one of its main advantages over latex. Always follow the brand’s care instructions.
Q: Do I need EN 1400 for EU pacifier sales and CPC for the US?
A: Yes — EN 1400 is the EU pacifier safety standard and US children’s products require CPC under CPSIA/ASTM F963. Your manufacturer should supply the relevant test documentation for your market(s).
Next steps
For most baby brands, silicone is the lower-risk, longer-lasting, more brandable choice — and compliance documentation is well established. If you are considering latex for a niche line, price in the allergy labeling and faster replacement cycle.
Planning a pacifier, nipple, or feeding line? Talk to our baby-product team about material selection, EN 1400/CPC documentation, and OEM/ODM support.
https://www.newtopsilicone.com/wp-content/uploads/2026/09/05-latex-vs-silicone-pacifier-cover.png10241536Enriquehttps://www.newtopsilicone.com/wp-content/uploads/2022/06/newtop-logo-300x138-2.pngEnrique2026-09-04 18:06:272026-09-04 18:14:37Latex vs. Silicone Pacifiers & Bottle Nipples: Full Guide
Liquid silicone rubber (LSR) has become a default material for electric vehicle battery systems because it solves the three problems a battery pack lives with every day: temperature extremes, vibration and humidity ingress, and thermal management. From housing gaskets that keep a pack at IP67/IP68 sealing levels to thermally conductive pads between cells and cooling plates, LSR and high-consistency silicone rubber (HCR) appear throughout modern EV architectures.
This article explains where silicone is used inside an EV battery pack, which material grades matter, and what to verify when sourcing automotive silicone parts from a contract manufacturer.
Where Silicone Appears in an EV Battery System
Battery packs are demanding environments: they must seal against water and dust for years, survive temperature cycling, resist vibration, and manage heat — often inside the same component family. Silicone’s typical application points:
Application
What it does
Typical material form
Housing gaskets & seals
Seal pack covers, connector areas against moisture and dust (IP67+)
Silicone is rarely the cheapest material in the bill of materials — it wins on lifetime behavior: it keeps sealing and insulating long after cheaper elastomers have hardened or cracked.
Why Silicone Wins in Battery Environments
Four material properties drive the choice over general-purpose rubber (EPDM, NBR) or TPE:
Wide continuous temperature range. Silicone remains elastic from roughly -50 °C to +200 °C in standard LSR grades, with specialty formulations extending further — critical for packs that see arctic winters, desert summers, and hot charging cycles. General-purpose rubber stiffens or degrades at the edges of that window.
Long-term compression set resistance. A gasket’s job is to keep sealing under constant compression for 10+ years. Silicone’s low compression set means the seal force does not relax away over time and temperature cycling.
Environmental aging. Silicone resists UV, ozone, humidity, and many coolants/fluids — the exact stressors a battery housing faces. It does not become brittle with cold or swell unpredictably in hot, humid conditions.
Electrical and thermal versatility. Silicone is an excellent electrical insulator, and thermally conductive grades (filled LSR/HCR) can be formulated to conduct heat where the design needs it — which is why one material family can seal, insulate, and manage heat in the same pack.
Flame resistance is the fourth dimension buyers should verify per grade: many automotive silicone formulations are rated flame-retardant (e.g., UL 94 V-0) and some ceramifying grades form a ceramic-like char under fire to help contain thermal runaway. Always request the specific grade’s datasheet for temperature, compression set, dielectric strength, thermal conductivity, and flame rating — these numbers vary widely between formulations.
LSR vs. HCR for Battery Components: How to Choose
Both material families are silicones — the difference is form and process:
Criterion
LSR (liquid)
HCR (solid/high-consistency)
Process
LSR injection molding
Compression or transfer molding; extrusion
Best for
Complex geometries, thin walls, high volumes, precision seals, overmolded components
Larger/simpler gaskets, lower tooling cost at modest volumes, thick sections
In practice, battery programs often use both: injection-molded LSR for intricate seal and connector geometries, and HCR gaskets where the part is a large, relatively simple perimeter seal. A manufacturer with both LSR injection and HCR compression/transfer capability lets your engineers pick the process per part rather than forcing one process on the whole pack.
What to Verify When Sourcing Automotive Silicone Parts
Automotive quality expectations (PPAP-style documentation, IATF or equivalent customer requirements, change control) are stricter than consumer goods. Before awarding a battery-component program, verify that the manufacturer can supply:
Material traceability: datasheets and certificates for the specific LSR/HCR grade, linked to production batches
Process capability: documented molding parameters and, where required, process validation
Testing evidence: hardness, tensile/tear, compression set, and any customer-specified tests (flame, thermal conductivity, dielectric) with records
Clean and controlled molding: contamination in a seal can become a leak path — ask about handling and QC discipline
Overmolding capability if your design bonds silicone to aluminum housings or plastic connectors (adhesion to metal typically needs primers or mechanical design features — confirm the manufacturer’s process)
Documentation discipline: PFMEA/control-plan-style documentation or equivalent, per your customer’s requirements
NEWTOP SILICONE is a China-based custom silicone manufacturer producing for industrial and automotive programs, with LSR injection molding, HCR compression and transfer molding, overmolding/multi-shot capability, and an in-house mold shop (CNC + EDM). Our ISO 9001 quality system covers custom silicone part production; tell us your customer’s documentation requirements and we will confirm what we can support for your program.
FAQ
Q: Can silicone battery gaskets really last the life of an EV?
A: Silicone is specified in automotive sealing precisely for long-term aging resistance — low compression set and stability across temperature cycling are its core advantages over general-purpose rubber. Validate the specific grade’s datasheet against your 10–15 year design life.
Q: What thermal conductivity can silicone thermal pads achieve?
A: Thermally conductive silicone grades are available across a wide range depending on filler loading — from around 1 W/m·K for general thermal pads to significantly higher for specialty gap fillers. Select the grade against your cooling design and confirm values on the actual material datasheet.
Q: Does an EV battery program need IATF 16949 certification?
A: Many automotive customers require IATF 16949 or their own supplier quality system; some accept ISO 9001 plus customer-specific PPAP and documentation requirements. Ask your customer which system they require, and verify the manufacturer’s certificate scope before quoting.
Q: Can silicone be overmolded directly onto aluminum battery housings?
A: Silicone bonds chemically to certain engineering plastics, but adhesion to metal (aluminum, steel) usually requires surface treatment such as primers or plasma, plus mechanical design features. Confirm the manufacturer’s metal-overmolding process with adhesion testing before tooling.
Next steps
Specify battery silicone parts by grade data, not material name: document the temperature window, compression set target, dielectric or thermal requirements, and flame rating you need, and ask manufacturers to propose the specific LSR/HCR grade. Then qualify the factory on process capability and documentation discipline, not just price.
Designing gaskets, seals, or thermal components for an EV program? Send us your drawings or requirements — our engineering team will confirm materials, tooling, and documentation support for your project.
https://www.newtopsilicone.com/wp-content/uploads/2026/09/03-lsr-ev-battery-cover.png10241536Enriquehttps://www.newtopsilicone.com/wp-content/uploads/2022/06/newtop-logo-300x138-2.pngEnrique2026-09-04 18:02:472026-09-04 18:15:05LSR in EV Battery Packs: Seals, Gaskets & Thermal Components
The EU General Product Safety Regulation — GPSR, Regulation (EU) 2023/988 — has applied to consumer products across the EU since 13 December 2024, replacing the old General Product Safety Directive. If you sell silicone feeding products, pet items, kitchenware, or any other consumer silicone product in the EU — online or in stores — GPSR adds new obligations on top of material standards such as LFGB, FDA 21 CFR 177.2600, and EN 71. This guide explains what changed and what a silicone manufacturer should provide to help you comply.
NEWTOP SILICONE is a custom silicone product manufacturer based in China with 10+ years of export experience to the European market. We make baby, kitchen, pet, personal-care, and medical silicone products under OEM/ODM programs and hold ISO 9001, ISO 13485, FDA, LFGB, CE, and TÜV-certified testing documentation. This article is general guidance, not legal advice — verify your specific obligations with a compliance adviser for the markets you ship to.
What Is GPSR and Why Does It Matter for Silicone Products?
GPSR is the EU’s horizontal safety law for non-food consumer products. Unlike CE-marking directives (toys, electronics) or food-contact regulations (LFGB, EU 1935/2004), GPSR applies across the board — including products that have no dedicated EU directive. It requires that every consumer product placed on the EU market is safe, traceable, and backed by an accountable economic operator.
Key facts:
Item
Detail
Legal basis
Regulation (EU) 2023/988
Applies since
13 December 2024 (replaces Directive 2001/95/EC)
Covers
Most non-food consumer products sold in the EU, including online sales
Affects
Manufacturers (EU and non-EU), importers, distributors, fulfillment providers, online marketplaces
Relationship to CE
GPSR does not replace CE or food-contact rules — it applies in addition to them
For a silicone supplier, the practical meaning: your product still needs the right material tests (LFGB, FDA, EN 71 for toys) — but now the chain of accountability must also be documented: who made it, who is responsible inside the EU, and how it can be traced per batch.
The Five Obligations That Most Affect Silicone Brands
1. An EU-based “responsible economic operator”
If the manufacturer is not established in the EU, the product can only be placed on the EU market if an economic operator based in the EU is responsible for it — typically the importer, an authorized representative, or a fulfillment service provider. That operator’s name, registered trade name, and contact address must appear on the product, its packaging, or an accompanying document.
Practical step: if you import silicone goods yourself, confirm that your EU importer or fulfillment provider accepts this role — and that their identity appears on the product label. If you sell under your own brand, you are the manufacturer and must designate a responsible operator for direct online sales into the EU.
2. Product traceability information
Every product must be identifiable by type, batch, or serial number, together with the manufacturer’s name and address. For silicone goods — teethers, slow feeders, baking mats — batch codes are the normal mechanism. This is what makes a recall or a market-surveillance check manageable.
3. Technical documentation
Manufacturers must keep technical documentation describing the product and its safety assessment and make it available to market surveillance authorities on request. For silicone this typically means: material certificates and test reports (LFGB, FDA, REACH, EN 71 where applicable), MSDS, and a short risk assessment (choking hazards, migration limits, temperature limits, intended users).
4. Online listings must show safety and identity information
GPSR puts specific duties on sellers offering products online (Article 19). Before a product is offered for sale on a marketplace, the listing must display:
The product image, type, and batch/serial number
The manufacturer’s identity (name, registered trade name or mark, address)
The EU responsible operator’s identity and contact details where applicable
Product warnings and safety information (in the official language of the member state where it is sold)
This matters for Amazon EU sellers in particular — incomplete listings can be de-listed even when the physical product is compliant.
5. Incident reporting and corrective actions
Economic operators must notify market surveillance authorities through the EU Safety Business Gateway when a product causes a serious accident or safety issue, and cooperate on recalls. Consumers must also be informed of corrective actions (Safety Gate). This is why batch traceability (point 2) is not paperwork — it is the mechanism that lets a small brand contain a problem fast.
GPSR vs. Food-Contact and Toy Rules: What Still Applies
GPSR sits on top of existing sector rules. For silicone products, brands commonly need three layers:
Layer
Typical requirement
Applies to
Material safety
FDA 21 CFR 177.2600, LFGB (German), EU 1935/2004 framework
Food-contact items: feeding products, kitchenware, pet feeders
Toy/child safety
EN 71 (EU), CPC / ASTM F963 (US)
Teethers, baby toys, play items
Horizontal safety
GPSR + responsible operator + traceability
All consumer silicone products in the EU
Many sellers assume “we have FDA/LFGB reports, so we are fine in the EU.” That is only half true: LFGB-type migration testing proves the material is food-safe; it does not satisfy the operator, traceability, and documentation duties that GPSR adds.
What a Silicone Manufacturer Should Provide to Support Your GPSR File
When you source custom silicone products for the EU market, your manufacturer should be able to supply, at minimum:
Test reports for the relevant material standards (LFGB, FDA, REACH; EN 71 / CPC for children’s items) tied to your batch — not just a generic certificate scanned from a website
MSDS for the silicone formulation used
Batch traceability: production records that map a batch code to raw material lots and QC results
Consistent product markings — including batch code placement agreed in the mold or via label/print
Factory compliance evidence: ISO 9001 quality management, and audits such as BSCI or SEDEX that EU importers increasingly request
Responsive documentation turnaround when your importer or marketplace asks for updated files
NEWTOP SILICONE supports OEM/ODM customers with documented material compliance and batch-level QC records across baby, kitchen, and pet silicone programs. Our export process includes inspection reports and test documentation per shipment — ask us for the exact document package for your product category.
FAQ
Q: Does GPSR apply to products I already sold before December 2024?
A: Products already on the EU market before 13 December 2024 can generally continue to be sold under the old regime, but new stock placed on the market after that date must comply. Check with your compliance adviser for your specific stock situation.
Q: I sell through Amazon EU — do I need my own responsible person?
A: For most direct-to-consumer online sales, yes: GPSR requires an EU-based responsible economic operator for products sold online, and marketplace listings must show the operator’s identity. If you have an EU importer, that importer can take the role; otherwise you need an authorized representative or fulfillment provider arrangement.
Q: Is GPSR the same as CE marking?
A: No. CE marking comes from specific product directives (e.g., toys under EN 71, electronics under the EMC/LVD directives). GPSR is a horizontal safety regulation that applies in addition to those rules. Many silicone products need no CE mark at all but still fall under GPSR.
Q: Do baby and pet silicone products need different compliance packages?
A: Yes. Baby feeding items need food-contact testing (LFGB/FDA) and, if they are toys or teethers, EN 71 / CPC testing plus choking-hazard review. Pet feeding products need food-contact testing; pet toys have their own durability and safety considerations. GPSR applies to all of them.
Next steps
GPSR is a documentation and accountability exercise, not a redesign of your product. Start by listing your EU SKUs and confirming (1) who your EU responsible operator is, (2) whether your labels carry batch codes and the operator’s identity, and (3) whether your online listings show the required information. Then collect the test reports and MSDS for each product from your manufacturer.
Planning an EU launch or updating an existing line? Request a quote or talk to our export team — we can walk you through the documentation package we provide per shipment.
https://www.newtopsilicone.com/wp-content/uploads/2026/09/01-gpsr-eu-compliance-cover.png10241536Enriquehttps://www.newtopsilicone.com/wp-content/uploads/2022/06/newtop-logo-300x138-2.pngEnrique2026-09-04 17:55:342026-09-04 18:15:42GPSR Compliance Guide for Silicone Products in the EU
Private label silicone products are manufactured by an OEM factory under your brand name, then sold as your own product line. For brands, the appeal is simple: silicone products across baby, kitchen, pet and personal-care categories are durable, food-safe and highly customizable — and a good OEM partner takes you from idea to shelf in roughly 3–4 months. This guide covers the full process, what it costs, the certifications your target market requires, and the mistakes that sink private label launches.
TL;DR — the private label journey in one glance
Stage
What happens
Typical output
1. Concept & spec
Define product, category, market, volume
Product brief
2. Design & DFM
CAD design, manufacturability review
3D files, mold-ready design
3. Tooling
Production mold built, samples produced
Mold + first article
4. Certification
FDA / LFGB / EN71 / CPC testing
Test reports
5. Mass production
Molding, QC, batch traceability
Finished goods
6. Branding & packaging
Logo, packaging, retail-ready design
Packed product
7. Shipping
FOB export, logistics, after-sales
Delivered goods
What Are Private Label Silicone Products?
Private label means a factory manufactures the product, and you — the brand owner — sell it under your own brand name and packaging. It is the same product most brands sell: the factory does not own the brand.
Three terms are often used interchangeably, with slight differences:
OEM (Original Equipment Manufacturer) — you bring the design and specs; the factory produces to your drawings.
ODM (Original Design Manufacturer) — the factory contributes design or uses its existing product as a base, which you brand.
White label — an existing, ready-made product you rebrand with minimal changes.
NEWTOP SILICONE, a custom silicone OEM/ODM manufacturer in China with 10+ years of experience, works across all three models — from brands that arrive with CAD files to startups that arrive with only an idea.
Why Private Label Silicone Is an Attractive Category
Broad, growing demand — silicone products span seven categories (baby, kitchen, home, pet, personal care, medical, industrial), so you can extend a brand across adjacent lines from one factory.
Food-safe and durable — platinum-cured, food-grade silicone passes FDA and LFGB food-contact standards, survives dishwasher and oven use, and lasts years — which supports premium pricing.
Deep customization — color (98% Pantone match), hardness (Shore A 10–80), shape, texture, logo and packaging are all customizable, letting you differentiate rather than resell a commodity.
No inventory of finished goods required — you order production quantities, not containers of stock; MOQ-focused production fits e-commerce launch cycles.
The 7-Step Private Label Process
Step 1: Concept & Product Specification
Define the product before contacting factories:
Category and target market (US, EU, or both — this decides certification)
Core use case and selling points
Target volume (first order and annual)
Budget (tooling, unit cost, certification, packaging)
Write this into a one-page brief. It will guide every subsequent decision — especially material grade and certifications.
Step 2: Design & DFM (Design for Manufacturing)
If you have CAD files, the factory reviews them for manufacturability — wall thickness, draft angles, parting lines, undercuts. If you only have an idea, a good OEM partner designs it with you. Common DFM issues in silicone: walls too thin (tearing), too thick (cost, long cure time), and undercuts that prevent demolding.
Milestone: a design both you and the factory agree is mold-ready.
Step 3: Tooling & Prototype
The production mold is the biggest upfront investment. Key questions to settle before paying:
Who owns the mold? Your contract must state that the mold is your property (or that you have exclusivity rights). Never assume.
What is the mold cost? Industry norm is a separate tooling fee (NRE). NEWTOP builds molds in-house with no markup — a structural difference, not a discount.
Prototype first? A prototype or T1 sample verifies size, shrinkage, hardness and appearance before you commit to mass production.
At NEWTOP, silicone shrinkage (LSR 2.5–4.0%, HCR 1.5–3.0%) is compensated in the mold design, and samples are measured before production approval.
Step 4: Certification & Compliance Testing
Certification requirements depend on your market and product category:
Market
Required for food-contact / baby / pet products
US
FDA (21 CFR 177.2600), CPC + CPSIA (children’s products), California Prop 65 considerations
EU
LFGB (or EU 1935/2004), EN71 (toys), CE where applicable
Both
Certify once with the broadest set — e.g., FDA + LFGB + EN71 + CPC covers most Western markets
Insist on finished-part test reports, not raw-material certificates. The part you sell must pass, and finished-part testing catches issues (residues, migration, odor) that raw-material data misses.
Step 5: Mass Production & Quality Control
Production should be documented and traceable:
Batch records and lot numbers for every run
In-process inspection at each stage
Post-curing for food-contact and medical parts (removes volatiles, stabilizes hardness)
Final inspection with AQL sampling or 100% visual inspection for key features
A factory with an ISO 8 cleanroom and ISO 13485 certification (medical-grade capability) maintains a higher baseline of cleanliness and documentation — relevant if you may extend into baby or medical lines later.
Step 6: Branding, Logo & Packaging
Silicone offers four main logo methods:
Embossed/debossed mold logo — permanent, clean, recommended for most products
Pad/screen printing — multi-color flexibility
Epoxy logo — raised, durable finish
Laser engraving — fine detail, good for small batches
Packaging (boxes, hang tags, barcodes, poly bags) is part of the OEM scope. Decide retail-ready vs e-commerce packaging early — it affects cost and MOQ.
Step 7: Shipping & After-Sales
Most China-based factories quote FOB. Plan for: mold/unit cost breakdown, lead time, freight, and import duties for your country. After-sales matters more than you expect — a partner that tracks every batch makes quality disputes simple to resolve.
What Does Private Label Silicone Cost?
Costs split into five buckets:
Cost item
Notes
Tooling (mold)
Largest upfront cost; typically 2,000–2,000–15,000+ depending on cavity count and complexity. NEWTOP: in-house molds, no markup
Unit price
Driven by material (platinum-cured food grade costs more than generic), size, hardness, surface finish, volume
MOQ
Varies by process — compression molding supports lower MOQs than LSR injection. Confirm before signing
Certification testing
Third-party tests (FDA, LFGB, EN71) are per-product; budget for finished-part testing
Packaging
Retail packaging, labels, barcodes add per-unit and setup costs
As a rule of thumb, a private label silicone launch runs roughly 3–4 months from brief to first shipment: ~2–3 weeks design/DFM, ~3–4 weeks tooling and samples, ~2–4 weeks certification, then production and shipping.
Protecting Your Brand and IP
Three layers of protection, all settled in writing before production:
NDA (non-disclosure agreement) — protects your design, specs and pricing. NEWTOP signs NDAs as standard practice.
Mold ownership / exclusivity clause — the mold is your asset, and the factory commits not to sell your design to other buyers.
Trademark & design patents — register your brand name/logo (trademark) and product design (design patent) in your target markets. If you sell on Amazon, enroll in Brand Registry to control your listings and remove knockoffs.
Skip these and you risk exactly what every cautionary story warns about: a competitor selling your product at a lower price from the same factory.
7 Mistakes That Sink Private Label Launches
Choosing a trading company instead of a factory — you pay a middleman and lose control of quality. Verify: factory photos/video, machine lists, certifications.
Unclear mold ownership — if it’s not in the contract, it’s not yours.
Certifying raw material, not finished parts — your finished product can still fail migration or sensory tests.
Ignoring sensory (odor/taste) compliance — LFGB includes odor/taste testing; poorly post-cured silicone fails. Ask about post-curing records.
Skipping prototype validation — shrinkage and tolerance surprises are far cheaper to fix before mass production.
Vague MOQ and lead-time agreements — e-commerce launch dates slip when these aren’t contractual.
No packaging plan — retail packaging decided at the last minute adds cost and delays.
FAQ
Q: What is the difference between OEM and private label?
A: They are the same model from the buyer’s perspective: a factory produces your product under your brand. OEM emphasizes producing to your design; private label emphasizes the brand ownership on the shelf.
Q: What is the minimum order quantity (MOQ) for private label silicone?
A: MOQ depends on the molding process and product size — compression molding typically supports smaller quantities (hundreds to low thousands), LSR injection favors larger runs. Ask for process-specific MOQs, not a single number.
Q: How long does it take to launch a private label silicone product?
A: Typically 3–4 months from product brief to first shipment, including design, tooling, certification and production. Custom designs with new molds take longer than white-label products built on existing tooling.
Q: Do I need FDA or LFGB certification?
A: If you sell food-contact products in the US, FDA compliance (21 CFR 177.2600) is expected; for the EU, LFGB is the recognized standard. Children’s products add CPC/CPSIA (US) and EN71 (EU). Your factory should provide finished-part test reports covering your target markets.
Q: Can I use my own logo on private label silicone products?
A: Yes — mold embossing, pad printing, epoxy and laser engraving are the four standard methods. Mold-embossed logos are permanent and recommended for most silicone products.
Q: How do I protect my design from being copied?
A: Sign an NDA, put mold ownership and exclusivity in the contract, and register trademarks/design patents in your sales markets. On Amazon, Brand Registry adds another layer of protection.
Conclusion
Private label silicone is one of the most accessible ways to build a durable-goods brand: the products are premium, food-safe and highly customizable, and the OEM process is well established. Success comes down to four decisions: choosing a real factory (not a trading company), settling mold ownership and IP protection in writing, certifying finished parts for your target markets, and planning packaging and MOQ before production starts.
If you are ready to evaluate a partner, talk to engineers who mold silicone daily. NEWTOP SILICONE — a 10-year custom silicone OEM/ODM manufacturer with in-house tooling (no markup on molds), ISO 8 cleanroom production, ISO 13485 and a dedicated materials lab — offers end-to-end service from idea or CAD to branded, shipped product, with NDA protection and 24/7 one-on-one support.
https://www.newtopsilicone.com/wp-content/uploads/2023/02/custom-silicone-products-quality-control-3.webp7501000Enriquehttps://www.newtopsilicone.com/wp-content/uploads/2022/06/newtop-logo-300x138-2.pngEnrique2026-08-20 14:01:362026-08-20 14:16:51Private Label Silicone Products: A Complete OEM Guide for Brands
For food-contact products that face heat — baby feeding items, kitchenware and pet bowls — silicone is usually the safer, longer-lasting choice: it withstands repeated sterilizing temperatures, holds food-grade certifications across more markets, and resists aging. TPE wins where cost, color flexibility or overmolding complexity matters more than heat. Choose based on four factors: temperature exposure, certification requirements, product lifetime, and unit cost.
TL;DR — Silicone vs TPE at a glance
Factor
Silicone
TPE
Continuous temperature range
−40 to 230 °C (typical)
−50 to ~120–135 °C, grade-dependent
Boiling / steam / dishwasher cycles
Excellent, repeatable
Degrades over repeated cycles
Oven / microwave use
Yes (most grades)
No
Food-contact regulation
FDA 21 CFR 177.2600, LFGB, EN71, CPC
Separate FDA sections by base polymer; sensory (odor/taste) compliance is harder
Aging & compression set
Low compression set, resists yellowing
Tends to harden or lose elasticity over time
Surface feel
Dry, non-greasy “silky” touch
Can feel tacky or waxy
Recyclability
Thermoset — not melt-reprocessable
Thermoplastic — can be reprocessed
Typical cost
Higher raw-material cost, longer tooling life
Lower raw-material cost, faster molding cycles
What Are Silicone and TPE?
Silicone rubber is a thermoset polymer — a silicon-oxygen backbone with organic side groups. Once cured, it cannot be melted and remolded. It is supplied as solid rubber (HCR, high-consistency rubber) or as a two-part liquid (LSR, liquid silicone rubber) that cures in the mold in 25–50 seconds. For food and baby products, silicone is almost always platinum-cured, which leaves minimal residues and low odor. In our factory (NEWTOP SILICONE, a custom silicone OEM/ODM manufacturer in China), we mold silicone across Shore A hardnesses from 10 to 80, and post-cure food-contact parts to remove volatiles and stabilize the material.
TPE (thermoplastic elastomer) is a family of polymers that behave like rubber at room temperature but melt when heated — the same plastic family includes SEBS, TPU and TPV. Because it is thermoplastic, TPE can be injection-molded on standard plastic machines, in faster cycles and with more easily recycled scrap. Its heat resistance is the limiting factor: most TPE grades are rated for continuous use well below 135 °C, and repeated exposure to boiling water or steam accelerates aging.
The core difference in one line: silicone is a cured rubber that stands up to heat and chemicals for years; TPE is a melt-processable rubber-like plastic that costs less but tolerates less.
The 4-Factor Decision Framework
1. Heat & Sanitizing Exposure
This is the single biggest differentiator.
Baby products — bottles, teethers, pacifiers, pump parts — are repeatedly boiled or steam-sterilized at ~100–121 °C. Silicone survives hundreds of these cycles without measurable degradation. TPE softens, hardens or loses surface finish after repeated sanitizing, and many grades are not rated for it at all.
Kitchenware — baking mats and molds sit in ovens at up to 230 °C, and silicone handles it. TPE cannot be used in an oven.
Dishwashers expose parts to ~60–70 °C water plus aggressive detergents. Silicone is dishwasher-safe for years; TPE tends to fade, pick up odors and lose elasticity faster.
Rule of thumb: if the product will be regularly boiled, steamed, microwaved or baked, choose silicone. If it will only see room temperature or gentle washing, TPE remains viable.
2. Food-Contact Regulations & Certifications
For baby, kitchen and pet products sold in the US or EU, compliance is not optional — and this is where the two materials diverge most.
Silicone is regulated as a rubber article under FDA 21 CFR 177.2600 (with extractive limits for water- and oil-based foods) and can be certified to LFGB (German food-contact standard, including sensory odor and taste testing), EN71 (EU toy safety) and CPC (US Children’s Product Certificate). A silicone manufacturer can hold all of these on the same product.
TPE food-contact compliance depends on the base polymer (e.g., styrenic block copolymers, TPU), which falls under different FDA food-contact regulations — and it frequently fails LFGB sensory testing because processing aids and plasticizers leave detectable odor or taste.
If your target market is the US or the EU or both, silicone’s regulatory footprint is simpler and more transferable. A product certified to FDA + LFGB + CPC + EN71 covers essentially all Western food-contact and children’s-product requirements.
3. Lifespan & Aging
Silicone’s chemical backbone resists oxidation, UV and hydrolysis, so it keeps its elasticity and appearance for years. TPE relies on physical crosslinks and plasticizers, which migrate or break down — expect gradual hardening, softening or yellowing, especially with heat, oils or sun exposure. For a product meant to be used daily for 2–3 years (a feeding bowl, a baking mat, a slow feeder), silicone’s longer life usually justifies its higher unit cost.
4. Cost & Tooling
TPE is cheaper per kilogram and molds faster on standard plastic machines, which lowers both tooling and unit costs at scale. Silicone tooling is more precise, but molds last longer, and — at NEWTOP — we build molds in-house with no markup, which removes the biggest upfront cost difference for custom products. At small-to-medium volumes, the total project cost gap between silicone and TPE is much smaller than raw-material prices suggest.
Silicone vs TPE for Baby Products
Verdict: silicone, for anything that touches a baby’s mouth or food.
Teethers, pacifiers, bottle nipples, feeding spoons and pump parts must survive boiling/steam sterilization — silicone does, cycle after cycle.
US children’s products require CPC + CPSIA compliance and often EN71 for EU; silicone parts from an ISO 13485-certified factory (medical-grade capability) carry the strongest compliance story.
TPE teethers exist and are cheaper, but they age faster, can develop odor, and have a softer regulatory story. Some brands use TPE for non-mouth, non-food components (handles, grips) to save cost — a reasonable hybrid approach.
Buyer tip: for mouth-contact items, ask your supplier for the finished-part test report (not a raw-material report) covering FDA 21 CFR 177.2600 and EN71-3 heavy-metal migration.
Silicone vs TPE for Kitchen Products
Verdict: silicone for anything that goes in the oven, microwave or dishwasher; TPE only for room-temperature accessories.
Baking mats, molds, spatulas and steamer baskets face 180–230 °C — TPE is ruled out entirely.
Silicone bakeware’s non-stick, non-toxic surface (no coatings, no BPA/BPS) is a genuine differentiator brands use in marketing.
TPE can work for items like jar openers or sink accessories that never see heat — but the cost savings are modest at custom-OEM volumes once tooling and certification are counted.
Silicone vs TPE for Pet Products
Verdict: silicone for food bowls, slow feeders and chew toys; TPE acceptable for low-cost accessories.
Slow feeder bowls and lick mats are licked and chewed daily. Silicone’s tear resistance (5–55 N/mm by ASTM D624, depending on grade) and cleanability make it the default for food-contact pet items.
Pet bowls are often washed in dishwashers — silicone holds up; TPE fades and ages faster.
Chew toys: silicone withstands aggressive chewing without sharp edges; TPE toys can tear and leave fragments.
Note that EU/US pet-food-contact rules increasingly reference the same food-contact standards — FDA/LFGB silicone covers you there too.
When TPE Is Actually the Better Choice
Being honest about TPE’s strengths makes this guide more useful — and more credible:
No heat, no food contact — desk accessories, grips, gaskets, non-food toys: TPE’s cost and fast cycles win.
Complex multi-material parts — TPE overmolds readily onto plastic in standard 2K machines; silicone overmolding needs more specialized process control.
Color and surface variety — TPE offers a wider palette and easier gloss/matte control.
Recyclability targets — if your brand must use recyclable materials, TPE’s thermoplastic nature is an advantage over thermoset silicone.
How to Verify Food-Grade Claims Before You Source
Whether you choose silicone or TPE, verify these five things with your supplier:
Finished-part test reports, not raw-material certificates — the part you sell must pass, not the pellet.
Sensory (odor/taste) compliance if selling into the EU — LFGB includes sensory testing; many TPEs and poorly post-cured silicones fail.
Certification breadth — FDA alone is not enough for EU; confirm LFGB, EN71 (toys), CPC (US children’s products), CE where relevant.
Post-curing records — for silicone, ask whether parts are post-cured (this removes volatiles and stabilizes Shore hardness and compression set).
A material specification sheet with Shore A hardness, tensile strength (ASTM D412), tear strength (ASTM D624) and elongation — a factory with its own materials lab can produce these on request.
FAQ
Q: Is TPE food safe?
A: Some TPE grades are food-contact approved, but compliance is base-polymer-specific and often fails EU sensory testing. Silicone regulated under FDA 21 CFR 177.2600 and LFGB has a broader, simpler compliance path for food-contact products.
Q: Can TPE go in the dishwasher or microwave?
A: Mild dishwasher cycles are borderline for TPE (it fades and ages faster); microwave and oven use are not recommended. Silicone is safe in dishwasher, microwave and oven up to its rated temperature.
Q: Is silicone more expensive than TPE?
A: Silicone costs more per kilogram, but the gap narrows when you count tooling life, certification coverage and product lifespan. For heat-exposed food products, silicone’s total cost of ownership is often lower. [CONFIRM: factory-specific price comparison to verify before publishing]
Q: Which is better for baby teethers — silicone or TPE?
A: Silicone. Teethers are boiled or sterilized repeatedly and chewed hard; silicone survives both without aging, odor or sharp edges, and carries CPC/EN71/FDA compliance.
Q: Can TPE be used for pet bowls?
A: It can, for low-cost lines, but silicone is the better default: dishwasher-safe, tear-resistant, longer-lasting and compliant with food-contact standards — important since pets lick and chew bowls daily.
Conclusion
Choose silicone for baby feeding items, oven/dishwasher kitchenware, and pet food bowls — the products that face heat, sterilization, chewing and daily washing. Choose TPE for room-temperature, non-food accessories where cost, recyclability or fast multi-material molding dominates.
If you are developing a custom silicone product, talk to engineers who mold both materials daily. At NEWTOP SILICONE, a 10-year custom silicone OEM/ODM manufacturer with ISO 13485, ISO 8 cleanroom production and an in-house materials lab, we can help you confirm the right material, hardness and certification path for your market — with in-house molds at no markup.
https://www.newtopsilicone.com/wp-content/uploads/2026/08/silicone-vs-TPE.png8641536Enriquehttps://www.newtopsilicone.com/wp-content/uploads/2022/06/newtop-logo-300x138-2.pngEnrique2026-08-20 12:12:252026-08-20 12:12:25Silicone vs TPE: How to Choose for Baby, Kitchen & Pet Products
Liquid Silicone Rubber (LSR) injection molding is a manufacturing process used to produce flexible silicone components with complex geometries, consistent repeatability, and high levels of automation.
In a typical process, two liquid silicone components are accurately metered, mixed, injected into a heated mold, cured, and then demolded. Compared with many conventional rubber molding processes, LSR injection molding is particularly well suited to automated production, precision components, multi-cavity tooling, and applications requiring consistent material and dimensional performance. Dow describes LSR as a two-part silicone material designed for rapid heat curing, while Shin-Etsu notes that LSR systems can automate the process from material mixing through molding.
However, successful LSR molding depends on much more than selecting an injection molding machine.
Part geometry, wall thickness, parting lines, gating, venting, shrinkage, tolerances, material hardness, mold construction, cavity count, and production volume all affect manufacturability and final cost.
This guide explains how LSR injection molding works, how to design parts for the process, how tolerances and shrinkage should be managed, and what determines the cost of an LSR project.
Key Takeaways
LSR is typically supplied as a two-component liquid silicone system that is metered, mixed, injected, and heat-cured.
The process is highly compatible with automated, multi-cavity and high-volume production.
LSR mold design must account for material flow, venting, flash control, parting lines, shrinkage, demolding, and cold-runner design.
Silicone shrinkage is material- and process-dependent, so it should not be treated as one universal percentage.
Tight tolerances are possible for selected features, but unnecessary precision increases tooling and process-control requirements.
LSR tooling may require a higher initial investment than simpler rubber tooling, but automation and multi-cavity production can improve long-term unit economics.
DFM should be completed before production tooling is manufactured, especially for sealing features, undercuts, thin walls, overmolded parts, and precision components.
What Is LSR Injection Molding?
Liquid Silicone Rubber, or LSR, is a flowable silicone elastomer formulated for injection molding.
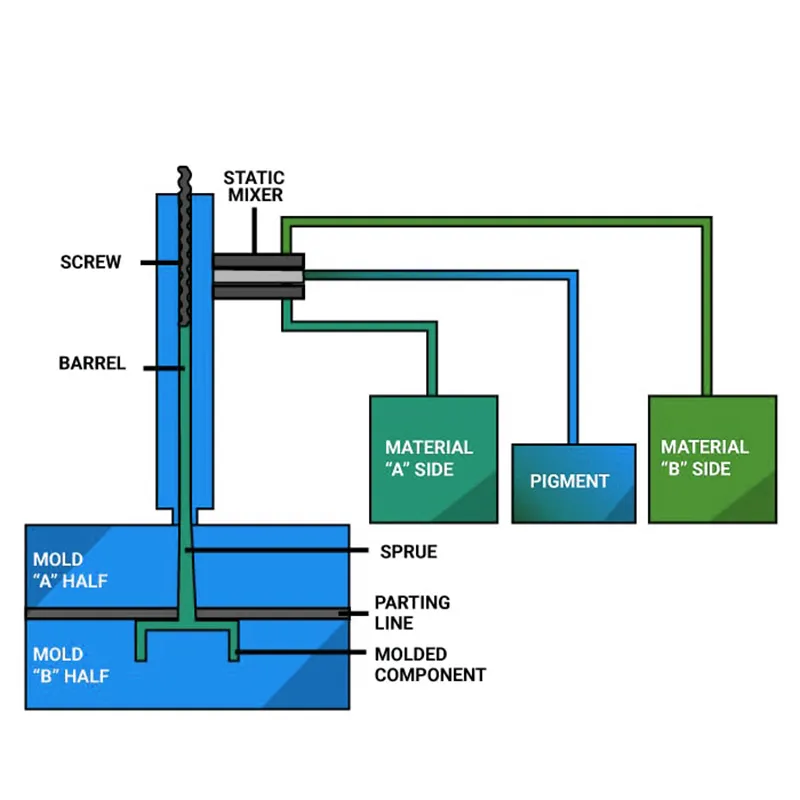
Many commercial LSR systems consist of two components—commonly referred to as Part A and Part B—which are metered and mixed before entering the injection unit. After the material enters the heated mold cavity, the silicone cures into an elastic solid component.
Unlike thermoplastic injection molding, where plastic is heated until it melts and then cooled inside the mold, LSR is a thermosetting elastomer.
The basic thermal strategy is therefore different:
The LSR feed and metering system is controlled to prevent premature curing, while the mold is heated to initiate and complete vulcanization.
This processing characteristic enables fast curing and automated manufacturing for suitable parts. Shin-Etsu specifically identifies fast curing, low injection pressure, high-precision molding, and automation as key characteristics of liquid silicone injection systems.
How Does LSR Injection Molding Work?
A typical LSR injection molding process can be divided into several stages.
1. Material Preparation
LSR is supplied as separate reactive components.
The material formulation is selected according to requirements such as:
Shore hardness
tensile strength
tear resistance
compression set
temperature resistance
transparency
electrical performance
food-contact requirements
healthcare requirements
self-lubrication
adhesion to substrates
LSR is not one standardized material.
For example, Shin-Etsu’s LSR portfolio includes materials ranging across multiple hardness levels and formulations for food contact, automotive applications, high tear strength, self-adhesion and other requirements.
Material selection should therefore begin with the product’s working conditions rather than hardness alone.
2. Metering and Mixing
The two material components are transferred from their containers using a metering system.
The equipment controls the proportion of the components before combining them in a mixing system.
Color pigment or other approved additives may also be introduced during this stage when required.
Accurate metering is important because inconsistent mixing can affect cure behavior and final material properties.
The mixed LSR then moves toward the injection unit.
3. Injection Into the Mold
The material is injected into a closed, heated mold.
Because uncured LSR can flow into fine features, it is suitable for many small or geometrically detailed components.
This flowability is useful—but it also creates one of the major engineering challenges of LSR molding:
flash control.
If mold shutoffs, parting surfaces, vents, or process parameters are poorly controlled, low-viscosity silicone may enter extremely small gaps.
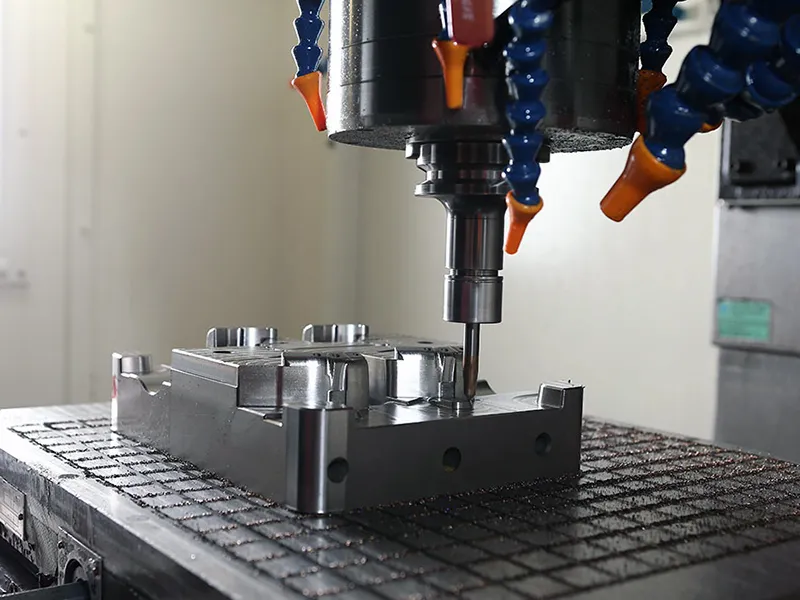
This means precision mold manufacturing is particularly important in LSR production.
4. Curing
Once the silicone reaches the heated cavity, the curing reaction accelerates and the material changes from a flowable liquid into a crosslinked elastomer.
Cure time depends on variables including:
material formulation
part thickness
mold temperature
geometry
cavity design
processing conditions
Fast-curing LSR grades can support short production cycles, although there is no universal cycle time for every LSR component. Dow and Shin-Etsu both offer LSR grades specifically designed around rapid heat curing and improved processing efficiency.
5. Demolding
After sufficient curing, the mold opens and the silicone component is removed.
Silicone’s flexibility can make it possible to demold geometries that would be difficult with rigid thermoplastics.
This creates greater freedom for:
certain undercuts
sealing lips
flexible ribs
internal retention features
However, flexibility should not be interpreted as unlimited design freedom.
Excessive undercuts can still:
increase demolding force
tear components
deform thin features
slow automation
require manual removal
A DFM review should evaluate both whether the part can physically be removed and whether it can be removed consistently during mass production.
6. Post-Molding Operations
Depending on the product and material system, molded LSR components may require additional operations such as:
flash inspection
trimming
post-curing
washing or cleaning
printing
laser marking
assembly
functional testing
dimensional inspection
packaging
Not every LSR formulation requires post-curing.
Some modern LSR formulations are specifically designed for applications where post-cure can be eliminated or reduced. Shin-Etsu, for example, provides LSR systems designed without a required post-curing stage for selected applications.
Whether post-curing is required should therefore be determined by the selected material, application, regulatory requirements, and validated manufacturing process.
LSR Injection Molding Process at a Glance
Stage
What Happens
Critical Control
Material Selection
Appropriate LSR grade selected
Hardness, properties, compliance
Metering
A/B components supplied
Mixing consistency
Pigment/Additive
Color or additives introduced if needed
Dispersion and ratio
Mixing
Components combined
Homogeneity
Injection
LSR enters heated mold
Pressure, filling, air removal
Curing
Silicone crosslinks
Time and temperature
Demolding
Finished component removed
Tear/deformation prevention
Secondary Processing
Post-cure, trimming, printing, assembly
Application dependent
Quality Control
Dimensions and appearance inspected
Critical specifications
Packaging
Parts prepared for shipment
Cleanliness and traceability
LSR Design Guidelines
Good LSR manufacturing starts at the CAD stage.
Many problems attributed to molding are actually created during product design.
Common examples include:
unnecessary thickness variation
poorly positioned parting lines
unrealistic tolerances
difficult undercuts
inadequate sealing geometry
uncontrolled flash locations
impossible insert positioning
The goal of DFM is to identify these issues before mold steel is cut.
1. Keep Wall Thickness as Uniform as Practical
Uniform wall thickness generally improves mold filling and curing consistency.
Large transitions from thin to thick silicone sections can create:
different curing behavior
dimensional variation
deformation
longer cycle time
local material accumulation
This does not mean every wall must have exactly the same thickness.
Functional products often require reinforcement or thicker sections.
Instead, transitions should be deliberate and gradual where possible.
2. Very Thick Silicone Sections Can Increase Cycle Time
A thicker component contains more material and generally requires more time for heat to reach and cure the entire section.
As a result, unnecessary thickness can increase:
raw material usage
curing time
machine occupancy
unit cost
Before increasing wall thickness for “strength,” engineers should determine whether geometry, ribs, material hardness, or higher-tear-strength silicone could achieve the required performance more efficiently.
3. Thin Features Require Flow Analysis
LSR’s flow characteristics allow it to fill relatively fine features.
However, very thin sections can still be affected by:
flow length
gate location
air traps
cavity geometry
pressure
material viscosity
There is therefore no universal minimum wall thickness applicable to every LSR product.
A short thin membrane close to the gate may be completely different from a long thin flow path at the opposite side of a cavity.
This is a typical area where mold-flow and DFM experience matter more than a generic design table.
4. Carefully Select the Parting Line
The parting line is where the mold halves meet.
Its position affects:
appearance
flash
dimensional control
demolding
mold complexity
For cosmetic products, the parting line should normally be positioned away from prominent surfaces when possible.
For sealing components, it should be positioned carefully so that flash or mismatch does not interfere with the sealing surface.
A seemingly small change in part orientation can sometimes substantially improve manufacturability.
5. Design Flash-Sensitive Areas Carefully
One of LSR’s advantages is its ability to flow into very small spaces.
The same property makes flash prevention demanding.
Potential flash-sensitive areas include:
mold parting surfaces
insert interfaces
shutoffs
ejector-related features
sliding structures
vent locations
For precision seals and membranes, flash limits should be specified according to function rather than applying an unrealistic cosmetic requirement to the entire product.
6. Draft Angles Work Differently From Rigid Plastics
Silicone’s flexibility means LSR parts can often be removed from molds with less draft than rigid injection-molded thermoplastics.
However, draft still influences:
demolding reliability
automation
surface damage
part deformation
tool wear
A design that can theoretically be removed manually may still be unsuitable for automated high-volume production.
Therefore, draft should be determined together with geometry, depth, texture, hardness, and demolding strategy.
7. Undercuts Are Possible—but Not Free
Flexible silicone can deform during removal, allowing certain undercuts to be molded without side actions.
This can simplify mold construction compared with rigid plastic components.
But undercuts increase demolding strain.
Important factors include:
silicone hardness
tear strength
undercut depth
wall thickness
product geometry
surface texture
demolding direction
For mass production, the important question is not:
“Can the part be removed?”
It is:
“Can the part be removed thousands of times consistently without tearing, deformation, or excessive manual handling?”
8. Consider Ribs and Reinforcement Strategically
Silicone ribs may be used for:
reinforcement
sealing
grip
flow control
positioning
Very tall, thin ribs may be more difficult to fill, demold, and maintain dimensionally.
Whenever a rib is critical to sealing or assembly, its tolerance and moldability should be evaluated separately from non-critical cosmetic features.
LSR Gate Design
The gate is the point where liquid silicone enters the mold cavity.
Gate design influences:
filling pattern
weld locations
trapped air
pressure
gate vestige
cosmetic appearance
cavity balance
Possible gating strategies vary according to mold and product geometry.
The gate should normally be placed where material can fill the cavity consistently while minimizing:
air traps
unnecessary flow length
visible gate marks
defects in functional areas
For multi-cavity tooling, balanced filling becomes especially important.
Venting in LSR Mold Design
Air inside the mold cavity must escape as LSR enters.
Poor venting may lead to:
incomplete filling
trapped air
burn or cure-related defects
surface imperfections
inconsistent dimensions
However, because uncured LSR flows readily, vents must also be engineered carefully to prevent excessive material escape and flash.
This makes vent design one of the precision aspects of LSR tooling.
Cold Runner Systems
High-volume LSR tooling often uses cold-runner technology.
The purpose is to keep material in the runner system from curing before it reaches the heated mold cavity.
This can:
reduce cured runner waste
support automation
improve production efficiency
enable multi-cavity production
Shin-Etsu identifies runnerless molding as one of the important capabilities of modern LSR systems.
However, cold-runner tooling is more technically complex than simple conventional tooling.
The additional tooling investment needs to be evaluated against expected production volume.
LSR Shrinkage: Why It Matters
Silicone does not leave the mold at exactly the cavity dimensions.
Dimensional change occurs as the material cures and cools.
This is generally referred to as molding shrinkage.
One common mistake is to specify one shrinkage percentage for all LSR products.
That approach is unreliable.
Shrinkage depends on variables such as:
material formulation
hardness
filler system
cure conditions
mold temperature
part geometry
cavity pressure
post-curing
substrate interaction in overmolding
Actual supplier data demonstrates this variation. Shin-Etsu’s published LSR data shows that linear shrinkage can differ among formulations rather than following one universal value.
Therefore:
LSR shrinkage should be treated as a material- and process-specific engineering parameter, not as a fixed silicone constant.
How Is LSR Shrinkage Controlled?
Manufacturers normally manage dimensional shrinkage through a combination of:
Material Data
The selected LSR grade provides an initial expected shrinkage behavior.
Tooling Compensation
Critical mold dimensions may be adjusted according to the material and manufacturing experience.
Process Control
Variables such as cure conditions and molding parameters need to remain consistent.
Sampling
Prototype or T1 samples are measured and compared with drawings.
Tool Adjustment
Where necessary, tooling is corrected before mass-production approval.
For precision projects, this process should be considered during tooling planning rather than waiting until finished molds produce out-of-tolerance components.
LSR Injection Molding Tolerances
LSR can produce precision elastomeric components, but silicone should not automatically be assigned the same tolerances used for metal or rigid plastic.
Elastomers behave differently because dimensions can be influenced by:
shrinkage
deformation
measuring force
temperature
part geometry
mold closure
material hardness
ISO 3302-1:2014 provides dimensional tolerance classes for molded, extruded and calendared solid rubber products and remains current following its 2024 confirmation.
Geometrical characteristics such as flatness, parallelism, perpendicularity, coaxiality and position are addressed separately by ISO 3302-2:2022.
These standards are useful references, but actual product tolerances should still be connected to functional requirements.
Fixed Dimensions vs Mold-Closure Dimensions
Not all molded dimensions behave in the same way.
A dimension formed completely within one mold component may be easier to control than a feature affected by the relationship between two mold halves.
For example:
cavity-defined diameter
mold-depth dimension
parting-line dimension
sealing-lip thickness
may have different manufacturing behavior.
This is why specifying the same tolerance across every drawing dimension is usually poor elastomer design practice.
How Should Engineers Specify LSR Tolerances?
Divide dimensions into three categories.
Critical Dimensions
Features directly affecting:
sealing
fit
assembly
functional performance
These deserve tighter control and defined inspection methods.
Important Dimensions
Features affecting product performance but allowing moderate variation.
Non-Critical Dimensions
Cosmetic or general dimensions where small variations do not affect function.
This approach concentrates manufacturing and inspection resources where they create actual value.
Why Over-Tolerancing Increases Cost
If every dimension is assigned an unnecessarily tight tolerance, the manufacturer may need:
higher-precision mold machining
additional mold corrections
tighter process windows
more sampling
increased dimensional inspection
more production sorting
lower acceptable process variation
That increases both tooling and recurring production costs.
The correct goal is therefore not:
“Use the tightest possible tolerance.”
It is:
“Use the tolerance required for the product to function consistently.”
LSR Hardness and Material Selection
LSR is available in a broad range of hardness and performance grades.
Hardness affects properties such as:
flexibility
sealing behavior
deformation
tactile feel
demolding
compression behavior
But Shore hardness alone does not fully describe an LSR.
Two materials with similar hardness may have different:
tear strength
tensile strength
elongation
compression set
viscosity
transparency
adhesion
regulatory status
For example, current commercial LSR portfolios include specialized grades for electrical connector seals, food-contact products, automotive parts and healthcare applications.
Material selection should therefore begin with the actual working environment.
LSR Overmolding and Insert Molding
LSR can also be molded around rigid components.
Common substrates include:
plastics
metals
electronic components
rigid housings
connectors
This technique is frequently referred to as:
LSR overmolding or insert molding.
Potential advantages include:
integrated sealing
reduced assembly
fewer separate components
improved water resistance
improved ergonomic surfaces
Some LSR formulations are specifically designed to adhere to selected engineering plastics during molding. Shin-Etsu, for example, lists self-adhesive LSR systems developed for substrates including PC, PBT and polyamide materials.
However, successful overmolding requires evaluation of:
substrate material
mold temperature
adhesion compatibility
insert positioning
thermal resistance
contamination
mechanical retention
Overmolding should therefore be assessed as an integrated material-and-process system.
Common Applications for LSR Injection Molding
LSR injection molding is used across multiple industries.
Automotive
Examples include:
connector seals
gaskets
sensor components
electrical protection
EV connector components
Dow specifically markets several injection-molding LSR grades for connector seals, radial seals and related automotive electrical applications.
Medical and Healthcare
Potential applications include:
masks
valves
seals
tubing-related components
non-implantable molded parts
Material selection and processing controls should be based on the regulatory and biocompatibility requirements of the actual device.
Consumer Products
LSR is also used for:
wearable components
household products
personal-care products
baby products
food-contact components
Electronics and Industrial Components
Applications may include:
waterproof seals
cable protection
grommets
electrical insulation
vibration protection
connector components
What Determines LSR Injection Molding Cost?
There is no universal LSR injection molding price.
Total project cost is generally influenced by:
Engineering + Tooling + Material + Cycle Time + Production Quantity + Secondary Operations + Inspection + Packaging
1. Tooling Complexity
LSR tooling cost increases with factors such as:
product size
cavity count
undercuts
tight tolerances
complex parting lines
precision shutoffs
cold-runner systems
inserts
overmolding
surface requirements
A complex multi-cavity automated mold requires a different investment from a simple single-cavity development tool.
2. Number of Cavities
More cavities generally increase mold complexity but increase production output per cycle.
For high-volume programs, this can lower recurring unit manufacturing costs.
Therefore:
The lowest-cost mold is not necessarily the lowest-cost manufacturing solution.
Tooling should be evaluated against projected annual volume.
3. LSR Material
Material cost depends on the selected formulation.
Special requirements such as:
medical-grade material
high-tear strength
self-adhesion
optical transparency
conductivity
flame resistance
self-lubrication
special temperature resistance
can affect material selection and cost.
4. Part Weight
More silicone means higher recurring material consumption.
Part weight is influenced by:
overall dimensions
wall thickness
ribs
solid sections
internal geometry
Reducing unnecessary material through DFM can improve manufacturing economics.
5. Cycle Time
Machine cost is closely connected to production time.
Cycle time may increase because of:
thick sections
slow-curing material
difficult demolding
manual operations
complex geometry
A product that takes substantially longer to cure or remove from the tool may cost more even if it uses approximately the same amount of silicone.
6. Automation Level
LSR injection molding is particularly attractive for automated manufacturing.
Modern LSR systems can integrate material metering, injection, molding and automated demolding.
Higher automation can reduce:
manual handling
labor variability
repetitive operations
But automation also requires more sophisticated tooling and equipment.
Whether that investment makes sense depends on production volume.
7. Secondary Operations
Additional processes may include:
post-curing
trimming
printing
laser marking
bonding
assembly
testing
specialized cleaning
Every added operation contributes to recurring production cost.
8. Inspection Requirements
Precision silicone components may require:
first-piece inspection
dimensional measurement
visual inspection
flash inspection
functional testing
sampling plans
traceability
The more critical the part, the more important it becomes to define inspection requirements before quotation.
LSR Injection Molding vs Compression Molding
These processes serve different manufacturing needs.
Factor
LSR Injection Molding
Silicone Compression Molding
Material
Liquid silicone rubber
Usually solid/HCR silicone
Automation
High potential
Moderate
Tool complexity
Higher
Often simpler
Production efficiency
Strong at scale
Effective for many simpler parts
Fine geometry
Strong
Application dependent
Multi-cavity production
Excellent
Available
Initial tooling investment
Often higher
Often lower
High-volume economics
Strong
Depends on product
Manual material loading
Minimal in automated system
More common
Overmolding
Strong capability
Possible, application dependent
The correct decision should be based on:
geometry + quantity + material + tolerance + automation + total manufacturing cost
rather than choosing a process only because one mold appears cheaper.
When Should You Choose LSR Injection Molding?
LSR injection molding is particularly attractive when a project requires a combination of:
stable repeat production
complex silicone geometry
precision features
high production volume
automated manufacturing
low manual handling
overmolding
multiple cavities
consistent silicone properties
Compression molding may remain preferable for some simpler, lower-volume or larger silicone products.
There is no universal “best” silicone molding process.
Common LSR Design Mistakes
Several design issues repeatedly increase project risk.
Mistake 1: Applying Plastic Tolerances Directly to Silicone
Silicone is an elastomer and must be toleranced accordingly.
Mistake 2: Ignoring Shrinkage Until Sampling
Shrinkage needs to be considered during mold design.
Mistake 3: Designing Excessive Undercuts
A flexible product may still tear during high-speed automated demolding.
Mistake 4: Putting the Parting Line Through a Critical Seal
Flash or mismatch can affect sealing performance.
Mistake 5: Making Every Dimension Critical
This increases tooling and inspection cost without necessarily improving performance.
Mistake 6: Choosing Material by Hardness Only
Hardness does not define tear strength, compression set, viscosity, adhesion or regulatory suitability.
Mistake 7: Selecting Cavity Count Based Only on Initial Tool Cost
Annual production volume should determine the manufacturing strategy.
LSR DFM Checklist
Before approving tooling, review:
Material
Required Shore hardness?
Tear-strength requirement?
Compression-set requirement?
Temperature environment?
Food-contact or healthcare requirements?
Transparency or color?
Geometry
Uniform wall thickness?
Problematic thick sections?
Extreme thin sections?
Deep undercuts?
Long thin ribs?
Difficult internal geometry?
Mold
Appropriate parting line?
Gate location?
Venting strategy?
Flash-sensitive areas?
Cold-runner requirement?
Number of cavities?
Dimensions
Which dimensions are functional?
Which dimensions are sealing-critical?
Are tolerances appropriate for an elastomer?
Has expected shrinkage been considered?
Production
Initial quantity?
Estimated annual volume?
Manual or automated demolding?
Secondary operations?
Inspection plan?
Packaging requirements?
A DFM review before tooling can prevent much more expensive modifications after mold completion.
Manufacturer Insight: How NEWTOP Approaches an LSR Project
At NEWTOP, an LSR project should start with engineering evaluation rather than immediately building a mold.
A typical review considers:
Application requirements What will the silicone component actually do?
Material selection Which hardness and formulation are appropriate?
Geometry review Are walls, ribs, sealing features and undercuts moldable?
Tolerance review Which dimensions genuinely require tight control?
Shrinkage strategy How should the selected material and geometry be considered in mold dimensions?
Tool architecture What cavity count, parting line, gating and runner system are appropriate?
Production strategy Is the product intended for prototype quantities, initial market production or long-term mass production?
Quality planning Which features need dimensional, visual or functional inspection?
This approach helps connect the product design with the expected manufacturing volume before production tooling is finalized.
Frequently Asked Questions About LSR Injection Molding
What does LSR stand for?
LSR stands for Liquid Silicone Rubber, a flowable silicone elastomer widely used in injection molding.
Is LSR a thermoplastic?
No.
LSR is a thermosetting elastomer. It is injected into a heated mold where it cures into a crosslinked silicone component.
What is the difference between LSR and HCR silicone?
LSR is a liquid two-component material primarily suited to automated injection molding.
HCR is a high-consistency or solid silicone rubber commonly processed through compression molding, transfer molding, extrusion and related processes.
The better option depends on the part geometry, quantity, material properties, and manufacturing strategy.
Does LSR shrink after molding?
Yes.
But there is no single shrinkage percentage applicable to every LSR. Shrinkage varies according to material formulation and processing conditions. Published supplier data confirms variation between different LSR grades.
What tolerances can LSR injection molding achieve?
Tolerance capability depends on dimensions, geometry, mold construction, material, shrinkage and measuring method.
ISO 3302-1 provides an established framework for dimensional tolerances in molded rubber products.
Critical tolerances should nevertheless be reviewed individually during DFM.
Can LSR be molded with undercuts?
Yes, selected undercuts can often be demolded because cured silicone is flexible.
However, excessive undercuts can increase tearing, deformation and demolding difficulty.
Does an LSR part need draft?
Some LSR geometries can be demolded with little draft compared with rigid plastics, but draft remains useful for reliable automated production.
The required draft depends on depth, texture, hardness and geometry.
Does LSR require post-curing?
Not always.
Requirements depend on the material, application and performance requirements. Some LSR grades are specifically designed without a required post-curing stage.
Is LSR injection molding expensive?
LSR injection molding can require sophisticated tooling and equipment, particularly for multi-cavity and cold-runner production.
However, its automation potential and production efficiency can make it economically attractive for suitable high-volume projects.
Total manufacturing cost should therefore be considered rather than tooling cost alone.
Can LSR be molded onto plastic or metal?
Yes.
LSR can be used in insert molding and overmolding applications. Specialized self-adhesive formulations are available for selected plastics and other substrates.
What files should I provide for an LSR quotation?
Ideally provide:
STEP/STP or other 3D CAD
2D drawing
material requirements
Shore hardness
critical tolerances
application conditions
initial order quantity
estimated annual volume
compliance requirements
This allows the manufacturer to evaluate both tooling and long-term production strategy.
Start Your LSR Injection Molding Project
Successful LSR injection molding is not determined by the molding machine alone.
Material selection, DFM, mold design, shrinkage compensation, tolerance strategy, cavity count and process control must work together.
For a new LSR project, the most effective approach is to review the design before production tooling begins.
Send NEWTOP your:
3D CAD file
engineering drawing
application requirements
target hardness
expected quantity
critical dimensions
compliance requirements
Our engineering team can evaluate the design for LSR molding, identify potential manufacturing risks, recommend an appropriate tooling strategy, and prepare the project for sampling and mass production.
Custom silicone manufacturing costs cannot be determined from part size alone. The final cost depends on the silicone material, molding process, part geometry, tooling complexity, production quantity, tolerances, secondary operations, testing requirements, and packaging.
In most projects, the total manufacturing cost can be divided into two major parts: one-time tooling and development costs and recurring unit production costs.
A simple way to understand the cost structure is:
Total Project Cost = Tooling & Development + Unit Production Cost × Quantity + Testing + Packaging + Logistics
For buyers, the most important question is therefore not simply:
“How much does a silicone product cost?”
A better question is:
“Which design, material, tooling strategy, and production process will achieve the required performance at the most efficient total cost?”
This guide explains how custom silicone manufacturing quotations are built, what affects tooling and unit pricing, how MOQ works, and how to reduce unnecessary costs without compromising product quality.
Key Takeaways
Custom silicone manufacturing costs are primarily influenced by tooling, material usage, molding cycle, labor, tolerances, secondary operations, quality requirements, and production volume.
Tooling is normally a one-time investment, while unit price is a recurring production cost.
A more expensive mold can sometimes result in a lower long-term unit cost through higher cavity count, better automation, and faster production.
Low-volume orders usually carry a higher unit cost because mold setup, material preparation, inspection, and production changeover must be distributed across fewer parts.
Extremely tight tolerances, complicated undercuts, inserts, overmolding, printing, special surfaces, and extensive testing can significantly change the quotation.
The lowest unit quotation is not necessarily the lowest total manufacturing cost. Tool life, defect rate, process stability, inspection, and future scalability also matter.
What Is Included in Custom Silicone Manufacturing Cost?
A typical silicone manufacturing project may contain several different cost components.
Cost Component
What It Covers
One-Time or Recurring
Product engineering
DFM review, drawings, moldability assessment
Usually one-time
Prototype development
Prototype tooling or sample preparation
Usually one-time
Production tooling
Compression or injection mold
One-time
Silicone material
LSR, HCR, food-grade, medical-grade or specialty compounds
Food-contact, medical, chemical or customer-specific testing
Project dependent
Packaging
Bags, boxes, labels, retail packaging
Recurring
Logistics
Freight and delivery
Recurring
Because these variables differ significantly from project to project, two silicone parts of similar size may have very different manufacturing costs.
1. Silicone Tooling Cost: What Determines Mold Cost?
Tooling is often the largest upfront investment in a custom silicone project.
The mold does much more than create the product shape. It determines production efficiency, dimensional stability, flash control, cycle time, cavity consistency, mold life, and how easily the product can be removed from the tool.
Several factors directly affect silicone mold cost.
Part Size
Larger products generally require larger molds, more mold steel, larger presses, and more silicone material.
However, size alone is rarely the decisive factor.
A large but geometrically simple silicone pad may be easier to tool than a much smaller precision component containing several sealing features and undercuts.
Part Geometry
Complex geometry usually requires more machining and more complicated mold construction.
Common cost-increasing features include:
deep cavities
thin walls
narrow ribs
complex internal channels
sharp transitions
difficult parting lines
undercuts
holes perpendicular to the mold-opening direction
intricate textures
complex sealing surfaces
Before quoting production tooling, the manufacturer should perform a Design for Manufacturing (DFM) review.
Small design modifications can sometimes simplify the mold substantially without affecting the product’s function.
Number of Mold Cavities
A mold may produce one part per cycle or multiple parts simultaneously.
Increasing cavity count normally increases the initial tooling complexity because the mold requires additional machining, runner design, venting, balancing, and quality control.
However, more cavities can significantly increase production output.
This creates an important cost trade-off:
Lower tooling investment does not always mean lower total manufacturing cost.
For smaller production quantities, a simpler low-cavity mold may be appropriate.
For stable, high-volume production, a multi-cavity mold may provide better long-term manufacturing economics.
The correct cavity strategy should therefore be selected according to forecasted annual demand rather than tooling cost alone.
Mold Material and Expected Tool Life
Tool steel selection depends on factors such as:
required production volume
surface requirements
silicone formulation
part geometry
dimensional requirements
expected mold life
A prototype or low-volume project may not require the same mold construction as a long-term mass-production program.
For products expected to remain in production for several years, mold durability and maintenance should be considered during the initial tooling decision.
Surface Finish and Texture
Silicone products can be manufactured with different surface appearances, including:
glossy
matte
fine texture
engraved texture
custom patterns
polished surfaces
Some finishes require additional polishing, texturing, EDM work, or specialized machining.
Surface finish should therefore be defined before tooling begins rather than added after the mold has already been completed.
Tolerance Requirements
Tight tolerances can significantly increase manufacturing difficulty.
A silicone component that only needs to maintain its general shape is very different from a sealing component that must consistently fit into a mating plastic or metal assembly.
Tighter tolerances may require:
more accurate mold machining
controlled material shrinkage
optimized processing parameters
additional sampling rounds
more dimensional inspection
more frequent process monitoring
Silicone is an elastomer, so applying metal or rigid-plastic tolerances directly to a silicone component can lead to unnecessary cost and manufacturing difficulty.
The tolerance should match the actual functional requirement.
Inserts and Overmolding
Some silicone components are molded around:
plastic substrates
metal inserts
electronic components
magnets
rigid frames
threaded inserts
These projects may require specialized fixtures, positioning systems, additional molds, surface treatments, or multi-step production processes.
As a result, an overmolded component typically has a different cost structure from a simple single-material silicone part.
2. What Determines the Unit Price of a Silicone Product?
Once the tooling strategy is established, the next major cost is the recurring production cost per part.
Unit cost is generally influenced by:
Material + machine time + labor + yield + secondary operations + inspection + packaging
Understanding these factors makes it easier to identify where cost reductions are possible.
Silicone Material Type
Silicone is available in many different formulations.
Common categories include:
general-purpose silicone
food-grade silicone
high-temperature silicone
high-tear-strength silicone
oil-resistant silicone
conductive silicone
flame-retardant silicone
medical-grade silicone
optical LSR
specialty LSR compounds
Material selection should be based on functional requirements rather than simply choosing the highest specification available.
For example, a household silicone component may not require the same material system as a medical component or an automotive seal exposed to aggressive operating conditions.
Over-specifying the material can increase cost without improving real-world product performance.
Silicone Part Weight
Raw material consumption directly affects manufacturing cost.
Two products with similar external dimensions may use very different amounts of silicone depending on:
wall thickness
internal cavities
solid sections
reinforcement areas
product geometry
Reducing unnecessary material can lower unit cost, but aggressive wall reduction can also create molding problems such as incomplete filling, deformation, tearing, or reduced durability.
Cost optimization should therefore be handled through DFM rather than simply making every wall thinner.
3. Molding Process: Compression Molding vs LSR Injection Molding
The selected manufacturing process can substantially change both tooling cost and unit cost.
For some relatively simple silicone products, compression molding provides an efficient production route.
For high-volume precision components, LSR injection molding may justify a higher tooling investment because automated production can reduce recurring manufacturing cost.
The correct process depends on:
geometry
production quantity
dimensional requirements
material specification
automation requirements
annual forecast
4. Cycle Time Has a Major Impact on Unit Cost
Machine time is one of the less visible but important components of silicone pricing.
If one mold can produce more acceptable parts within the same production period, manufacturing cost per part can decrease.
Cycle time can be affected by:
product thickness
silicone formulation
mold temperature
cavity count
curing behavior
part geometry
demolding difficulty
automation level
This is one reason why two parts with the same weight may have different unit prices.
A thin, easily demolded component produced automatically may have very different manufacturing economics from a thick silicone component requiring a long curing cycle and manual demolding.
For stable high-volume programs, manufacturers may optimize fixtures, tooling, and automation to reduce manual handling.
However, automation itself requires investment.
The goal is not to automate every silicone product. The goal is to find an appropriate level of automation for the expected production volume.
6. Secondary Operations Can Significantly Affect Cost
Molding is not always the final manufacturing step.
Custom silicone products may require additional processing such as:
post-curing
trimming
punching
laser marking
pad printing
screen printing
color printing
surface treatment
adhesive application
plastic or metal assembly
inspection
cleaning
specialized packaging
A quotation should clearly state whether these operations are included.
This is especially important when comparing suppliers.
One supplier may quote only the molded component, while another quotation may include printing, inspection, assembly, and packaging.
The numbers cannot be compared accurately until the quotation scope is aligned.
7. How Does MOQ Affect Silicone Unit Cost?
MOQ stands for Minimum Order Quantity.
Buyers sometimes assume that MOQ exists only because manufacturers prefer larger orders. In reality, MOQ is strongly connected to production economics.
Every silicone production run involves fixed preparation activities such as:
scheduling the production line
preparing raw materials
color matching
installing and setting up the mold
adjusting process parameters
performing first-piece inspection
cleaning equipment
arranging quality inspection
preparing packaging
These activities occur whether the production run is small or large.
With a larger production quantity, these fixed manufacturing costs are distributed across more parts.
That generally results in a lower unit cost.
With a very small quantity, the same setup cost is divided across fewer parts, increasing the effective cost per unit.
Does Higher Quantity Always Mean Lower Unit Price?
Usually, the unit cost becomes more efficient as quantity increases, but the relationship is not unlimited or perfectly linear.
Once production reaches an efficient manufacturing level, further quantity increases may create smaller incremental savings.
That is why silicone manufacturers often quote several quantity tiers.
For procurement teams, comparing multiple quantity scenarios can help identify the most efficient order range.
8. Why Color Can Affect Cost
Custom silicone products can be matched to brand colors, including Pantone references.
However, custom colors require additional production control.
The process may include:
color masterbatch preparation
mixing
trial molding
sample approval
batch color comparison
production cleaning between colors
Standard or frequently used colors are generally easier to manage than highly specific custom colors.
Projects containing many colors in small individual quantities can also create more changeovers and cleaning operations.
For a product family, consolidating colors where possible can improve production efficiency.
9. How Logo and Branding Affect Cost
Silicone branding can be produced using several methods:
molded embossed logo
molded debossed logo
pad printing
screen printing
laser marking
multi-color printing
separate logo components
A molded logo is created directly in the tooling and normally does not require a separate printing operation during every production cycle.
Printed logos add recurring processing steps.
Which option is better depends on:
logo design
number of colors
surface shape
durability requirement
brand appearance
order quantity
This decision should ideally be made before tooling is finalized.
10. Packaging Can Change the Final Unit Cost
For OEM and private-label projects, packaging can represent a meaningful part of the final product cost.
Options may include:
bulk packaging
individual polybags
printed bags
paper sleeves
hang cards
color boxes
custom retail packaging
instruction manuals
labels and barcodes
A product being shipped as an industrial component has very different packaging requirements from a retail silicone baby product.
Therefore, manufacturers need to know whether the requested quotation is for:
factory part cost
or
finished retail-ready product cost
before providing an accurate quotation.
11. Testing and Compliance Requirements
Testing requirements depend strongly on the target market and application.
A project may require material documentation, third-party testing, or application-specific quality controls.
Depending on the product, buyers may need to consider requirements related to:
food contact
restricted substances
heavy metals
consumer product safety
medical applications
electrical applications
automotive specifications
customer-specific standards
Testing should be defined early in the project.
Changing compliance requirements after tooling or production has started can create additional sampling, material, testing, and documentation work.
Quality control is not separate from manufacturing economics.
Parts requiring more stringent control may involve:
incoming material verification
first-piece inspection
dimensional inspection
visual inspection
flash limits
functional testing
sampling plans
batch records
traceability
additional documentation
For an ordinary consumer silicone accessory, the inspection plan may be relatively straightforward.
For a precision seal, medical component, or safety-critical industrial part, inspection requirements can be considerably more demanding.
Procurement teams should therefore provide drawings and critical-to-quality requirements when requesting a quotation.
Without them, two suppliers may be quoting completely different quality levels.
13. What Information Does a Manufacturer Need to Quote a Custom Silicone Part?
The quality of a quotation depends heavily on the quality of the project information.
For the most accurate silicone manufacturing estimate, provide:
Product Design
Preferably:
STEP
STP
IGES
another usable 3D CAD format
A 2D drawing should also identify critical dimensions and tolerances where applicable.
Material Requirement
Specify:
silicone type
Shore hardness
color
regulatory requirements
special performance requirements
If the exact silicone grade has not yet been selected, describe the product’s working conditions instead.
For example:
operating temperature
contact with food
chemical exposure
outdoor exposure
required flexibility
compression requirements
tear resistance
The manufacturer can then recommend an appropriate material.
Quantity
Provide both:
initial order quantity
estimated annual demand
Annual demand helps the manufacturer determine the appropriate cavity count and tooling strategy.
Secondary Operations
Specify whether the product requires:
printing
logo
assembly
bonding
surface treatment
inspection
packaging
Application
Explain what the silicone component actually does.
Knowing the application often allows engineers to identify unnecessary specifications or potential design risks before tooling begins.
14. How to Reduce Silicone Manufacturing Cost Without Sacrificing Quality
Effective cost reduction normally comes from engineering rather than simply negotiating a lower unit price.
Here are several practical approaches.
Simplify the Geometry
Avoid unnecessary:
undercuts
deep narrow grooves
extreme thickness transitions
complex internal structures
Simpler geometry usually improves tooling, molding stability, and demolding.
Use Functional Tolerances
Do not apply the tightest tolerance to every dimension.
Instead, identify:
critical dimensions
assembly dimensions
sealing dimensions
cosmetic dimensions
non-critical dimensions
This allows manufacturing control to focus on the features that actually affect product performance.
Optimize Wall Thickness
Excessive material increases:
silicone consumption
curing time
product weight
But walls that are too thin can create filling and durability issues.
A DFM review can determine where material can be reduced safely.
Select the Right Manufacturing Process
Do not assume LSR injection molding or compression molding is always the cheapest solution.
Evaluate the total project based on:
tooling + projected production volume + unit manufacturing cost + quality requirements
For some projects, lower-cost tooling is more important.
For others, automated mass production provides better lifetime economics.
Design for Easy Demolding
Parts that are difficult to remove from the mold may require more manual labor and can increase defect risk.
Optimizing:
parting lines
draft
undercuts
wall transitions
gripping areas
can improve production efficiency.
Avoid Unnecessary Secondary Operations
Every additional operation adds another process step.
For example, if a logo can be molded into the silicone instead of printed, the product may eliminate a recurring decoration process.
This does not mean molded logos are always better, but manufacturing should be considered during the branding decision.
Design the Product Family Together
If a brand plans multiple sizes or related products, discussing the entire range early can help optimize:
color strategy
material purchasing
tooling
packaging
production scheduling
This is often more efficient than developing each SKU independently.
15. Why the Lowest Silicone Quote May Not Be the Lowest Cost
When comparing silicone manufacturers, buyers should look beyond the quoted unit price.
Consider whether the quotation includes:
production tooling
sample approval
defined material
correct Shore hardness
color matching
post-curing
trimming
inspection
printing
assembly
packaging
compliance requirements
Also consider longer-term manufacturing risks:
tool durability
dimensional consistency
batch-to-batch variation
flash control
defect rates
delivery stability
engineering support
A lower initial quotation can become more expensive if the project later requires mold modification, repeated sampling, sorting, rework, or replacement production.
For custom silicone manufacturing, total cost of ownership is generally more useful than unit price alone.
16. Tooling Cost vs Unit Cost: Which Should You Optimize?
The answer depends primarily on production volume and product lifecycle.
For Early-Stage or Low-Volume Projects
The priority may be:
reducing initial tooling complexity
validating the product design
maintaining flexibility for future changes
For Established High-Volume Products
The priority may shift toward:
multi-cavity tooling
automated production
shorter cycle times
stable quality
lower recurring production cost
This is why a manufacturer should understand your expected annual volume before recommending tooling.
The optimal mold for an initial market test may not be the optimal mold for long-term mass production.
17. Example: How Two Similar Silicone Products Can Have Different Costs
Consider two silicone products with similar dimensions and weight.
Product A
simple geometry
standard silicone
one color
moderate tolerances
molded logo
simple packaging
Product B
multiple undercuts
specialty silicone
custom color
critical dimensions
printed multi-color graphics
assembly
individual retail packaging
additional testing requirements
Although the two products may appear similar in size, Product B involves considerably more tooling, processing, inspection, and secondary operations.
This is why product dimensions alone are insufficient for estimating silicone manufacturing cost.
Manufacturer Insight: How NEWTOP Evaluates Silicone Manufacturing Cost
At NEWTOP, a custom silicone quotation should begin with the product requirements rather than a generic price per gram or price per piece.
Our engineering evaluation typically considers:
Product geometry – Is the part suitable for silicone molding?
Material – Which silicone formulation and hardness match the application?
Process – Compression molding, LSR injection molding, overmolding, or another process?
Tool design – What cavity arrangement and mold structure are appropriate?
Production volume – Is the project a pilot run or stable mass production?
Quality requirements – Which dimensions or functional characteristics are critical?
Secondary operations – Does the product require post-curing, printing, assembly, or finishing?
Packaging and testing – Is the quotation for a molded component or a complete retail-ready product?
The purpose of this evaluation is not simply to generate a quotation. It is to identify a manufacturing solution that can remain practical as the project moves from sampling into production.
Frequently Asked Questions
How much does it cost to manufacture a custom silicone product?
There is no universal price per silicone product. Cost depends on the product design, tooling, material, quantity, process, tolerances, finishing, quality control, packaging, and testing requirements. A 3D drawing and estimated production quantity are normally required for an accurate quotation.
Why is silicone tooling charged separately from the unit price?
Tooling is created specifically for the customer’s product and is primarily a one-time development investment. Unit price covers recurring manufacturing costs such as material, molding, labor, inspection, finishing, and packaging.
Does a higher MOQ reduce silicone unit cost?
Usually yes. Every production run requires setup, material preparation, mold installation, process adjustment, inspection, and production management. Larger quantities spread these fixed costs across more parts, improving unit economics.
Is LSR injection molding more expensive than compression molding?
Not necessarily. LSR injection tooling can be more complex, but highly automated production can provide strong economics for suitable high-volume precision parts. Compression molding may be more economical for other geometries and production volumes. The correct comparison should include both tooling and long-term unit production cost.
What makes a silicone mold expensive?
Major factors include product size, geometry, cavity count, tooling material, tolerance requirements, surface finish, undercuts, inserts, parting-line complexity, mold life requirements, and automation.
Can I get a quotation without a 3D drawing?
A preliminary assessment may be possible using sketches, samples, dimensions, or product concepts. However, production tooling normally requires finalized 3D geometry before the manufacturer can evaluate mold structure accurately.
How can I reduce the cost of my silicone product?
The most effective approach is usually DFM optimization. Simplifying geometry, using appropriate tolerances, optimizing wall thickness, reducing unnecessary secondary operations, selecting the right molding process, and choosing an appropriate cavity strategy can all improve manufacturing economics.
Does silicone hardness affect price?
It can, especially when hardness is connected to a specific silicone formulation or performance requirement. However, hardness alone should not be used to determine cost. Tear strength, temperature resistance, compression performance, regulatory requirements, and other material properties may be equally important.
Does custom Pantone color increase manufacturing cost?
Custom colors require material preparation, color matching, production control, and equipment cleaning between colors. Projects involving many colors and relatively small quantities per color can therefore require additional manufacturing work.
What quantity should I provide when requesting a quote?
Provide both the initial order quantity and expected annual demand whenever possible. This allows the manufacturer to recommend a tooling and cavity strategy that fits both your immediate requirement and potential future production.
Request a Custom Silicone Manufacturing Cost Estimate
The most reliable way to estimate a custom silicone project is to evaluate the actual part rather than rely on a generic unit-price range.
Send NEWTOP your:
3D CAD file or product drawing
target silicone material or application requirements
Shore hardness, if known
target color
expected order quantity and annual volume
tolerance requirements
logo or printing requirements
packaging requirements
applicable testing or compliance requirements
Our engineering team can review the design, evaluate suitable molding processes, identify potential DFM issues, and develop a manufacturing approach before production tooling begins.
Have a silicone product under development? Send your CAD file for a DFM review and manufacturing cost evaluation.
https://www.newtopsilicone.com/wp-content/uploads/2026/08/custom-silicone-manufacturing-cost.png9411672Enriquehttps://www.newtopsilicone.com/wp-content/uploads/2022/06/newtop-logo-300x138-2.pngEnrique2026-08-17 14:39:572026-08-17 15:02:42How Much Does Custom Silicone Manufacturing Cost? Tooling, Unit Price, MOQ & Cost Drivers
Silicone nipple covers may appear simple, but their performance depends on several tightly controlled elements: silicone formulation, product thickness, tapered-edge design, adhesive consistency, curing conditions, cleanliness, and packaging.
A defect in any one of these areas can affect comfort, appearance, adhesion, durability, or repeated-use performance. Manufacturers should therefore evaluate the complete product rather than inspecting only the molded silicone body.
Common Silicone Nipple Cover Quality Problems
The following table summarizes the most frequent defects, their likely causes, and the manufacturing controls used to reduce them.
Quality problem
Common causes
Manufacturing prevention
Edge lifting
Edge too thick, body too firm, uneven adhesive, poor curvature
Optimize tapered edges, compare hardness levels, control adhesive coverage
Validate shape recovery and design protective packaging
1. Edge Lifting and Visible Outlines
Edge lifting is commonly caused by a thick edge, abrupt thickness transition, excessive body hardness, poor product curvature, or uneven adhesive distribution.
A nipple cover can use very soft silicone and still remain visible if the edge is not properly designed. The mold should create a gradual transition from the center to the outer edge without forming a sudden step.
Manufacturers prevent edge lifting by:
Designing a smooth, tapered edge
Controlling edge thickness
Comparing several silicone hardness levels
Checking product curvature against the intended body area
Applying adhesive evenly to the full contact area
Conducting wear tests under thin and tight clothing
An extremely thin edge is not always better. If the edge becomes too thin, it may tear during demolding, cleaning, or removal.
2. Weak or Inconsistent Adhesion
Weak adhesion can cause slipping, partial detachment, or edge lifting during movement.
The silicone body and skin-contact adhesive are separate material systems. Lowering the hardness of the molded body does not automatically improve adhesion.
Adhesive consistency can be affected by:
Adhesive grade
Coating or dispensing amount
Layer thickness
Mixing ratio
Cure time
Surface contamination
Storage conditions
Release-film compatibility
Perspiration and skin oils
Manufacturers should specify the adhesive by measurable properties such as peel force, tack, curing conditions, and coating weight rather than describing it only as “strong” or “reusable.”
Soft silicone skin adhesives are available in different adhesion levels, so the grade must be selected according to the required wear time and removal experience.
3. Excessive Adhesion and Uncomfortable Removal
Higher adhesion is not always an improvement.
An adhesive layer that is too aggressive may pull the skin during removal, cause discomfort, or make the product difficult to reposition. Product development should balance secure attachment with manageable removal force.
Manufacturers can reduce this risk by:
Comparing low-, medium-, and high-adhesion formulations
Measuring peel force
Evaluating removal at different wear times
Testing on the final silicone construction
Confirming that adhesive remains uniform after cleaning
Avoiding unsupported claims about skin comfort
The adhesive should be tested as part of the final nipple cover, because backing flexibility and product geometry can change the actual removal behavior.
4. Edge Cracking and Tearing
Thin edges create a smoother appearance under clothing, but they are also the most vulnerable areas of the product.
Tearing may result from:
Insufficient silicone tear strength
Edge sections that are too thin
Sharp mold transitions
Excessive stretching during demolding
Rough handling during release-film removal
Repeated cleaning and pulling
Manufacturers should evaluate both product geometry and material strength. Shore hardness alone cannot predict tear resistance.
ASTM D624 measures the tear strength of vulcanized rubber, while ASTM D412 covers tensile strength and elongation. These tests provide useful material comparisons, although actual product testing is still required for thin nipple cover edges.
5. Wrinkling, Folding, and Poor Shape Recovery
Very soft silicone may conform well to the skin but become difficult to handle.
A nipple cover that folds onto itself after the release film is removed can be frustrating to position. It may also wrinkle under clothing or lose its original shape after cleaning.
Shape stability depends on:
Silicone hardness
Tensile modulus
Product diameter
Center thickness
Edge thickness
Product curvature
Storage pressure
Packaging design
Manufacturers should compare several hardness levels while keeping the product structure unchanged. This makes it possible to identify whether the problem comes from the material or the geometry.
6. Uneven Thickness and Asymmetry
Uneven thickness affects appearance, flexibility, weight, and fit.
For domed nipple covers, one side may feel firmer or sit differently if material distribution is not balanced. Differences can also appear between mold cavities.
Possible causes include:
Inaccurate mold machining
Uneven cavity temperature
Unbalanced material flow
Incorrect material loading
Inconsistent mold pressure
Product deformation during demolding
Uncontrolled shrinkage
Manufacturers should inspect:
Center thickness
Edge thickness
Product diameter
Dome height
Product weight
Flatness
Left-to-right symmetry
Cavity-to-cavity variation
Soft silicone can deform under ordinary calipers, so low-force or non-contact inspection methods may be required.
7. Air Bubbles and Pinholes
Bubbles can weaken thin areas and reduce the visual quality of transparent or skin-tone nipple covers.
They may be introduced through:
Air trapped during mixing
Moisture or contamination
Poor material feeding
Inadequate degassing
Insufficient mold venting
Filling speed that traps air
Manufacturers prevent bubbles by controlling material storage, mixing, degassing, mold venting, and filling conditions.
The mold should allow trapped air to escape without creating excessive flash around the product edge.
8. Sticky or Incompletely Cured Silicone
Unexpected tackiness outside the intended adhesive area can indicate incomplete silicone curing.
Possible causes include:
Incorrect two-part mixing ratio
Insufficient mold temperature
Insufficient curing time
Contaminated tools or surfaces
Materials that inhibit platinum curing
Incorrect pigment or additive
Poorly controlled post-curing
Addition-cured silicone systems can be sensitive to contaminants. WACKER processing guidance states that surfaces must be clean and free from substances that may inhibit curing.
Manufacturers should use dedicated tools, controlled material handling, verified formulations, and recorded curing parameters.
9. Dust, Hair, and Fiber Contamination
Self-adhesive nipple covers attract dust easily because the exposed surface is intentionally tacky.
Contamination may occur during:
Adhesive application
Manual handling
Inspection
Release-film placement
Packaging
Rework
Unprotected storage
Manufacturers reduce contamination by:
Separating adhesive processing from dusty operations
Using clean work surfaces
Controlling operator clothing and gloves
Limiting the time that adhesive remains uncovered
Applying release film immediately
Inspecting products under suitable lighting
Sealing finished products promptly
A visually clean silicone body can still fail inspection if the skin-contact surface contains fibers or particles.
10. Adhesive Delamination
Adhesive delamination occurs when the skin-contact layer separates from the molded silicone body.
This can result from:
Incompatible material systems
Incorrect surface preparation
Contaminated silicone surfaces
Insufficient curing
Excessive adhesive thickness
Poor interlayer bonding
Repeated washing
High storage temperature
The body and adhesive should be treated as a complete bonded system.
Manufacturers should perform:
Peel evaluation between layers
Cleaning-cycle tests
Temperature-storage tests
Repeated application tests
Inspection for bubbles and separation
Packaging-aging evaluation
Material compatibility should be confirmed before tooling and mass production are finalized.
11. Color Variation and Yellowing
Skin-tone nipple covers often require several closely controlled shades. Small color differences can become noticeable when products are sold as matched pairs or as part of a multi-shade collection.
Color variation may be caused by:
Incorrect pigment weighing
Uneven pigment dispersion
Different silicone batches
Different curing conditions
Contaminated mixing equipment
Inconsistent product thickness
Aging of the approved color sample
Manufacturers should retain an approved molded color sample and record:
Silicone grade
Pigment formula
Pigment ratio
Material batch
Cure conditions
Product thickness
Inspection lighting
The final molded product should be used as the approval standard rather than a color displayed on a phone or computer.
12. Packaging-Related Deformation
A nipple cover can leave the factory in acceptable condition and become deformed during storage or transportation.
Common packaging problems include:
Products pressed flat for long periods
Edges bent by undersized trays
Adhesive surfaces touching packaging materials
Release films shifting during transport
Excessive heat exposure
Pairs rubbing against each other
Protective trays or shaped inserts can help maintain the dome and edge profile.
Packaging validation should consider stacking, compression, temperature, shipping vibration, and storage duration.
How Manufacturers Build a Quality-Control Plan
A reliable quality plan covers incoming materials, production, adhesive application, final inspection, and packaging.
Incoming Material Control
Check:
Silicone material code and batch
Adhesive material code and batch
Pigment formula
Shelf life
Storage conditions
Supplier documentation
In-Process Control
Record:
Material mixing ratio
Pigment ratio
Mold temperature
Cure time
Product weight
Adhesive dosing or coating amount
Cavity number
Operator and production batch
Final Product Inspection
Inspect:
Diameter and thickness
Edge shape
Dome symmetry
Color consistency
Surface defects
Contamination
Adhesive uniformity
Release-film position
Pair matching
Packaging condition
Functional Validation
Depending on the product design, testing may include:
Shore hardness on standard test sheets
Tensile and tear strength
Adhesive peel force
Edge-lifting evaluation
Shape-recovery testing
Perspiration and temperature testing
Cleaning cycles
Repeated application
Packaging and storage aging
ASTM D2240 provides a method for rubber durometer hardness measurement. Finished nipple covers may be too thin or curved for reliable direct measurement, so manufacturers can test standard sheets made from the same formulation and curing batch.
Skin-Contact Testing Considerations
Skin-contact evaluation should represent the final production product, including the silicone body, pigment, adhesive layer, surface treatment, and curing process.
Testing requirements depend on the target market, intended use, contact time, and product claims.
For products classified as medical devices, ISO 10993-23 addresses irritation testing and ISO 10993-10 addresses skin sensitization. These standards should not be presented as automatically mandatory for every consumer nipple cover.
What Buyers Should Confirm Before Production
Buyers should provide the manufacturer with:
Product dimensions and 3D design
Center and edge thickness
Silicone hardness target
Adhesive or non-adhesive structure
Required wear time
Expected reuse and cleaning cycles
Skin-tone color references
Target market
Skin-contact testing requirements
Packaging method
Acceptance criteria
Estimated order quantity
A reference sample is useful, but measurable specifications are still needed for consistent repeat production.
Conclusion
Common quality problems in silicone nipple covers are usually connected rather than isolated.
For example, edge lifting may involve body hardness, edge thickness, product curvature, and adhesive distribution at the same time. Tearing may involve both material strength and mold design.
Manufacturers prevent these problems by controlling:
Silicone and adhesive selection
Product thickness and tapered edges
Material mixing and curing
Adhesive application
Clean handling
Dimensional inspection
Wear and cleaning tests
Protective packaging
Batch traceability
The final quality standard should be based on the complete nipple cover, not only the silicone raw material or one laboratory test.
https://www.newtopsilicone.com/wp-content/uploads/2026/07/IMG_8767-scaled.jpg12801920Enriquehttps://www.newtopsilicone.com/wp-content/uploads/2022/06/newtop-logo-300x138-2.pngEnrique2026-07-21 15:36:022026-07-21 15:36:02Common Quality Problems in Silicone Nipple Covers and How Manufacturers Prevent Them
Silicone nipple cover hardness should not be selected by assuming that softer always means more comfortable. Lower-hardness silicone generally conforms better to body curves, but material that is too soft may curl at the edges, deform during demolding, become difficult to position, or lose shape after repeated use.
For thin, reusable silicone nipple covers, the more reliable approach is to evaluate hardness together with center thickness, tapered-edge design, product diameter, and the skin-contact adhesive layer.
For first-round sampling, Shore A 10, Shore A 20, and Shore A 30 can be used as three comparison levels. The final specification should then be based on wear testing, edge visibility, shape retention, adhesive performance, and manufacturing feasibility.
These ranges are engineering starting points, not universal nipple cover standards.
What Silicone Hardness Is Suitable for Nipple Covers?
Most projects require a balance between soft skin conformity and sufficient structural stability.
The following ranges can be used for early material screening:
Hardness range
Typical feel and structural behavior
Main advantages
Main limitations
Below Shore A 10 or within the Shore 00 range
Gel-like or extremely soft
High conformity and soft skin feel
May fold, curl, stick to itself, or lack enough support to function as the full body
Shore A 10–20
Very soft
Adapts well to body curves and reduces edge pressure
More difficult to demold and handle; thin edges may tear
Shore A 20–30
Soft with moderate support
Balanced conformity, recovery, and structural stability
Thickness and edge design still need optimization
Shore A 30–40
Firmer and more stable
Easier to mold, demold, position, and retain shape
May feel more noticeable under tight or thin clothing
Above Shore A 40
Strong structural support
Suitable for support rings or reinforced areas
Usually too firm for a full cover intended to feel skin-like
This table is suitable for initial screening only. Two silicone materials with the same Shore A value may still have different tensile modulus, elongation, tear strength, and recovery behavior.
What Is Shore A Hardness?
Shore A measures resistance to indentation, but it does not fully describe softness, elasticity, or skin feel.
Shore hardness is measured with a durometer. A lower number generally indicates that the material is easier to indent, while a higher number indicates a firmer elastomer.
Common scales include:
Shore A for most flexible silicone elastomers
Shore 00 for very soft gels and soft elastomers
Shore M for thin or small elastomer samples
Penetration values for some extremely soft silicone gels and skin adhesives
A very soft silicone adhesive layer may not be accurately described using Shore A. Suppliers may instead use penetration, peel strength, tack, or adhesion level.
A material specification should therefore define:
Hardness scale
Target value and tolerance
Test method
Test-sample thickness
Cure conditions
Test temperature and timing
A specification that only says “soft silicone” is not sufficient for production control.
How Does Silicone Nipple Cover Hardness Affect Comfort?
Hardness affects pressure, conformity, handling, and recovery, but comfort also depends on thickness, edge geometry, and the adhesive layer.
Conformity to Body Curves
Softer silicone deforms more easily and can reduce local gaps between the nipple cover and the skin.
However, if the product is large or has a raised center, very soft silicone may collapse and fail to maintain the intended profile.
Edge Visibility
Edge visibility is often influenced more by edge thickness and transition design than by hardness alone.
Even a soft cover can show through clothing if the edge changes thickness abruptly. A smooth, progressively tapered edge is usually more effective than lowering the hardness of the entire product.
Handling and Positioning
A slightly firmer nipple cover is easier to lift, align, and apply.
If the material is too soft, the cover may fold onto itself after the release film is removed. This can reduce ease of use even when the skin feel is very soft.
Recovery and Reusability
Reusable nipple covers must recover their original shape after cleaning, drying, storage, and repeated wear.
If the silicone body is too soft or has insufficient tear strength, the edge may gradually deform. Higher hardness may improve stability, but it cannot replace adequate material strength and suitable thickness.
Is Softer Silicone Always More Comfortable?
No. Excessively low hardness may improve the initial feel but reduce durability, handling, and edge stability.
A comfortable nipple cover should:
Conform to different body curves
Avoid noticeable local pressure
Keep the edges flat
Maintain the center shape
Remain easy to pick up and position
Resist excessive stretching during removal
Recover after cleaning and storage
Avoid curling after extended wear
If the silicone is too firm, the product may not conform properly. If it is too soft, the product may lose shape and become difficult to use.
The correct decision should be based on the complete product rather than the lowest possible hardness value.
The Silicone Body and Adhesive Layer Must Be Evaluated Separately
The Shore A hardness of the nipple cover body and the adhesion of the skin-contact layer are separate parameters.
A self-adhesive silicone nipple cover usually includes:
A silicone body that provides shape and coverage
A soft silicone pressure-sensitive adhesive or skin adhesive
A release film or storage layer that protects the adhesive
The silicone body determines shape, recovery, and overall flexibility. The adhesive layer determines initial tack, holding strength, removal force, and repeat adhesion.
Lowering the body hardness does not automatically increase adhesion. Increasing the adhesive strength also does not solve edge lifting caused by a body that is too firm.
A skin-contact adhesive layer needs to balance:
Quick initial contact
Stability during movement and perspiration
Comfortable removal
Minimal residue
Acceptable adhesion after cleaning
Stable bonding to the silicone body
For extremely soft silicone adhesives, penetration and peel strength may be more useful than Shore A hardness.
How Should Hardness Change for Different Nipple Cover Designs?
Different structures require different hardness strategies.
Ultra-Thin Invisible Nipple Covers
The main goal is to reduce edge visibility under clothing.
Lower-hardness silicone can be evaluated, but the edge still needs a gradual taper. Reducing hardness without improving the edge may lead to wrinkling or curling.
Large-Diameter Nipple Covers
Large covers are more likely to fold during handling.
They may require better elastic recovery or a slightly firmer body. Another option is to reinforce the center locally instead of increasing the hardness of the entire product.
Covers with a Raised Center
The center needs enough support to maintain its form, while the outer area needs to remain soft and conformable.
Possible structures include:
One hardness with different thickness zones
A thicker center and tapered edge
Dual-hardness silicone
Local reinforcement
A soft silicone body combined with a support layer
Non-Adhesive Nipple Covers
Non-adhesive products rely on surface contact, product curvature, and friction against the skin or clothing.
Material that is too firm may not conform properly. Material that is too soft may not hold its intended form.
Hardness should be tested together with curvature, surface finish, perspiration, and movement.
Reusable Self-Adhesive Nipple Covers
The silicone body and adhesive system should be developed separately and then tested as a complete product.
The body controls shape and coverage. The adhesive controls skin attachment.
How Do You Select Silicone Hardness for Nipple Covers?
Define the use scenario first and then compare multiple hardness levels using the actual product design.
Step 1: Define the Intended Use
Confirm:
Daily wear or performance and sports use
Expected continuous wear time
Reusability requirements
Washing requirements
Perspiration exposure
Tight, thin, or standard clothing
Product diameter and coverage
Adhesive or non-adhesive design
Target preference for softness or support
The application determines whether the material should prioritize conformity or structural stability.
Step 2: Prepare a Hardness Comparison
Do not produce only one hardness during early development.
Using the same material family, color, and structure, consider making samples at:
Shore A 10
Shore A 20
Shore A 30
For products that require more support, Shore A 40 may also be included as a control sample.
Step 3: Keep the Product Structure Consistent
The comparison samples should use the same:
Product diameter
Center height
Center thickness
Edge thickness
Mold texture
Cure process
Color
Adhesive thickness
Adhesive formulation
If hardness and structure are changed at the same time, the development team cannot determine which variable caused the performance difference.
Step 4: Conduct Material and Functional Tests
Recommended evaluations include:
Test item
What it should confirm
Shore hardness
Whether the material batch is within the target range
Tensile strength and elongation
Whether the cover permanently deforms when stretched
Tear strength
Whether thin edges and handling points resist tearing
Shape recovery
Whether the product recovers after folding or stretching
Edge conformity
Whether the edge curls, wrinkles, or remains visible
Adhesive peel strength
Whether attachment is stable without excessive removal force
Perspiration and temperature testing
Whether heat and moisture cause slipping
Cleaning cycles
Whether shape and adhesion remain acceptable
Packaging storage
Whether compression or storage causes deformation or blocking
Wear evaluation should include different body shapes, clothing types, and activity levels. Record:
Initial comfort
Edge visibility
Movement after activity
Stability during perspiration
Pressure after extended wear
Skin pull during removal
Performance after cleaning
Ease of positioning and handling
The final hardness should be selected based on the complete product performance.
Why Can Finished Nipple Covers Be Difficult to Test with a Shore A Durometer?
Nipple covers are often too thin, curved, and flexible for stable direct Shore A measurement.
Shore hardness testing depends on sample thickness, flatness, support, and test force. A finished nipple cover may include:
Different center and edge thicknesses
Curved geometry
A soft adhesive layer
Ultra-thin edges
A flexible backing
Compression during measurement
A more reliable method is to:
Prepare standard test sheets using the same silicone formulation and cure conditions
Measure material hardness on those sheets
Test the finished nipple covers for thickness, recovery, stretch, and function
Link the test sheets and products through batch traceability
Hardness controls material consistency. Functional testing confirms actual product comfort and performance.
Hardness Cannot Replace Tensile and Tear Testing
Two silicone materials with the same hardness can have very different strength and durability.
Nipple covers experience stress during:
Release-film removal
Positioning
Product removal
Washing
Folding
Storage
Repeated stretching
Material evaluation should therefore include tensile strength, elongation at break, and tear strength.
Tear strength is especially important for products with very thin edges. A low-hardness silicone with poor tear strength may develop edge cracks during repeated use.
Why Are Thickness and Edge Design More Important Than Hardness Alone?
The user experiences the flexibility and edge pressure of the complete product, not the Shore number of the raw material.
The final feel depends on:
Silicone hardness
Center thickness
Edge thickness
Diameter
Curvature
Surface texture
Adhesive thickness
Reinforcement layers
A thick Shore A 20 product may feel firmer than a thin Shore A 30 product.
The specification should therefore control both hardness and dimensional tolerances.
How Does Mold Design Affect Nipple Cover Comfort?
Mold design controls thickness distribution, edge transition, surface finish, and final shape.
Tapered Edge Design
The edge should become thinner gradually and smoothly.
An extremely thin edge may improve invisibility but increase the risk of short shots, tearing, and demolding damage. The mold must balance appearance and production stability.
Thickness Uniformity
Uneven thickness can cause deformation, asymmetry, or inconsistent fit.
Surface Texture
Glossy and matte surfaces affect skin feel, friction, and appearance.
Texture should not be selected only for visual reasons. It also influences clothing contact and handling.
Demolding Design
Very soft silicone can stretch during demolding.
Parting lines, mold-release direction, venting, and part-removal methods should minimize deformation.
Shrinkage Compensation
Different silicone hardnesses and formulations may shrink differently.
Mold dimensions should be based on the final production material and actual sampling results.
Does “Food-Grade” or “Medical-Grade” Mean Softer Silicone?
No. Material application category, skin-contact suitability, and Shore hardness are separate concepts.
Food-contact or medical-use descriptions relate to intended use, formulation control, or evaluation pathways. They do not automatically indicate lower hardness.
The same application-grade silicone may be available in several hardness levels. A very soft material also cannot be considered suitable for extended skin contact based on hardness alone.
Development may also need to evaluate:
Complete silicone formulation
Pigments and additives
Adhesive layer
Residual volatiles
Cleaning residues
Contact duration
Target market
Product claims
If the nipple cover is sold as an apparel accessory, its regulatory pathway may differ from that of a medical device. Medical biological evaluation should only be applied when the intended use and claims place the product within the relevant medical-device category.
What Should Be Considered for Skin-Contact Testing?
Skin-contact evaluation should cover the final product and the actual contact layer, not only the silicone body.
In a self-adhesive nipple cover, the adhesive layer contacts the skin. Test samples should therefore represent the production product, including:
Silicone body
Adhesive layer
Pigments
Coatings
Cleaning process
Possible transfer from the release film
Final cure and post-treatment conditions
For medical applications, ISO 10993-23 may be used for irritation evaluation, while ISO 10993-10 covers skin-sensitization evaluation. These standards should not be treated as universal mandatory requirements for every consumer nipple cover.
The test plan depends on product classification, target market, contact area, contact duration, and product claims.
Common Silicone Hardness Selection Mistakes
Mistake 1: Assuming Lower Hardness Always Means Higher Quality
Material that is too soft may curl, tear, fold, or become difficult to position.
Mistake 2: Testing Only the Silicone Body
Self-adhesive products also require adhesive testing, including peel strength, tack, holding power, and removal comfort.
Mistake 3: Using a Thick Test Sheet to Predict the Feel of a Thin Product
A standard sheet is useful for hardness testing, but it does not fully represent the bending behavior of a thin nipple cover.
Mistake 4: Producing Only One Hardness Sample
Without comparison samples, it is difficult to determine whether the material can be improved.
Mistake 5: Changing Thickness and Hardness at the Same Time
Changing several variables prevents clear interpretation of the results.
Mistake 6: Treating “Medical-Grade” as Proof of Comfort
Comfort must be verified through structure, material, adhesive performance, and wear testing.
Mistake 7: Ignoring Performance After Cleaning
Reusable nipple covers should be tested after repeated cleaning for shape, surface, and adhesion.
What Information Should Buyers Provide to the Manufacturer?
More complete product information leads to more accurate hardness and structure recommendations.
Provide:
Product diameter
3D drawing or reference sample
Center and edge thickness
Product curvature
Adhesive or non-adhesive construction
Expected wear time
Sports or perspiration requirements
Washing and reuse requirements
Target number of uses
Target market
Skin-tone color requirements
Packaging and storage method
Skin-contact testing requirements
Estimated order quantity
If a complete drawing is not available, product dimensions, intended use, and a reference sample should be provided for initial evaluation.
How Does NEWTOP Silicone Develop Nipple Cover Hardness?
Nipple cover development should follow the sequence of material comparison, structural sampling, adhesive integration, and wear validation.
For OEM and ODM projects, NEWTOP Silicone can evaluate:
LSR or HCR material systems
Shore A hardness levels
Product thickness distribution
Tapered-edge structures
Mold feasibility
Skin-tone color matching
Adhesive-layer combinations
Sample and mass-production consistency
Final product testing requirements
For a new product, it is not advisable to finalize material hardness and production tooling without actual sample validation.
A small comparison program can reduce the risk of later mold modifications and material changes.
Shore A 10–30 can be used as a first-round engineering comparison range for thin silicone nipple covers, but it is not a universal answer. Large diameters, raised centers, ultra-thin edges, adhesive layers, and reuse requirements may all change the final selection.
A more reliable development process is to:
Define the intended use
Prepare several hardness samples
Keep product structure and process consistent
Test tensile, tear, and recovery performance
Evaluate the silicone body and adhesive layer separately
Conduct actual wear and cleaning tests
Finalize the specification based on complete product performance
When selecting silicone nipple cover hardness, the key question is not simply which material is softer. The correct question is which combination of hardness, thickness, edge design, adhesive performance, and wear conditions provides the most stable overall result.
FAQ: Silicone Nipple Cover Hardness
1. Is Shore A 20 softer than Shore A 30?
Usually, yes. A lower Shore A value indicates that the material is easier to indent, although actual feel also depends on thickness, geometry, and tensile modulus.
2. Are softer nipple covers always less visible?
No. Edge visibility is mainly affected by edge thickness and the smoothness of the thickness transition. Very soft material may become more visible if it wrinkles or curls.
3. Can Shore A 10 silicone be used for nipple covers?
It can be used for sampling, but demolding, handling, tear resistance, edge stability, and repeated-use performance should be tested carefully.
4. Why can’t self-adhesive nipple covers be evaluated by body hardness alone?
Adhesion, holding power, and removal comfort are controlled mainly by the skin adhesive. The body hardness primarily affects shape, recovery, and conformity.
5. Should the adhesive layer be measured with Shore A?
Not always. Extremely soft silicone adhesives may be described using Shore 00, penetration, peel strength, or tack rather than Shore A.
6. How should hardness be inspected on a thin nipple cover?
Use a standard test sheet made with the same formulation and cure conditions for hardness measurement. Test the finished cover separately for thickness, recovery, tearing, and function.
7. Will two Shore A 20 silicone materials feel the same?
No. Materials with the same hardness can have different tensile modulus, elongation, tear strength, and recovery.
8. Should a large nipple cover use harder silicone?
Not necessarily. Shape stability can also be improved through center thickness, local reinforcement, or dual-hardness construction.
9. Can skin-tone pigments affect silicone hardness?
Normal levels of silicone-compatible pigment are usually not the main hardness factor, but the final colored formulation should still be retested for hardness, curing, and mechanical properties.
10. Is medical-grade silicone automatically more suitable for nipple covers?
No. The material documentation, complete formulation, intended use, contact duration, target market, and product claims must all be reviewed.
11. What additional tests are needed for reusable nipple covers?
Recommended tests include cleaning cycles, adhesive retention, shape recovery, edge tearing, packaging storage, and repeated-wear evaluation.
12. When should dual-hardness silicone be considered?
Dual-hardness construction may be useful when the product requires a very soft edge and a more stable center. It increases tooling, processing, and production-control complexity.
https://www.newtopsilicone.com/wp-content/uploads/2025/06/Silicone-Nipple-Cover-Manufacturers-3.webp20002000Enriquehttps://www.newtopsilicone.com/wp-content/uploads/2022/06/newtop-logo-300x138-2.pngEnrique2026-07-16 17:02:062026-07-16 17:02:06How to Select Silicone Hardness for Soft, Comfortable Nipple Covers